- FMA
- The Fabricator
- FABTECH
- Canadian Metalworking
Categories
- Additive Manufacturing
- Aluminum Welding
- Arc Welding
- Assembly and Joining
- Automation and Robotics
- Bending and Forming
- Consumables
- Cutting and Weld Prep
- Electric Vehicles
- En Español
- Finishing
- Hydroforming
- Laser Cutting
- Laser Welding
- Machining
- Manufacturing Software
- Materials Handling
- Metals/Materials
- Oxyfuel Cutting
- Plasma Cutting
- Power Tools
- Punching and Other Holemaking
- Roll Forming
- Safety
- Sawing
- Shearing
- Shop Management
- Testing and Measuring
- Tube and Pipe Fabrication
- Tube and Pipe Production
- Waterjet Cutting
Industry Directory
Webcasts
Podcasts
FAB 40
Advertise
Subscribe
Account Login
Search
Why should you care about inside bend radii?
- By Steve Benson
- January 29, 2004
- Article
- Bending and Forming
 |
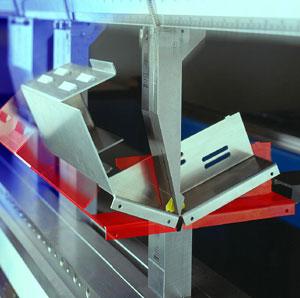
| Photo courtesy of TRUMPF Inc. |
A minimum bend radius is a function of the material and has little or nothing to do with the press brake punch tip. A minimum bend radius for one material thickness is not the same for another material thickness. In cold-rolled mild steel, the minimum bend radius is 63 percent of the material thickness. For example, a piece of 12-gauge (0.104-in., 2.64-mm) material turns sharp at 0.065 in.(1.66 mm), making any punch radius less than that value, by definition, a sharp bend, such as 0.062 in. (1/16 in., 1.58 mm), 0.032 in. (1/32 in., 0.82 mm), or 0.015 in. (1/64 in., 0.38 mm). Radius bends occur between the 63 percent threshold and a bend radius no greater than 10 times that of the material thickness.
Can a press brake operator achieve the desired bend radius on-the-fly? Well, maybe, maybe not. I suppose that depends on the operator's skill level.
Bending Basics
Before we continue, a discussion of bending principles is in order. First, we must establish a common language about forming methods, bend types, and their subsequent mathematical effects.
During any forming process, material elongation occurs. Elongation is a bit of a misnomer, because the material actually changes shape, which may or may not include elongation. The part of the material that normally would square into the corner must go somewhere else as a result of the radius effect. This elongation commonly is called a bend deduction (BD) or K factor—mathematically equivalentterms.
How many times have you referred to a bend deduction or K factor chart to find a bend deduction value only to discover later that it wasn't correct for the finished part? What happened? Was the chart wrong? Was the problem operator error? Was engineering asking for something that couldn't be done in practice? Any or all of these factors could have caused the error.
Chart Confusion
Let's look at examples from five BD charts. Sixteen-gauge cold-rolled steel (0.059 in., 1.50 mm) with a 1/32-in. (0.032-in., 0.83- mm) inside bend radius has the following values:
- 1/32-in. radius in 0.060-in. material
- Chart #1 N/A
- Chart #2 0.063
- Chart #3 0.083
- Chart #4 0.097
- Chart #5 0.102
- 1/16-in. radius in 0.060-in. material
- Chart #1 0.106
- Chart #2 0.108
- Chart #3 0.110
- Chart #4 0.132
- Chart #5 0.136
The difference between the high and the low values for one 1/32-in. single bend radius is 0.039 in. Multiplying 1/32 times three bends gives 0.117 in.
The difference between the high and low values for one 1/16-in. bend radius is 0.030—0.090 for three bends.
Are the charts wrong? No. Every value from every chart is valid for an achieved radius under a given set of circumstances. The problem lies in the fact that the radius called for rarely, if ever, matches the achieved radius. Most test samples confirm the descrepancy.
Correct Bend Deduction
Empirical-formula charts do not take into account all the variables. They just assume a 1/32-in. (0.83-mm) radius in 14-ga. material, rather than the natural minimum radius of the material of 0.046 in. (1.18 mm), 63 percent of the material thickness. This changes the value of the calculations. If the 0.032-in. (0.83-mm) value is used in the calculations, the resulting BD will be incorrect,because 0.046 in. (1.18 mm)—the achievable radius—produces an incorrect bend deduction value, which, in turn, makes the corresponding flat blank layout incorrect.
BD or K factor is developed in the following manner:
OSSB = [Tangent (0.5 x complementary bend angle)] x (Rp + Mt)
BA = [(0.017453 x Rp) + (0.0078 x Mt)] x complementary bend angle
- Where:
- BD = Bend deduction
- OSSB = Outside setback
- BA = Bend Allowance
- Rp = Punch tip radius (can be interchanged with inside radius)
- Mt = Material thickness
These formulas are valid, but they do not take into account whether the bend to be produced is a sharp or radius bend.
Options
Picture a sheet of 0.100-in.-thick material (2.54 mm). By multiplying the material thickness by 0.63 (63 percent), the natural minimum radius can be determined—in this case, 0.063 in. (1.57 mm). Within the 63 percent range of this particular material, press brake tool radii of 0.062 in. (1.57 mm), 0.032 in. (0.83 mm), and 0.015 in. (0.41 mm) are valid sharp-bend tools.
No matter how far into the sharp range you go, it is the natural radius that will be produced, not the 1/16-in., 1/32-in., or 1/64-in. punch tip radius. The only thing that will change throughout the range is the severity of the ditch at the bottom of the bend.
Any of the punches listed could produce the part. Why? Because, for example, if the part required a 1/16-in. radius in 0.100-in.-thick material, the bend, by definition, would be a sharp bend. An experienced operator or setup person could use any tool radius equal to or less than the 63 percent sharp-bend threshold to achieve the desired bend. This has the effect of tripling the toolingoptions. As an operator, you might find that the perfect gooseneck punch is available only with a 1/32-in.-radius tip. Not a problem, since a sharp bend is a sharp bend, regardless of the tip used to achieve it.
Caveat
Of course, as everyone knows, there is no free lunch. The sharper the punch radius is in relationship to the material thickness, the greater the effect on angular error, and concurrently, dimensional error. In other words, any variances in material thickness, hardness, and grain direction exponentially increase with each decrease in punch radius.
By understanding and addressing what is happening at the point of bending, you can avoid many forming problems, including those associated with flat blank layouts (CAD or not) and the effects of a sharp bend on the finished part. By doing so, you'll have a healthier bottom line.
About the Author

Steve Benson
2952 Doaks Ferry Road N.W.
Salem, OR 97301-4468
503-399-7514
Related Companies
subscribe now

The Fabricator is North America's leading magazine for the metal forming and fabricating industry. The magazine delivers the news, technical articles, and case histories that enable fabricators to do their jobs more efficiently. The Fabricator has served the industry since 1970.
start your free subscription- Stay connected from anywhere

Easily access valuable industry resources now with full access to the digital edition of The Fabricator.

Easily access valuable industry resources now with full access to the digital edition of The Welder.

Easily access valuable industry resources now with full access to the digital edition of The Tube and Pipe Journal.
- Podcasting
- Podcast:
- The Fabricator Podcast
- Published:
- 04/16/2024
- Running Time:
- 63:29
In this episode of The Fabricator Podcast, Caleb Chamberlain, co-founder and CEO of OSH Cut, discusses his company’s...
- Trending Articles
How to set a press brake backgauge manually

Capturing, recording equipment inspection data for FMEA

Tips for creating sheet metal tubes with perforations

Are two heads better than one in fiber laser cutting?

Hypertherm Associates implements Rapyuta Robotics AMRs in warehouse

- Industry Events
16th Annual Safety Conference
- April 30 - May 1, 2024
- Elgin,
Pipe and Tube Conference
- May 21 - 22, 2024
- Omaha, NE
World-Class Roll Forming Workshop
- June 5 - 6, 2024
- Louisville, KY
Advanced Laser Application Workshop
- June 25 - 27, 2024
- Novi, MI


