Contributing Writer
 |
One of the stupidest things I ever did as a parent was to buy my son a book about kyusho-waza (pressure point attack) written by master martial artist, George A. Dillman. I then became the recipient of painful ambushes in the hall, kitchen, and even driving down the road in my truck. I finally used a technique my father had used on me as a boy to get my son to stop. I told him if he grabbed me one more time, I would kick his ^**!
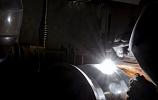
I was proud, however, that my son had taken a book, studied, and learned something new. Of course, he would have to study under a qualified instructor for years to actually master kyusho-waza, and it is the same with welding. You can't learn to master welding simply by reading a book. To learn a good technique, you gotta get in there and burn rod.
My high school students don't like to hear that. They want to jump right into building projects. They get very tired of hearing me repeat my clichés:
"You gotta burn to learn," I gently yell.
"The more you burn, the more you learn," I shout soothingly.
"And the more you learn, the more you'll earn!" I holler over and over and over.
To be a good welder, you have to practice. There is no way around it.
Anyone can learn how to weld. I know because I have taught everyone from gangstas to honor students to pilots to engineers. When I say I have taught them, what I mean is I have SHOWN them. Like a fishing guide who leads someone to where all the good fish are, I show people how to weld, then watch and critique until they learn. In the beginning, I may hold their hands and show how to manipulate the rod and puddle, but after that, it is all self-learned.
Some people have a natural talent for welding. They pick up a stinger, and it's as if they have welded forever. All I have to do is show them the basics, and immediately, they are producing sound, good-looking welds. Most people have to practice for quite some time before they become proficient. And some people have to practice for what seems like forever before it finally clicks. But click it will if the student is tenacious enough.
One of the best parts of my job is seeing a high school student who has been frustrated to the point of punching walls, finally get into the zone. (The zoneis that point at which you become one with the weld, Grasshopper.) I can tell by the student's smile that he or she has figured out how to weld without undercut, or has smoothed out the beads, or is tying incorrectly. The student is in the zone.
Now back to those who have natural talent. Twice I've had students who looked like they had been welding for years the first time they picked up a stinger. They both won competitions, but they both blew their most important competitions. How could this happen? They both quit practicing, figuring that they were too good to practice or study. Their figuring cost them big time. I don't care how good you are at anything, you still gotta practice to stay on top of the game. Welding is the only trade in which craftsmen and women have to prove themselves, even if they've been welding for 50 years.
I've been welding for 25 years and have passed many tests. (I also busted out on a couple, but we won't go into that!) If I were to take a plate test now, I would practice on plate after plate after plate before I would feel competent to test. I gave that advice to my buddy. He figured he didn't need to practice before he took a test to certify for some structural GMAW work. He figured incorrectly and lost $450.00 in testing fees when he failed. A couple of his welds had no fusion. He probably would've passed if he had run a bunch of practice plates and analyzed what he was doing on each one before taking the test. Although hard to do, I was very polite and did not say, "I told you so." (He's also about a hundred pounds bigger than I am!)
I learned welding from two of the best in the business. Phil Newell yelled in my ear, telling me I was never going to be a welder because I didn't practice enough—scared the hell out of me. Mike Waldrop was a laid-back, easygoing, go-have-a-beer-with-me-after-class kind of guy. I learned all sorts of tricks of the trade from both of them and am forever grateful. They had different teaching styles, but they both taught the basics:
Of course there are all kinds of variables, such as arc length and electrode size and type, which go along with the basics.
Let's examine a couple of simple techniques used when welding beads on flat bar with 6010 or 6011 rod. 6010 and 6011 are very similar. The only differences are in the flux composition and the fact that 6011 can run on AC/DC, while 6010 is for DC only.
6010 has cellulose sodium and 6011 has cellulose potassium in the flux. (I wish I could tell you what that means, but we are now in territory too deep for my shallow mind. Remember, I am a structural welder, not an engineer!)
Both rods have forceful arcs, deep penetration, and fast-freeze characteristics. Fast-freeze means the puddle solidifies rapidly—it returns to solid steel, or metal from being molten, or liquid.
With 6010 and 6011 the puddle goes back to solid almost as soon as the rod is removed. Therefore it is very important that the rod is placed directly back into the puddle or there will be a space without filler metal in the bead. A space is a weak point (defect) subject to cracking or pulling apart under stress.
This also applies to restarts. Restarts occur when the rod has been consumed and the bead stops. The bead then is resumed with another rod. Now we must not only make sure we place the rod back into the puddle, we must also make sure we are tying into it. Hesitating ever so slightly at the beginning of the crater, then backtracking and gently pushing into the top of the crater will do this. (The crater is where the weld was stopped. The steel was penetrated, but no filler metal was deposited, thus leaving a crater.) That way we pre-heat the previous weld, make it molten again, and then tie into (join with) it.
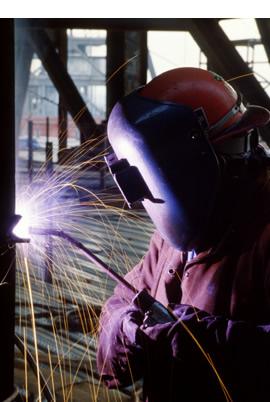
And this is where technique comes in—we have to use a good technique to make sure the bead is continuous and uniform. Running a flat bead on plate can be done using several different techniques including whip, circle, figure eight, crescent, j, and z. All I've ever seen or used in the field are circles and the whip.
I first learned circles, then later the whip. Some instructors will tell you the whip is the onlyway, while others advocate circles or both. There are many different techniques in welding applications, and as I've said before, I don't care if you weld standing on your head or gargling purple peanut butter, as long as you produce a sound weld.
In circles the rod is rotated counter clockwise, pushing back into the puddle, rotating to the front, then again pushing back into the puddle.
In the whip, the rod is whipped (brought out in a quick motion) out and away from the puddle anywhere from " to 1". (The distance is subjective. It could be more or less.) The rod then is whipped back into the puddle immediately.
Correctly performed, the circle and whip produce beads that look like dimes laid down overlapping each other.
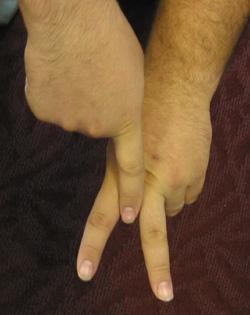 |
In describing both the circle and whip techniques, I said that you move the rod back into the puddle. Doing so is a critical element of these techniques. Now let's do a highly sophisticated, hands on, physical demonstration.
First make a peace or World War II victory sign with your left hand.
Now with the tip of your right index finger, push down into the web (bottom of the V) of your peace, or victory sign.
The V is your weld and the right index finger is your welding rod. This demonstration illustrates placing the welding rod into the puddle. When you do so, you are pushing the puddle inward and the outer edges are forced out, resulting in a feathering effect that ties the puddle into the base metal uniformly.
And that is what welding technique is all about. Making a sound, solid, defect-free, pleasing-to-the-eye weld. In the ZONE!

Contributing Writer
High School Career Center in Texas

The Welder, formerly known as Practical Welding Today, is a showcase of the real people who make the products we use and work with every day. This magazine has served the welding community in North America well for more than 20 years.
start your free subscription
Easily access valuable industry resources now with full access to the digital edition of The Fabricator.

Easily access valuable industry resources now with full access to the digital edition of The Welder.

Easily access valuable industry resources now with full access to the digital edition of The Tube and Pipe Journal.

Easily access valuable industry resources now with full access to the digital edition of The Fabricator en Español.
In this episode of The Fabricator Podcast, Caleb Chamberlain, co-founder and CEO of OSH Cut, discusses his company’s...