


Press brake basics: Bending across the hem
How to apply the bend functions for a bent and hemmed part
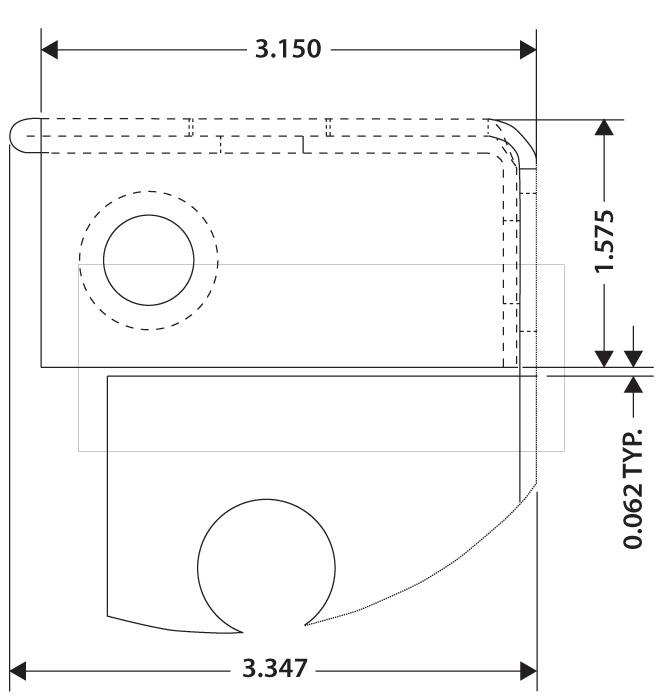
Figure 1
The reader’s operation bends the closed hem first, then makes the 90-degree bend over two material thicknesses.
Question: We have a customer that is requiring us to bend a hem (see Figure 1). We have two scenarios: 14-gauge hot-rolled pickled and oiled (HP&O) and galvanized, and 12-gauge HP&O and galvanized. We make the hem, and then we bend across the double material thickness. How do I calculate the bend lines on something like this? What radius do I use? What K-factor do I use?
Answer: Let’s begin by looking at the hem. While those in the sheet metal trade form dozens of different kinds of hems and seams, most are simply outdated, and only three are in general use. It’s not that a “Pittsburgh” or “double lap seams” didn’t work; they did and, in some cases, are still used. It’s just that technology has moved on.
The three remaining are flat (also called flattened or closed) hem, the teardrop, and the open hem. All three are usually used to create stiffeners to strengthen a flange or bend or used for safety or cosmetic reasons. The flat hem is most common, and the teardrop is a lightly pressed hem that creates an air channel along the length of the bend. The open hem is just that—open. The two sides of the hem never touch.
Figure 2 shows the three most common hems, plus the rope hem. Of the four presented in the figure, the closed is the most common. The open hem is a close second. Open hems have become more popular because of all the chemical processing, such as passivating, chromate conversion coating, and etching, common in today’s shop. These leave residues that sometimes can be very difficult to remove.
You seem to be working with a closed hem, which has a zero inside bend radius. The total amount of elongation for such a hem is 43 percent of the material thickness, under perfect conditions.
The key word here is perfect. Hit the hem too hard and the elongation increases; hit it softer and the elongation gets smaller. It’s often a best practice just to run a test piece to acquire the best data. The same holds true for both the teardrop and open hems.
You also asked about the K-factor, which happens to be one of the most commonly misused terms in precision sheet metal. A K-factor, while a very important factor for calculating bend elongation, is just that—a factor. The K-factor itself is a multiplier used to calculate the new position for the relocated neutral axis after forming. The value itself is a percentage based on both the material type and method of forming.
Average the standard multiplier values from a chart in Figure 3 and you get 0.446. Multiply the material thickness by this average K-factor of 0.446 and you find the approximate location of the neutral axis within the material thickness in the bend, where there is neither compression nor elongation. If you were working with, say, 0.060-in.-thick cold-rolled steel, the neutral axis would be at about 0.0267 in. into the material thickness, as measured from the inside surface of the bend (0.060 × 0.446 = 0.0267).
It is a small but important part of the esoteric knowledge of the sheet metal trade. This K-factor is applied to the formula that calculates bend allowance (BA):
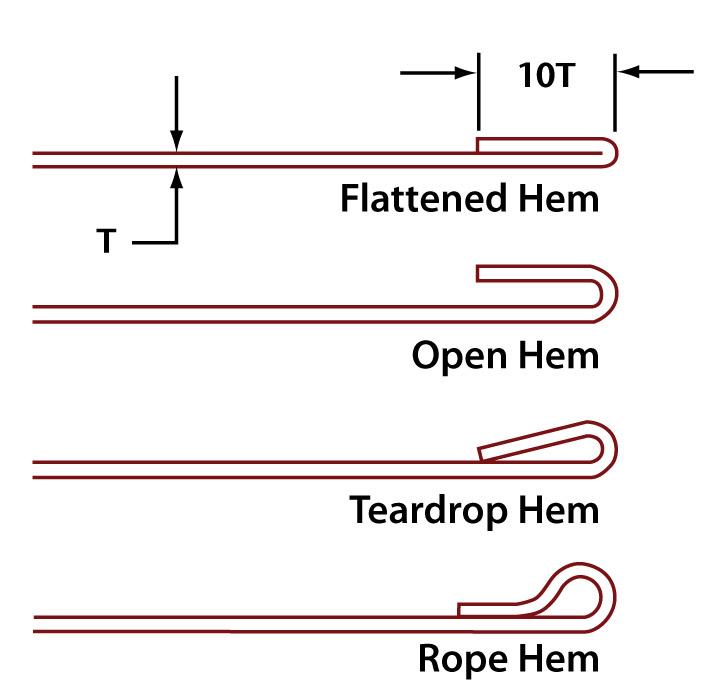
Figure 2
Of all the typical hems formed in today’s fab shops, the flattened, or closed, hem is most common.
{[(π/180) × K-factor] × Material thickness} ×
Complementary bend angle
Simplified to an equation you can punch into any calculator, and using 0.446 as the K-factor, we have:
BA = [(0.017453 × Inside bend radius) +
(0.0078 × Material thickness)] ×
Complementary bend angle
At this point, the formula for bend allowance has incorporated the shifting of the neutral axis. Now calculate the values for outside setback (OSSB) and, finally, the bend deduction (BD)—that is, the total amount of elongation for a given bend.
BD = (OSSB × 2) – BA
The lapped 90-degree bends are calculated as all bend functions are. You are bending two material thicknesses—a “double bend.” Here, the inside radius of the outer material is the same as the outside radius of the inner material.
Once you determine the inside radius for the inner material, you simply add a material thickness to that, and you have the inside radius of the outer material. You then use those values to calculate the bend functions as usual, just with two inside radius values.
In the case of your 14-ga. (0.074-in.) material, you would first calculate the hem elongation factor by multiplying 43 percent by the material thickness: 0.074 × 0.43 = 0.031 in. This means your flat hem will elongate the material by 0.031 in., and this needs to be accounted for in the flat pattern layout.
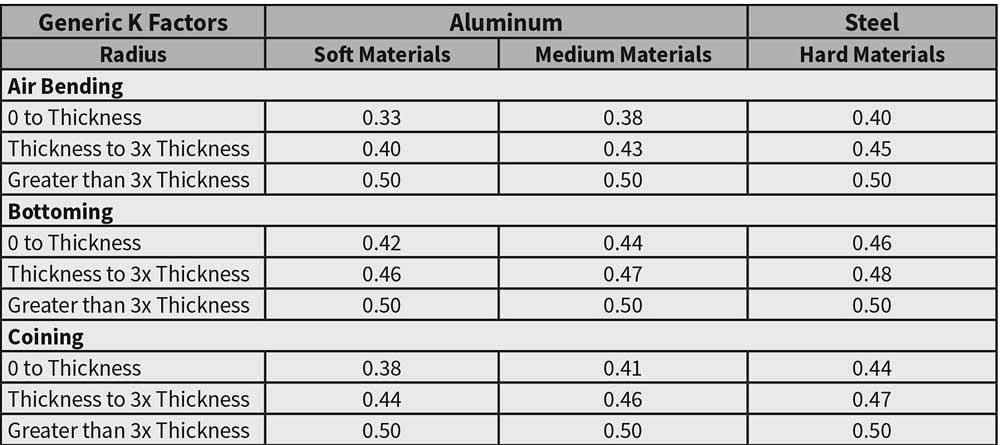
Figure 3
The K-factor describes how far the neutral axis shifts toward the bend’s inside surface during forming. This shows average K-factors for various materials. Average these out, and you have a K-factor of 0.446.
Next, determine your inside bend radius for the inner 90-degree bend based on your available tooling and the forming approach you choose (see “Forming Options” below). In air forming, the naturally floated radius forms as a percentage of the die width. For 60,000-PSI cold-rolled steel, our baseline material, the radius forms at about 16 percent of the die width. For more on this, check out “How the inside bend radius forms,” archived at thefabricator.com.
For this example, we’ll stick with the ideal one-to-one inside bend radius-to-material-thickness ratio and specify an inside bend radius of 0.074 in. for the inner 90-degree bend. The elongation of the outer 90-degree bend is calculated using an inside radius of 0.148 in., a radius equal to the outside radius of the first 90-degree bend. (Again, you calculate the outside radius by adding the material thickness to the inside bend radius, in this case: 0.074 + 0.074 = 0.148 in.).
Run these variables through the equations described previously, and you should find that the inner 90-degree bend has a BD of 0.128 in., while the outer bend has a BD of 0.160 in.
Establish the Bend Lines
To develop the flat, you need to incorporate three deductions, one for each bend line: the inner 90-degree bend (0.128-in. BD), the outer 90-degree bend (0.160-in. BD), and the elongation for the closed hem (0.031-in. elongation).
To develop the flat pattern, first add up the outside dimensions—that is, all the dimensions that make up one side of the sheet metal, as if the part were unfolded and flat. There are several ways to establish a flat blank. To dive deeper on this subject, see “The basics of applying the bend functions,” archived at thefabricator.com.
The hem and two bends all are parallel to each other, which means all elongation occurs in one dimension—just along the length of the flat blank, not the width. Therefore we need to subtract all three deductions from the flat blank length. This removes the total amount of material that will elongate during forming. When that blank is formed, it will elongate and end up back at the originally specified dimension.
Now you need to establish the location of the three bend lines: again, one for the inner 90-degree bend, another for the outer 90-degree bend, and one more for the hem.
Before describing this, let’s take a step back: What exactly occurs at the bend line during forming? As the punch tip applies force to the bend line and forms the workpiece, the metal elongates by one bend deduction; we account for half of that elongation in front of the bend line and the other half behind the bend line. The same applies to the closed hem—again, essentially a zero-radius bend. We account for half of the hem elongation on one side of the bend line, half on the other. A finished flat layout should reflect this, with the bend line splitting the bend-deduction area in half.
This hemmed part may look complicated, but you’d actually develop the flat pattern and establish the bend lines as you would any other job: Measure to the specified dimensions and then subtract your bend deductions, depending on where that bend is on the part. Just make sure each bend uses its correct bend deduction.
To establish the inner (smaller-radius) 90-degree bend line, subtract half a bend deduction from the outside dimension of the flange. To establish the hem bend line, add the two outside dimensions up to the hem, then subtract half the hem elongation allowance and a full bend deduction for the inner 90-degree bend. Finally, to establish the bend line for the outer 90-degree bend, add up the outside dimensions of the previous flanges, subtract half a bend deduction for the outer 90-degree bend, a full hem elongation allowance for the flat hem, and a full bend deduction for the inner 90-degree bend.
Flat-pattern layout is a visual science. It’s difficult to put into words, easy to show. For more on the subject, including some visual aids, check out “Press brake bending and the notch: A deeper dive,” archived at thefabricator.com.
Forming Options
You have two forming options. The double-thickness option you refer to involves forming the hem first, then making the 90-degree bend in the two material thicknesses. You just need to make sure your die width is correct to produce the desired inside radius in the thickness. You need to treat it as if it were a single piece of material.
Your second option is to form the two 90-degree bends separately, each to a different bend radius, and close with the hem. If you don’t have the proper die width to create the desired radii in the doubled-thickness approach, this second option is your best bet. Still, the part will be difficult to form. I recommend making a few extra setup pieces, at least for the first run of parts.
Steve Benson is a member and former chair of the Precision Sheet Metal Technology Council of the Fabricators & Manufacturers Association International®. He is the president of ASMA LLC, steve@theartofpressbrake.com. Benson also conducts FMA’s Precision Press Brake Certificate Program, which is held at locations across the country. For more information, visit www.fmanet.org/training, or call 888-394-4362. The author’s latest book, Bending Basics, is now available at the FMA bookstore, www.fmanet.org/store.
Is precision metal bending esoteric?
You bet it is. Wait … well, it might be. Maybe.
“What’s this? You cannot produce the password? You cannot provide the secret grip, nor the handshake? Your access to the Inner Circle is denied. You shall not pass through these doors. Please do not try me—just turn and walk away!”
You’ve been a sheet metal guy for years. You know the Inner Circle exists. You’ve heard bits and pieces of knowledge. With years of experience, you have wisdom to share, but you’ve never been invited in. You have not received your initiation into the Inner Circle, to be one who preserves that special and sacred knowledge. Sounds pretty esoteric to me.
When applied to precision sheet metal, esoteric might be better defined as, “Intended for or likely to be understood by only a small number of people with specialized knowledge, skills, or interests.” They are devotees of the trade, if you will. That certainly does sound like us, doesn’t it?
You won’t find many degreed engineers and programmers in this Inner Circle, as they have little to no practical experience on the floor of a sheet metal shop, and they often don’t have the skills necessary to produce an actual workpiece. We have operators struggling with basic math; and with high school shop classes two generations gone, many operators and engineers enter the sheet metal trade unable to use even the most rudimentary hand tools or measurement devices.
What kinds of esoteric or specialized knowledge do we need to impart to current and future sheet metal enthusiasts? How do we enlarge the Inner Circle to keep our trade viable in the face of new technologies and methods? The “onion” of press brake operation has, at its core, knowledge that is based on basic common sense. Each successive layer of esoteric knowledge builds upon the last layer.
The required knowledge to excel in this trade by its very nature is unique and specific, and it will be studied only by a select few. Those who seek it out have a curious mind, but therein lies the biggest part of our problem in finding good craftsmen and engineers: We live in a world where we dumb things down to the point where those people who would make world-class devotees of the craft leave because they are bored and see no future in it.
Do we want this Inner Circle to grow and this esoteric knowledge to be preserved and passed on? Of course we do. The gentleman who asked the question here sought out answers. He not only received the answers, but also gained some esoteric knowledge.
Remember, there’s no shame in asking for enlightenment. There is no limit to how large this Inner Circle can become; the knowledge is there for the asking. As the Bible puts it in Matthew 7:7: “Ask and it shall be given to you; seek and you will find; knock and the door will be opened unto you.” Like the gentleman who asked the questions in this column, you too can find your way to the Inner Circle. Just knock on the door and ask.
About the Author

About the Publication

subscribe now

The Fabricator is North America's leading magazine for the metal forming and fabricating industry. The magazine delivers the news, technical articles, and case histories that enable fabricators to do their jobs more efficiently. The Fabricator has served the industry since 1970.
start your free subscription- Stay connected from anywhere

Easily access valuable industry resources now with full access to the digital edition of The Fabricator.

Easily access valuable industry resources now with full access to the digital edition of The Welder.

Easily access valuable industry resources now with full access to the digital edition of The Tube and Pipe Journal.

Easily access valuable industry resources now with full access to the digital edition of The Fabricator en Español.
- Podcasting

In this episode of The Fabricator Podcast, Caleb Chamberlain, co-founder and CEO of OSH Cut, discusses his company’s...


