


Senior Editor

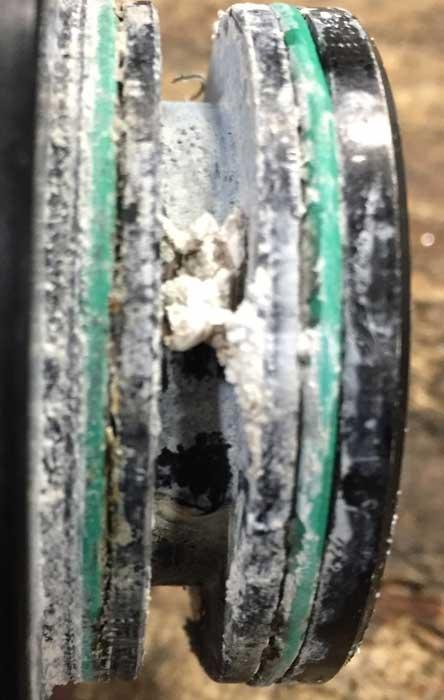
Figure 1
These optics, each from a different machine brand, have seen better days.
Brent Donner has some stories to tell when it comes to CO2 laser cutting machine maintenance: dirty optics, burned resonator tubes, clogged filters, gunk on the gaskets over the cutting head—you name it, he’s seen it. No wonder the machines aren’t cutting like they used to.
Fiber lasers dominate new laser cutting machine sales, and from a maintenance perspective, there’s a good reason for that. Fiber lasers aren’t maintenance-free. They still have chillers and a cooling system, and their cover glasses, which protect the cutting head optics, still need to be cleaned or replaced. But overall the fiber laser has fewer moving parts than its older CO2 cousin.
That said, tens of thousands of CO2 laser cutting machines remain in fabrication operations across the country. Donner’s own shop, New Ulm, Minn.-based DLC Manufacturing & Fabrication, has a CO2 cutting laser that cuts through extraordinarily thick plate—1.5 in. (that’s not a typo) and even thicker. The edges emerge clean and smooth, no deburring required.
Visit the shop and you’ll find machines that don’t look their age. His secret is a careful though not terribly complicated maintenance regimen. A beam of light, combined with a column of assist gas, is the laser’s cutting tool. A dirty cutting tool doesn’t cut well, and neither does a beam that passes through debris and dirt (see Figure 1).
This includes dirt in the beam path between the resonator and workpiece, the bellows (which at Donner’s shop are purged with gas from a nitrogen generator, not liquid nitrogen tanks), and in the path the water takes from the chiller to cool the system.
It really boils down to a simple concept: Keep it clean, inside and out. “It’s not rocket science,” Donner said. “You just have to pay attention to details.”
Along with DLC Manufacturing & Fabrication, Donner has another business called Donner Laser Consulting for which he has traveled the country to bring tired lasers back to life, sometimes to conditions better than they were new.
To start, Donner talks to the laser operator about his lens changing and cleaning regimen. Does he blow the cutting head cavity out before putting it back in the machine? Some machines have a blow nozzle on the side just for this purpose. If a blow nozzle isn’t available, an operator can find an unused port and put one on.
A common rubber bulb (like a baby snot remover) sometimes does the trick, though this solution isn’t ideal. The bulb has a small flap in the back to draw air into it, which isn’t good if you have dirty shop air. You may end up blowing dirty shop air right into the top of the lens.
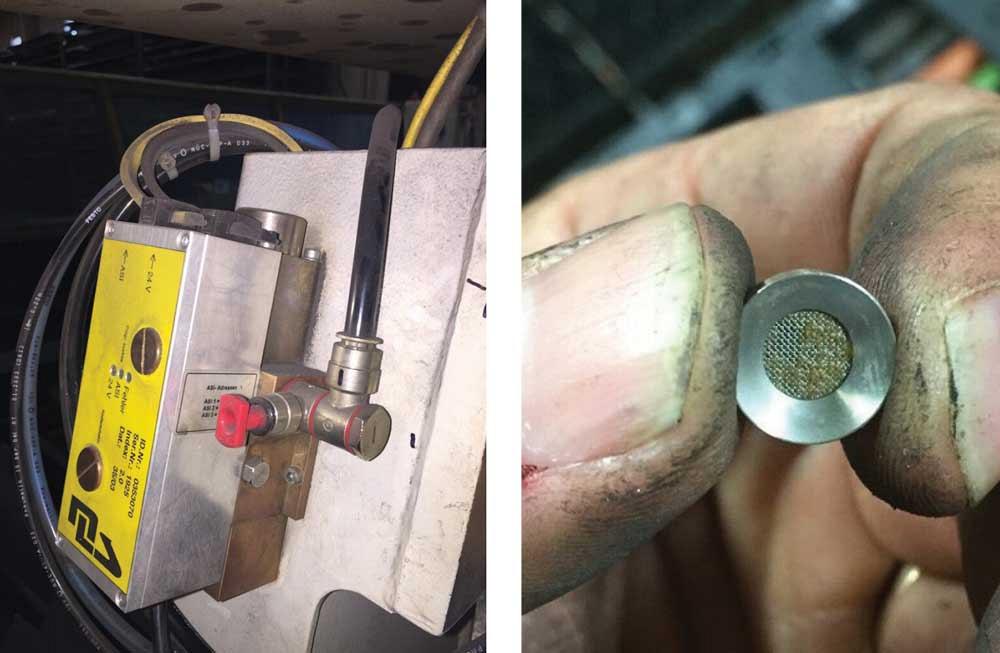
“This is why I use a little filter to ensure no contamination gets into the head from your blower nozzle,” Donner said (see Figure 2). “I bring it every place I go. If they don’t have a blower on their machine, I find an unused port [for the nitrogen purge] and create my own blower nozzle.”
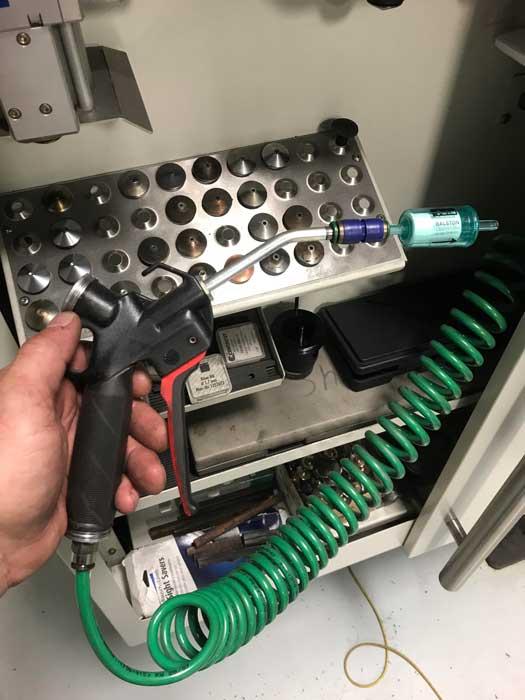
Figure 2
After cleaning or changing out a lens, Donner uses a blow gun with a small filter attached to blow out the cutting head cavity.
Donner next pulls out the cutting head and checks several gaskets just above the head assembly. Often these gaskets have never been wiped clean, but they need to be.
“In all the shops I’ve visited over the years,” Donner said, “no one has known that those gaskets were there.”
These gaskets can be the source of myriad cutting problems. An operator may do a stellar job cleaning the lens, yet he fails to blow the head cavity clean before reinserting the cutting head. This introduces dirt into the system and onto those gaskets. When the head contacts those dirty gaskets, they drop specks of dirt onto the newly cleaned cutting lens. The operator locks the cutting head tight, and the machine turns on the nitrogen purge gas, which in turn induces that dirt back up into the bellows—not a good thing if you want to keep your beam-delivery optics clean.
Next, Donner shines a flashlight up inside the CO 2 laser’s beam-delivery system. If the gaskets were dirty and the bellows are full of dirt and debris, the bellows themselves might have holes, and the mirrors in the beam-delivery path may be damaged (see Figure 3). “Often, unless you replace the bellows and optics, including the cutting lenses and mirrors, you’ll just keep wrecking optics,” Donner said.
He added that if the optics aren’t damaged, they may have a film on them. This comes from the liquid nitrogen used for the bellows purge, which is why Donner recommends the delivery optics be cleaned every three months (see Figure 4).(Editor's note: This refers to the delivery optics, not the final focusing optic in the cutting head, which of course has to be inspected and cleaned more regularly.)
After this, it’s on to the CO2 laser’s resonator and the quartz tubes (see Figure 5). If they’re not clear, there’s a problem that’s probably robbing the laser of power. Contaminated quartz tubes can appear black or white, depending on the resonator. In extreme cases, pieces of quartz can break off and get caught inside the tube.
“It often means the operator didn’t change the laser gas bottles when he was supposed to change them,” Donner said.
This goes back to simply following the manual that came with the CO2 laser machine. When the carbon dioxide, helium, and nitrogen laser gas pressures in the bottles fall below a certain level as specified by the machine manufacturer—like 500 PSI for nitrogen and helium and 300 PSI for carbon dioxide—you need to change out the bottle. Donner recommends shops refer to their machine manuals for the exact pressure requirements.
“If you let the bottles run down to, say, 50 PSI, you’ve already done damage to your resonator,” Donner said. “Below 500 PSI [or as otherwise specified by the machine maker], the impurities in the gas bottles get in your resonator. This is why I recommend shops buy alarms for their laser gas bottles. Below a certain pressure the bottles start chirping, and this forces you to go over and replace your laser gas bottle. This helps protect your investment.”
If a shop is concerned about laser gas usage, Donner recommends leak-testing all the lines between the laser gas and resonator, simply by pressurizing the lines and spraying soapy water on them. “I have a machine that’s on its second bottle of CO2 in nine years. My nitrogen bottles are lasting me three to four months, and my helium is lasting one month to two months,” he said. “It’s all leak-tested. I have no leaks in my lines.”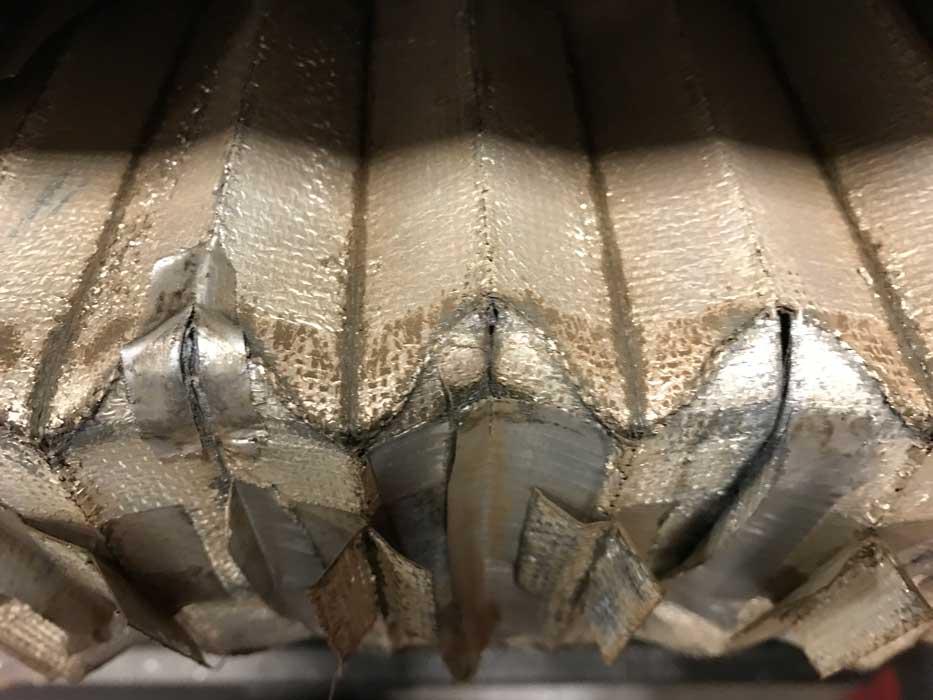
Figure 3
Dirt and debris can enter through holes in the machine’s bellows, and the duct tape shown here won’t prevent contamination.
When replacing the laser gas bottles, clear out debris by cracking the bottle before hooking it up to the line. At his shop, Donner uses purge valves on the lines before the regulator. After he cracks the bottle and closes it again, he hooks it up to the line, opens the bottle full-on, then releases the purge valve to clear the airstream of any debris. Only then does he open the line to let the gas flow into the resonator.
After the quartz tubes, Donner also inspects the resonator’s output coupler, checking for haze, dirt, and debris. He then does the same inspection routine for the beam-delivery optics all the way to the cutting head.
Next, he uses a power puck to take a power shot at the cutting head and resonator, testing for power loss. If resonator optics are damaged, all the available power almost certainly isn’t making it out to the cutting head, no matter how pristine the beam-delivery optics may be—and vice versa: A shipshape resonator won’t send all its power to the workpiece if the delivery optics are dirty.
“A power puck test is essential,” Donner added. “Just because the screen [on the control] says you have a certain amount of power from your resonator doesn’t mean you truly have that power.”
With beam-delivery optics in optimal condition, typical CO2 lasers should have at most a 400-W power loss between the resonator and cutting head. However, with suboptimal optics the loss is much greater, because they are absorbing (instead of reflecting) more power than they should be.
Donner reiterated that he has never had to meticulously inspect the beam-delivery component on his own CO2 laser for nine years. His secret? “I keep my machine clean,” he said. “For instance, the quartz tubes on my machine now are as clear as they were nine years ago,” Donner said, adding that continual monitoring of temperature has a lot to do with that. Certain high-powered lasers (6-kW CO2 laser and higher) have temperature monitors on the optics. Any significant change in temperature points to internal damage.
“If you keep your machine clean in the first place,” Donner said, “there are so many things you don’t need to do.”
Put another way, good preventive maintenance minimizes reactive maintenance. And on the road for his consulting work, Donner performs plenty of reactive maintenance.
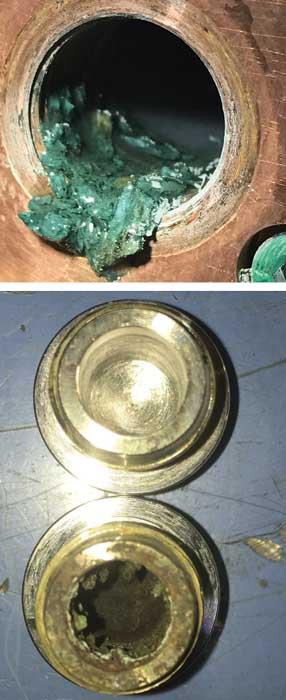
Like the beam path, the water in the cooling system must be clean and have the right amount of chemicals in it. If it doesn’t, dirt, debris, and corrosion can accumulate on components that rely on that water for cooling (see Figure 6).
For instance, consider the cooling water running through the CO2 laser’s charged cathodes. If the water isn’t as clean as it should be, those cathodes will become contaminated (see Figure 7).
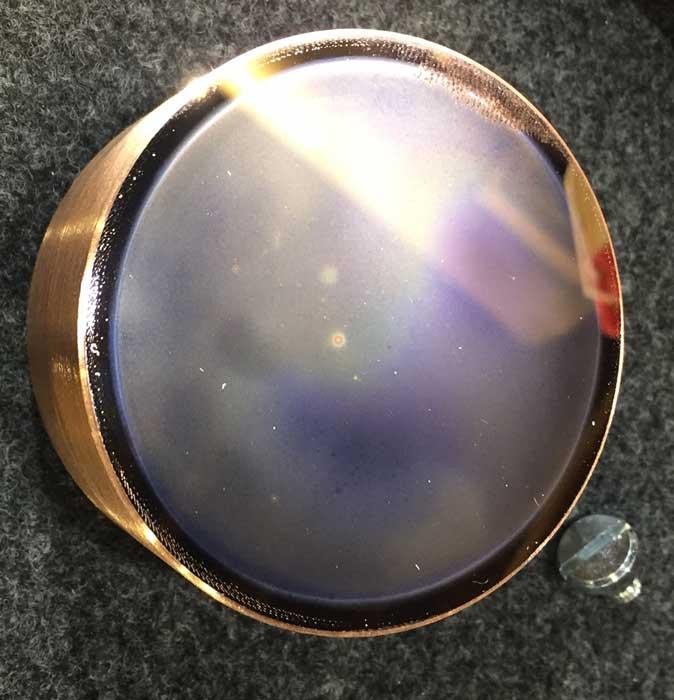
Figure 4
The film on this delivery optic, from a system with a liquid nitrogen purge, shows why optics should be cleaned every three months.
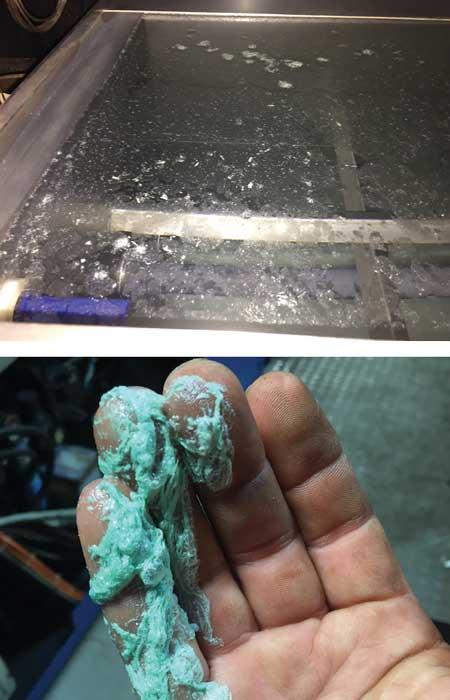
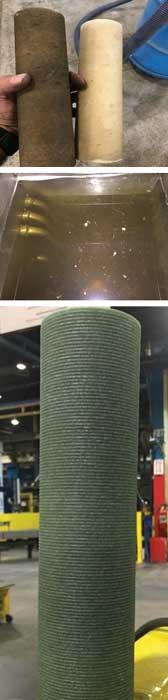
Basic cooling system maintenance includes flushing the water every year and changing the chiller filter every six months (see Figures 8 and 9). Also, make sure the chiller’s air cooling is working properly and that the covers are closed. Otherwise, debris from shop air can make it into the system.
If, say, a shop is hot and humid, and some chiller water evaporates, never simply pour more water into the system without pouring in the correct amount of chemical. “If you do that, you now have diluted the chemical-water mixture in the system,” Donner said. Microbes start growing, and the chiller water and filter turn green. Donner recommends operators use replenishing kits, available from laser machine manufacturers, that can help replenish the chiller water with the correct amount of chemical.
Problems also can come from improper water changes, and the water color in the chiller tank can be a telltale sign. Red water comes from improperly applying antimicrobial agents like STA•BR •EX®.
Donner recommends applying the agent, running it for an hour or two, and then draining it. Next comes the critical part: “I recommend filling and flushing the system with water at least five or six times,” he said. “If you don’t, traces of that [bacteria-killing agent] will start corroding components inside the machine.”
Only then do you refill the chiller with deionized water, check it with a conductivity meter to ensure the water conductivity is at zero (a check of the water’s purity), and then add the needed chemicals provided by the laser machine manufacturer.
“Once the chemicals are in [the chiller], you need to run it for a good hour before you can shut it off,” Donner explained. “You need to dilute the chemicals. If you just dump them in the water, you have a bunch of chemicals that will just sink to the bottom of the chiller tank, because the chemicals are heavier than the water.”
Donner checks the sacrificial anodes that collect dirt from the cooling water. These anodes protect other resonator components. If those anodes are not cleaned, dirty water could be entering the system, which can damage RF tubes and similar components—and which can be very expensive to replace.
“You need to check those sacrificial anodes to make sure they’re clean,” Donner said. “Even titanium sacrificial anodes, which should last the life of the machine, still collect debris, so you still need to clean them.”
Finally, Donner checks the screens and restrictors on the water lines that filter and control the water flowing into optical elements, including mirrors in the beam-delivery system and focusing elements in the cutting head.
When inspecting certain machines, Donner checks a Lanny valve above the cutting head, then looks for a tiny stainless steel screen in the Lanny valve itself, as well as a restrictor connected to the valve. He then unscrews the screen, sees the gunk, and shows it to the operator (see Figure 10).
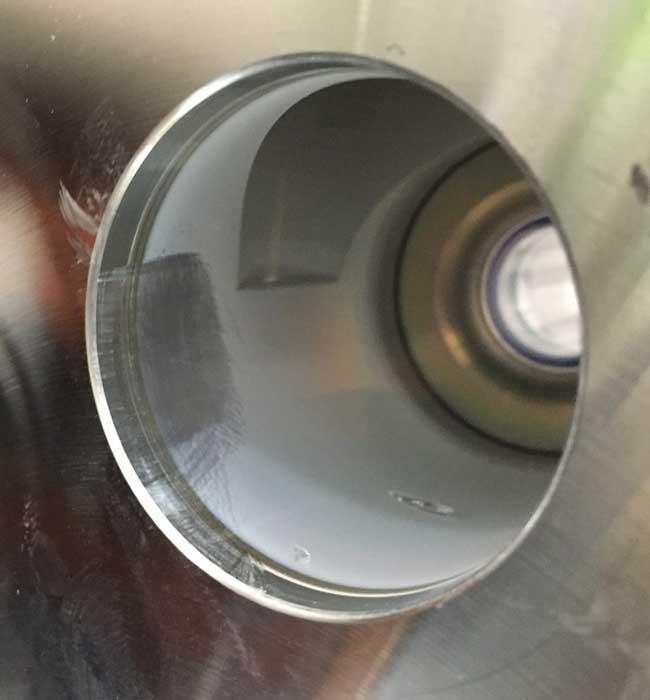
Figure 5
This quartz tube mounting block is coated white, a sign of serious contamination. A piece of quartz has even broken off.
“Nobody I’ve worked with has known this screen was there,” Donner said, adding that cleaning or replacing screens like this can save shops thousands of dollars in replacement parts. He added that cleaning screens frequently doesn’t solve the larger issue. The chiller water has to be clean to begin with.
Some elements of the machine will need replacing at some point, no matter how clean the cooling water is. Conventional (not titanium) sacrificial anodes are one example. But with careful maintenance, many components can last much longer than their expected life.
Making sure the system is clean to begin with is really the key to it all. If the beam path is pristine, lens changeouts occur properly, and the chiller water is kept clean and consistent, most components in a laser should stay clean as well.
Half the battle is just knowing how to keep the system clean, and what components to check during preventive maintenance. If everything is as it should be during the next PM cycle, you’ll need only to inspect and clean components—not spend tens of thousands of dollars, or more, replacing them.
Photos courtesy of Donner Laser Consulting, 320-296-6076, www.donnercompanies.com.


The Fabricator is North America's leading magazine for the metal forming and fabricating industry. The magazine delivers the news, technical articles, and case histories that enable fabricators to do their jobs more efficiently. The Fabricator has served the industry since 1970.
start your free subscription
Easily access valuable industry resources now with full access to the digital edition of The Fabricator.

Easily access valuable industry resources now with full access to the digital edition of The Welder.

Easily access valuable industry resources now with full access to the digital edition of The Tube and Pipe Journal.

Easily access valuable industry resources now with full access to the digital edition of The Fabricator en Español.
In this episode of The Fabricator Podcast, Caleb Chamberlain, co-founder and CEO of OSH Cut, discusses his company’s...


