Welding Product Marketing Manager
- FMA
- The Fabricator
- FABTECH
- Canadian Metalworking
Categories
- Additive Manufacturing
- Aluminum Welding
- Arc Welding
- Assembly and Joining
- Automation and Robotics
- Bending and Forming
- Consumables
- Cutting and Weld Prep
- Electric Vehicles
- En Español
- Finishing
- Hydroforming
- Laser Cutting
- Laser Welding
- Machining
- Manufacturing Software
- Materials Handling
- Metals/Materials
- Oxyfuel Cutting
- Plasma Cutting
- Power Tools
- Punching and Other Holemaking
- Roll Forming
- Safety
- Sawing
- Shearing
- Shop Management
- Testing and Measuring
- Tube and Pipe Fabrication
- Tube and Pipe Production
- Waterjet Cutting
Industry Directory
Webcasts
Podcasts
FAB 40
Advertise
Subscribe
Account Login
Search
Robotic welding issues and challenges
- By Chris Anderson
- February 3, 2014
- Article
- Automation and Robotics
Historically, robotic welding has been a complex process that required four key factors to be profitable for a company:
- A high volume of parts
- A highly repetitive welding task
- An in-house programming expert to set the application
- In-house welding knowledge to fine-tune the robot welding settings
Although robotic welding applications have been profitable for large manufacturers that produce a high volume of parts, things are much different for medium-size and job shop businesses. Frequently these manufacturers lack the four factors to make robotic welding effective and profitable.
Small-scale manufacturers often say that programming a welding robot takes longer than the time needed to produce the parts. Automating welding for low-volume production runs does not necessarily give the best immediate return on investment, but it becomes crucial when they are looking at industry and labor trends.
Facts
The skilled-employee shortage is a major problem for industrial manufacturing. According to the American Welding Society, 40 percent of manufacturing companies declined new contracts because not enough skilled workers were available.
Lack of flexibility is cited as the major reason 90 percent of all manufacturing companies do not have robotic systems. (Source: National Institute of Standards and Technology)
When skilled employees are hard to recruit and retain, it is essential to automate welding processes. As labor costs rise, the investment in automation accelerates ROI and improves a company’s competitive position.
Intuitive teaching was developed to simplify the process of programming a robot to weld, which makes it easier for job shops to justify purchasing a robotic welding cell. It also reduces the time to program a part, making it practical to automate smaller lot sizes typical of job shop production.
Traditional Programming Methods
Traditionally, programming a robot involves one of two possible approaches, teach pendant and offline programming.
Teach pendant programming involves moving the robot to each point of its trajectory using 12 of the teach pendant buttons (one per direction and per axis). This requires the operator to select the appropriate coordinate frame (joint, robot, tool, or user), which defines the direction in which the robot will move when a button is pressed. He manually sets the speed, for example when moving the robot from one point to the other and when the position needs to be set precisely.
It is important to verify that the frame, direction, and speed are set appropriately before moving the robot, especially when the tool is located near a rigidly fixed object (which is always the case in welding applications). Moving in the wrong direction often leads to tool-damaging collisions.
In addition to moving the robot through the points defining the trajectory, the operator must learn a robot brand-specific programming language and enter these instructions in a text file using the teach pendant. If positioning the robot presents a challenge, navigating through all the possible instructions within the teach pendant also can be a difficult, time-consuming task.
Offline programming consists of loading specialized software, the robot cell, and the parts that need to be welded. The programmer can generate the robot trajectory on the computer and may have the aid of some automatically generated paths. Weld instructions must be inserted to produce the program to load in the robot controller.
This approach requires extreme precision in the definition of the robot cell (robot position, tool geometry, worktable shape and position), as well as the manufactured part and the jigs used to fix the part to the table. Any error in these definitions could result in a bad trajectory or a collision during run-time. This often means having to make modifications in the field with the teach pendant (the first approach described). Also, a CAD file is required to detect all possible obstacles in the robot cell to foresee possible collisions.
These two teaching methods require a high level of expertise and expensive programming tools. Even for expert users, the time required for programming the path makes these approaches cost-efficient only for producing approximately 100 units or more. The consequence of these limitations is that very few job shops that produce low volumes have robotic applications.
A New Approach: Intuitive Teaching
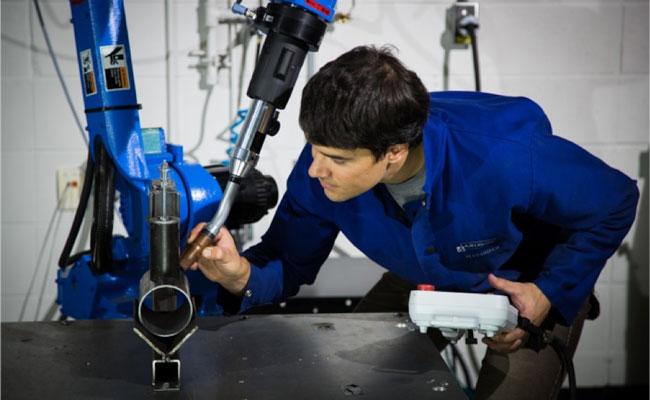
Intuitive teaching is a new method that builds on a welder’s knowledge by greatly reducing the programming acumen required to teach a task to a robot. Through an add-on, welders or operators can hand-guide the robot and program welding tasks by selecting sequence options via an icon-based touchscreen interface on the teach pendant.
With this technology, the operator moves the robotic welding tip next to a workpiece by physically hand-guiding the robot. Once the welding point is reached, he selects a procedure through a touchscreen interface. After all the points are recorded, the welder can review the programmed trajectory, modify it as needed, and proceed to weld.
Experienced welders can set welding jobs and oversee more than one robotic welder at a time. They also can train less-skilled personnel to program the welding robot and act as a technical adviser and a quality assurance resource. They can quickly program the robot for simple jobs, while using their expertise on the more complex tasks.
Intuitive Teaching Components
Hands-on Approach With the Teaching Robot. With this intuitive method, the operator moves the robot by applying forces directly on the tool. The teaching points do not require cumbersome and confusing algorithm. Full motion is available (in all degrees of freedom), and the welder has the ability to lock axes to keep either the rotation or the translation. Crashes are reduced while teaching, because the robot is moving in the direction it is pushed or pulled. Speed control provides coarse to fine positioning control as the torch gets close to the joint.
Fast and Simple Creation of Welding Trajectories. A touchscreen menu is used to set arc welding and targeted jobs. All useful arc welding functions are accessed easily via a graphic toolbox. It is not necessary for the operator to learn a complex robot programming language. The teaching environment has the look and feel of a smartphone application.
Flexible Welding Capabilities. Intuitive teaching uses the mature, precise, and built-in welding functionality of the robot’s controller. This includes the use of linear or circular interpolation to reduce the number of programmed points for the path geometry.
For Advanced Operators. It is possible to export a job that can be edited manually so that all the features of the controller are available. Saved programs can be imported back into the intuitive teaching environment for point modification or sequence editing.
Intuitive teaching was designed to make use of skilled employees’ knowledge by enabling them to move the robot with their hands. Even without in-depth programming knowledge, they can intuitively and efficiently program the robot sequences and movement with a dedicated teach pendant interface; they also can adjust the process-specific parameters and playback of the programmed trajectory.
Such intuitive teaching makes robotic technology more feasible for high-mix, low-volume applications.
Example of a Trajectory Taught With Intuitive Teaching
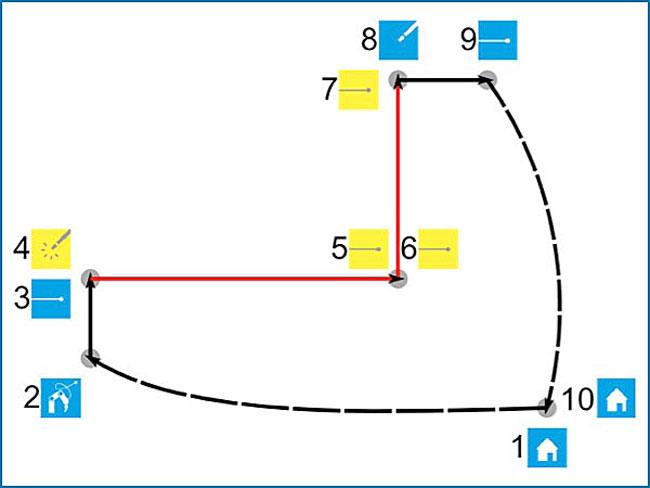
In this basic weld example, a welding path is composed of two straight lines. The welder first teaches the trajectory and then makes small touchups in a second step. The schematic representation in Figure 1 illustrates the first recorded steps.
Setting the “Home” – Point 1
When the job is created, the trajectory has only one instruction: the Home instruction (Point 1 in Figure 1). This instruction refers to a safe position, which is away from the table and parts, for all possible setups. This position is chosen well above the table to allow the robot to move anywhere with a simple motion. During playback, the robot moves toward this position using an Air Cut motion.
The target position of the home instruction can be modified by selecting the icon in the trajectory timeline, activating the intuitive teaching system, then moving the robot to the desired position and clicking on the Modify Position button.
Record the Approach – Point 2
Once the Home position is set properly, the next step is to record an approach point (Point 2 in Figure 1). This motion brings the robot closer to the part to be welded, yet far enough away from it to make sure that the robot will not hit the object (or table). If required, two or more approach points can be taught, for example, if an object needs to be avoided. To insert an approach point, the operator activates intuitive teaching, then moves the robot to the desired position and clicks on the Air Cut instruction in the toolbox.
The instruction is inserted after the selected item in the trajectory timeline. It is not necessary to click on the timeline if the previous item is already selected. For the approach point, the Air Cut instruction normally is used because it produces faster motions, which are preferable for large displacements (linear motion can cross invalid robot positions, which would trigger an error).
Teach a Welding Position – Point 3
The next step is to teach the first position of the welding path (Point 3). The position is taught by activating the intuitive system, then moving the robot to the desired location and clicking on the Linear Motion instruction in the toolbox.
Because this position needs to be precise, the operator adjusts the sensitivity of the intuitive teaching mode by using the Fast and Slow buttons on the teach pendant. The Linear Motion instruction is used for this step to avoid hitting obstacles when the robot is moving close to the table and the parts.
Enter Arc Start and Welding Parameters – Point 4
Once the first point of the welding path is taught, the operator inserts the Arc Start instruction (Point 4) by clicking on the appropriate icon in the toolbox.
One parameter is required for this instruction, which is the Arc Start File number (or ASF#). This parameter defines the welding parameters for starting the arc. It refers to the configuration file defined outside of the intuitive teaching application using the robot’s standard application. In this example, the operator enters the number 12, which refers to the previously programmed welding parameters used for right-angle welding of ¼-in. steel plates.
Teach the Welding Path – Points 5, 6, and 7
The welding path’s first segment is a straight line. To make sure that the angle of the torch remains constant during the motion, the operator can lock the orientation by toggling the motion mode to Translation Only. The robot then is moved to the end of the first segment using intuitive teaching, and the Linear Motion instruction (Point 5) is added.
In this example, the welder first tries to perform the right-angle motion by rotating around the corner of the path (how the trajectory can be modified is discussed next). The robot tool is rotated, and another Linear Motion instruction (Point 6) is inserted after the previous end point.
The last welding segment (Point 7) is recorded by adding a Linear Motion instruction, similar to Point 5.
Insert Arc Stop Instruction – Point 8
At this position in the trajectory, it is important to insert an Arc Stop instruction (Point 8) that will turn off the welding torch. Similarly to the Arc Start instruction, the Arc Stop requires an Arc End File number (AEF#), which defines the parameters used to shut down the arc. The operator enters the number that refers to the welding shape and material.
Complete the Loop - Points 9 and 10
To move the robot away from the welding path, the operator records a retract position (Point 9) using a Linear Motion instruction to avoid touching nearby obstacles.
Finally, another Home instruction (Point 10) is added to make sure that the robot finishes its trajectory in the same position as it started. The new Home instruction copies the position of the previously recorded home (Point 1). There is only one home position, and if the operator modifies any of the home positions, he modifies all of them. This position should be chosen in a way that ensures it is easy to move around the robot, for example, to remove and feed new parts in the welding jig.
While it still is recommended that at least one employee be factory-trained on a robot, intuitive teaching makes it possible for operators at most levels to program the machine easily and efficiently. Robotic welding cells that incorporate this teaching are practical technology for small shops that perform low-volume, high-mix fabricating.
Demonstration of intuitive teaching
About the Author
Related Companies
subscribe now

The Fabricator is North America's leading magazine for the metal forming and fabricating industry. The magazine delivers the news, technical articles, and case histories that enable fabricators to do their jobs more efficiently. The Fabricator has served the industry since 1970.
start your free subscription- Stay connected from anywhere

Easily access valuable industry resources now with full access to the digital edition of The Fabricator.

Easily access valuable industry resources now with full access to the digital edition of The Welder.

Easily access valuable industry resources now with full access to the digital edition of The Tube and Pipe Journal.
- Podcasting
- Podcast:
- The Fabricator Podcast
- Published:
- 04/16/2024
- Running Time:
- 63:29
In this episode of The Fabricator Podcast, Caleb Chamberlain, co-founder and CEO of OSH Cut, discusses his company’s...
- Trending Articles
AI, machine learning, and the future of metal fabrication

Employee ownership: The best way to ensure engagement

Steel industry reacts to Nucor’s new weekly published HRC price

Dynamic Metal blossoms with each passing year

Metal fabrication management: A guide for new supervisors

- Industry Events
16th Annual Safety Conference
- April 30 - May 1, 2024
- Elgin,
Pipe and Tube Conference
- May 21 - 22, 2024
- Omaha, NE
World-Class Roll Forming Workshop
- June 5 - 6, 2024
- Louisville, KY
Advanced Laser Application Workshop
- June 25 - 27, 2024
- Novi, MI


