


Contributing Writer

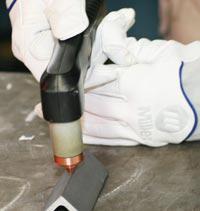
If you're maintaining the proper travel speed, the sparks will exit the workpiece at a 15- to 20-degree angle.
Plasma cutting is easy to learn, and cutters are simple to use. In fact, it's so easy that many users go right to work as soon as they remove the unit from its packaging. However, that approach may not optimize your plasma cutter's capabilities. Here are some tips and suggestions for best practices that will increase your efficiency and precision and prolong the life of your plasma cutter and consumables.
The first and most important step is one that many users fail to do: Take the time to read the manual thoroughly and familiarize yourself with your particular plasma cutter. It pays to do so because the manual contains important information on getting the most from your plasma cutter.
Note that plasma cutting produces fumes and gases that may be hazardous to your health. Proper ventilation and attire are required. Please review your owner's manual for important safety information on the proper practices used and attire worn for plasma cutting.
Develop a "preflight routine" for using your plasma cutter, starting from the back of the machine and working forward.
A clean cut depends on several factors—travel speed and direction, distance from the work surface, consumables, and technique.
Your owner's manual should contain a chart that compares material thickness to travel speed in inches per minute (IPM).
The faster you move (especially on aluminum), the cleaner your cut will be. On thick material, set the machine to full output and vary your travel speed. On thinner material, you need to turn down the amperage and change to a lower-amperage tip to maintain a narrow kerf.
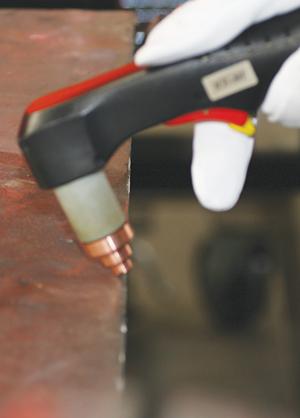
To determine if you're going too fast or too slow, visually follow the arc that is coming from the bottom of the cut. The arc should exit the material at a 15- to 20-degree angle opposite the direction of travel (see image at top of page). If it's going straight down, that means you're going too slowly, and you'll have an unnecessary buildup of dross or slag. If you go too fast, it will start spraying back. Because the arc trails at an angle, at the end of a cut, slow your cutting speed and angle the torch into the cut through the last bit of metal.
Human mechanics makes it easier to pull a torch than to push it. A plasma cut leaves a beveled edge and a straight edge. Plasma swirls as it exits the tip, biting one side and finishing off on the other. An easy way to remember it is to think of the plasma torch as a car without reverse. The torch is always traveling forward, and the passenger side is always the straight side. If this is important to your project, plan accordingly.
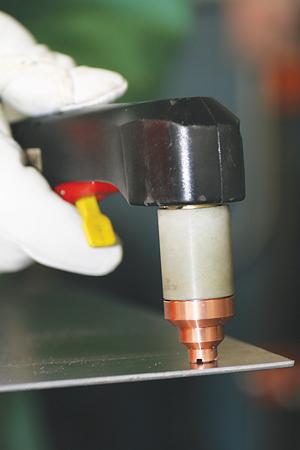
When you're not using a drag shield, maintain a 1/16- to 1/8-inch distance between the tip and the workpiece (see Figure 3). Although touching the tip to the work surface adversely affects cut quality and consumable life, moving the tip too far away from the workpiece reduces the cutting capacity of the unit.

Figure 1 An air filter and dryer help maintain the air quality needed for optimal cutting.
Many plasma cutters come with a drag shield that is placed on the cutting surface to maintain an optimal 1/8-in. standoff (see Figure 4). This is especially suitable if your hands are unsteady, or to perform pattern cutting. This also helps extend tip life.
Tips focus the plasma stream to the workpiece. Some plasma cutters use separate tips for the high and low end of their amperage ranges. For instance, an 80-amp plasma cutter may use 80-amp and 40-amp tips, plus extended versions of those for increased reach, as well as gouging tips.
The higher-amp tip is used when the plasma cutter is set to its upper amperage ranges for cutting thick material. As noted previously, to maintain a thin kerf when cutting sheet metal, set the machine to a lower-range amperage and use a low-amp tip. Because a low-amp tip has a smaller orifice, it maintains a narrow plasma stream at lower settings for use on thin-gauge material. Using a 40-amp tip at an 80-amp setting will distort the tip orifice and require replacement. Conversely, using an 80-amp tip on the lower settings will not allow you to focus the plasma stream as well and creates a wide kerf.
Use extended tips to cut patterns or to reach into corners or tight areas.
Use gouging tips to spread the plasma stream and the arc so you can remove a large amount of material all at once in a single pass.
If you are using clean, dry air and making long cuts, you can expect your consumables to last for approximately two hours of continuous cutting time. Continuously restarting the pilot arc by triggering the torch shortens consumable life. Touching the tip to the material without a drag shield in place causes double arcing, because the electrical current tries to find the shortest path to the workpiece. This decreases consumable life too.
If you're not using a drag shield, or are trying to make very precise cuts, place your noncutting hand down (see Figure 5) and use it as a guide for the other hand. This rest hand position allows freedom of movement in all directions while helping you steady your hand and maintain a constant standoff.
Keep the torch perpendicular to the workpiece whenever possible, except when you are beveling.
When you are piercing thin material to start a cut, you may be able to punch through it with little or no arc backsplash. However, on thick material, start with the torch on a 45-degree angle so the first blast of metal has somewhere to go. If not, the metal will splash back and quickly wear your consumables.
As noted, at the optimal travel speed, the arc will exit the material at a 15- to 20-degree angle opposite the direction of travel. Therefore, the cut also will be at an angle opposite the direction of travel. At the end of a cut, angle the torch forward to cleanly cut the last bit of metal (see Figure 6).
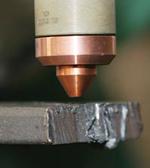
Figure 3 Maintaining a 1/16- to 1/8-in. standoff increases the longevity of your consumables, gives you a cleaner cut, and maximizes your machine's cutting capacity.
Guides. To mark the material to be cut, use either a black marker or white chalk. Contrast makes the marks easier to see.
For more precise cutting, you may clamp a straight edge to the workpiece to guide the torch (see Figure 7). If you'll be making multiple cuts of the same shape, create a template.
Make sure the guide isn't flammable. Aluminum is preferable because of its smooth surface, but because of its electrical conductivity, the aluminum should touch the torch cup or drag shield and not contact the tip.
Circle guides also are available to help ensure precise cutting (see Figure 8). A center punch is used in preparation for using a circle-cutting guide. An easy way to make a bevel cut is to use a piece of angle iron as your guide (see Figure 9).
While it may be easy enough to unpack your plasma cutter and begin cutting, take the time to familiarize yourself with its proper operation. It bears repeating that you should read the owner's manual first.

The Fabricator is North America's leading magazine for the metal forming and fabricating industry. The magazine delivers the news, technical articles, and case histories that enable fabricators to do their jobs more efficiently. The Fabricator has served the industry since 1970.
start your free subscription
Easily access valuable industry resources now with full access to the digital edition of The Fabricator.

Easily access valuable industry resources now with full access to the digital edition of The Welder.

Easily access valuable industry resources now with full access to the digital edition of The Tube and Pipe Journal.

Easily access valuable industry resources now with full access to the digital edition of The Fabricator en Español.
In this episode of The Fabricator Podcast, Caleb Chamberlain, co-founder and CEO of OSH Cut, discusses his company’s...


