


President
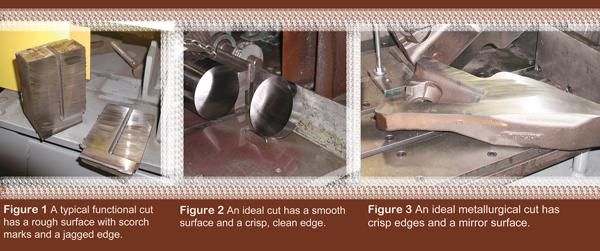
For many companies an abrasive saw is simply a functional way to cut something. However, those same companies may use the saw in very different ways to achieve certain outcomes:
Sometimes achieving an acceptable cut can be a frustrating situation. You can go for weeks making ideal cuts and then, seemingly without reason, the quality drops. Or you have successfully cut 0.5-inch stock, but cutting the same material that's 2 in. thick does not produce the results you want. This can seem to be a mystery, but if you understand how to optimize your abrasive saw for each specific cutting application, you will be able to achieve that ideal cut.
Although you may think you are cutting a very familiar job, the material being cut may be different than you think. Is the stock a different size or shape from what you have cut before? Is it solid or hollow? What type of finish do you want on the cut end—smooth or highly polished? If you are cutting a different material, you not only need to answer these questions, but also determine if your abrasive wheel is right for the material.
You also need to evaluate a range of operator functions. How is the stock clamped? How are the controls programmed? How does the operator perform a manual downfeed?
In some cases, a little experimentation can produce a solution. In other cases, you may have to make major upgrades to your equipment or purchase a new saw.
Just as different metal saw blades are made for different woodworking jobs, abrasive cutting wheels come in many formulations for the material being cut. The most common abrasive materials are aluminum oxide, silicon carbide, and zirconia, with proprietary formulations available for specific applications. Aluminum oxide wheels generally are used for cutting mild steel. Silicon carbide wheels are used to cut glass, ceramics, tungsten, and similar materials. Zirconia wheels are used when cutting alloy steels.
Proprietary wheels usually contain several types of abrasive materials. The wheel manufacturer determines the formula of abrasive materials, their proportions, and other characteristics needed to achieve the optimal cut in a specific type and size of workpiece. Given the range of materials and alloys, it is impossible to recommend one specific type of wheel. You should contact your saw distributor or the saw manufacturer, especially if you will be cutting large workpieces or require an ideal metallurgical cut.
Abrasive materials come in grain sizes from 8, which is the coarsest, to 600, which is superfine. A coarser-grain wheel cuts faster, but will produce a rougher surface finish and may leave a burr around the edge. A superfine-grain wheel cuts slower but produces smooth, highly polished surfaces and clean edges.
Wheels are graded from A, which is the softest, to Z, which is the hardest. The hardness determines how tightly the bond holds the abrasive material. In general, hard wheels are used to cut soft materials such as mild steel, and soft wheels are recommended for hard alloys. The reason for this is the nature of the abrasive cutting process.
Regardless of the wheel's composition, all cut by releasing abrasive particles from the wheel in the process of removing material from the workpiece. This abrasion continually produces a fresh cutting surface as the wheel wears down. A soft wheel allows the release of abrasive particles faster than a hard wheel. This provides the optimal cutting surface for hard materials. Since soft materials are easier to cut, the cutting surface of the hard wheel does not break down as fast.
While the abrasive wheel is the key to making ideal cuts, as mentioned previously other factors such as the size and material type play important roles in the success—or failure—of the process. To understand how, consider the example of a base model 14-in. dry cutoff saw with a manual downfeed.
With the correct wheel on the saw, almost any experienced metalworker could make a good cut in a 0.5-in. piece of square stock in most materials. As the size increases, making an ideal cut becomes harder to accomplish. At 2.5 in.—the maximum capacity for a 14-in. wheel—an experienced operator may be able to produce ideal cuts in mild steel stock, but not in harder materials such as HASTELLOY®.
The reason is the relative percentage of the wheel's surface area in contact with the workpiece. The friction generated by the abrasion process during cutting produces heat—the greater the contact area, the more heat that is generated. With dry cutting, in which no flood coolant is used—the heat has nowhere to go. Obviously, cutting harder materials increases the heat generation, and this is why large workpieces made of hard material are more likely to suffer scorching and edge melting.
To help produce ideal cuts in almost any type of material, most companies select a wet saw with some type of power downfeed. A wet saw provides a stream of coolant to drench the cut. This coolant lubricates the abrasion process, producing a smoother finish than dry cutting. Additionally, the coolant acts as a heat transfer agent and continually flushes out the cut to remove loose abrasive and material particles. For optimal metallurgical cuts (using a fine-grain wheel), the coolant contributes to the polishing process to produce a mirror surface.
Flood cooling alone is not enough. It is nearly impossible to maintain a consistent feed rate with a manual downfeed. If you think of feed rate as the pressure applied to the wheel as it is cutting, you can see that a higher feed rate potentially increases the heat generation and potential for scorching. A 14-in. wet saw with a manual downfeed can produce ideal cuts in a wider range of material sizes and composition, but the lack of operator consistency can result in quality variations.
A power downfeed overcomes the consistency issue. The most common type is the standard chop saw downfeed, on which the rate can be set and maintained from one piece to the next, regardless of the operator. Of course, the exact downfeed rate depends on the workpiece size, the material type, and the abrasive wheel type and grade. In general, the harder the material is, the slower the downfeed rate will be.
For large, high-alloy workpieces, many companies choose an oscillating power downfeed. With this option, the wheel "rocks" back and forth slightly, continually breaking the arc of contact—similar to what happens when you use a hand saw to cut through a 2-by-4. The flood cooling and the oscillation further reduce heat buildup and allow for more complete flushing of the loose material and abrasive particles. This can result in a smoother cut with any wheel because the oscillation ensures that no one point is continually exposed to the wheel's abrasive action. Depending on the workpiece's size and makeup, the cut can be made faster than with the standard chop-style power downfeed.
While the saw manufacturer usually sets the wheel speed and horsepower, the operator still needs to pay attention to these two factors when optimizing the sawing process. If the saw is relatively new, everything should be fine. If you have an older saw, especially if the motor has been replaced, some simple calculations can determine if a potential problem exists.
Wheel speed is measured in surface feet per minute (SFPM). Think of it as how far a wheel of a given diameter would travel in one minute if it were turning at a given RPM.
The optimal speed for dry saws is 12,000 SFPM and 8,000 SFPM for wet saws. (Wet saws must run slower to prevent coolant from being slung out of the cut.) These speeds were calculated to produce the best possible abrasive cutting, and saw and abrasive wheel manufacturers use these calculations in their designs.
To determine if your wheel is running at the correct SFPM, use the following formula to find the required spindle speed for a given diameter:
3.82 x SFPM
Wheel Diameter = Spindle RPM
Again using the dry saw with a 14-in. wheel as an example: 3.82 x 12,000 = 45,840. Dividing that by 14 results in about 3,275 RPM. For a wet saw, the required spindle speed would be about 2,183 RPM. Don't worry if your spindle speed is somewhat different from these examples. But notice the 1,000-RPM difference between dry and wet RPMs. If your spindle speed varies from the optimal speed by that much or more, it could be the cause of any existing problems.
Because wheel speed and the downfeed rate work together to produce the cut, varying the downfeed rate can compensate for a slightly slower or faster wheel speed. If you are cutting small workpieces, you may not be able to detect a difference in the cut quality. Optimal wheel speed becomes an important factor, however, when cutting larger workpieces, especially high-alloy steels. A slower- or faster-than-optimal wheel speed can contribute to poor-quality cuts and possibly longer cutting times.
Machine horsepower is important because you need the ability to maintain the optimal wheel speed during the cutting process. This speed depends on sufficient torque, which is a function of horsepower. In practice, horsepower requirements depend on the material type, workpiece size, and the type of cut—ideal or metallurgical.
A 14-in. saw designed for general cutting should have at least a 5-HP motor. Move up to a 20-in. saw and you will need a 15-HP motor. A 30-in. saw requires a minimum of 25 HP. If you want to make ideal metallurgical cuts with a 30-in. saw, you should have a 50-HP motor. Notice that the horsepower requirement is not linear—the larger the saw, the more relative horsepower needed. The extra horsepower is needed to battle greater friction that is generated while cutting larger workpieces and to produce greater torque, which is needed to maintain optimal cutting speed.
Most abrasive saw manufacturers equip their saws with motors that have adequate horsepower for any potential sawing application. This is not always the case with inexpensive retail chop saws. To keep the price down, these manufacturers use low-horsepower motors. Sometimes the same motor is used for both metal blades and abrasive wheels, resulting in improper wheel speed for your application.
The wheel's position relative to the workpiece is critical. Whether you are cutting a single piece of stock, a bundle, or an irregular workpiece, the wheel should always make contact on the leading top edge. This is where the centerline of the wheel is ahead of the piece being cut. In this position, the rotation of the wheel helps clear the cut.
To minimize movement and vibration, clamp the workpiece on both sides of the cut. When cutting a bundle, always ensure interior pieces are held securely, ideally with a bundle cutting clamp—also called a top clamp. If round shapes have freedom of movement, they can rotate when the abrasive wheel engages them. If square or rectangular shapes are not clamped tightly, they can shift. The result can be a quality control nightmare.
So many variables exist in metalworking that laying out exact parameters and steps for abrasive cutoff saw use is difficult, if not impossible. However, these guidelines can help you understand the process, uncover potential problem areas, and find the optimal equipment and procedures.
Ultimately, you have to experiment with sample workpieces. While this may seem like more work than you have time for, think of it as gaining a competitive edge. At the very least, you may be able to eliminate the need for secondary finishing operations, and that could make a big difference in your profitability.

The Fabricator is North America's leading magazine for the metal forming and fabricating industry. The magazine delivers the news, technical articles, and case histories that enable fabricators to do their jobs more efficiently. The Fabricator has served the industry since 1970.
start your free subscription
Easily access valuable industry resources now with full access to the digital edition of The Fabricator.

Easily access valuable industry resources now with full access to the digital edition of The Welder.

Easily access valuable industry resources now with full access to the digital edition of The Tube and Pipe Journal.

Easily access valuable industry resources now with full access to the digital edition of The Fabricator en Español.
In this episode of The Fabricator Podcast, Caleb Chamberlain, co-founder and CEO of OSH Cut, discusses his company’s...


