


Founder, President, and CEO,

Figure 1
Does your company view this aluminum scrap as a revenue stream paid by the recycler? If so, management should rethink that scenario. Some of that scrap can be used to create metal parts that will sell at a price that is considerably higher than today’s scrap rate.
Raw material costs in businesses that process aluminum extrusions typically account for more than half of the company’s operating expenses. Controlling these costs can make a greater impact your bottom line than almost any other effort you can make.
With aluminum costs unlikely to decrease anytime soon, what can you do to save money when it comes to processing aluminum extrusions? Here are four actions that can result in immediate savings.
If you sell your scrap aluminum (see Figure 1) by the pound, but are pricing your extrusions in your purchase orders and bills of materials (BOMs) by the foot, how do you determine your yield? Well, the answer is, you can’t. The only way to determine what you’re throwing away as scrap is to know how much per pound you’re paying for your extrusions and then calculating how many pounds go to the recyclers.
Make sure you price your BOMs and purchase orders by both the pound, or kilo, and linear foot, or meter. Then when you sell your scrap each month, you can deduct its weight from the total weight of material you used in the same period and get an accurate picture of your yield.
For example, if you used 50,000 lbs. of aluminum in a given month and 10,000 lbs. ends up as scrap, you know you are getting an 80 percent yield. Once you know your yield, you can work toward reducing scrap to improve your bottom line. But first you have to see the problem so you can fix it.
Most companies see the scrap number at the end of the month on their profit and loss statements as a revenue number. Well, it’s not.
This cannot be stressed enough. Now that you are purchasing and accounting for material by the pound, you can see your scrap number as a measure of inefficiency. Your scrap bins are bins of lost profits.
When you purchase by the pound, your costs are most likely in the range of $2.50/lb. Typically, scrap brings in about $0.50/lb. Therefore, the real cost of scrap is $2/lb. So, that 10,000 lbs. of scrap you got $5,000 for is really $40,000 of lost profits. Not such a fun number now! Learn to hate that number.
Let’s assume you have a scrap rate of 18 percent. For every 10,000 lbs. of material, you’re losing 1,800 lbs., or $3,600. If you reduced your scrap rate from 18 percent to 12 percent for a net savings of 600 lbs., or $1,200, you could put a net of $1,200 per 10,000 lbs. directly on your bottom line. (Learn how to obtain those cost savings later in this article.) That’s a discount of close to 5 percent on your material costs. How much do you spend in a year on aluminum? Would a 5 percent rebate be a pleasant surprise?
To achieve those savings, you should view your scrap rate as a trackable metric. Your monthly scrap percentage should be posted where every member of your organization can see it. Your percentage of scrap is a measure of overall organizational efficiency, involving everyone from the sales team to the guy fabricating the parts. Everyone needs to own and understand this number.
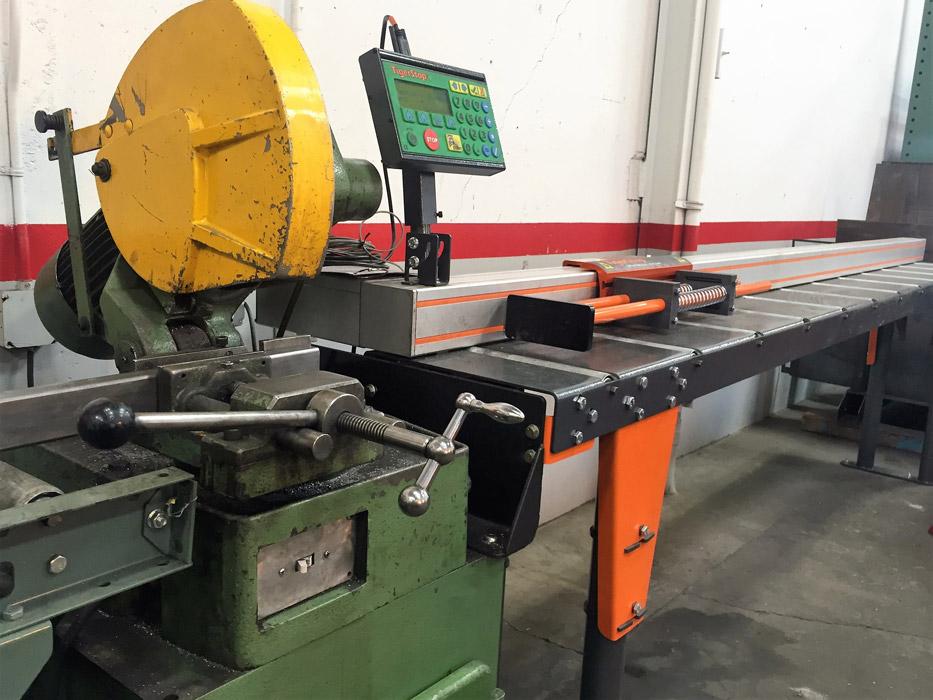
Figure 2
A saw equipped with an automatic stop eliminates mistakes related to manual measurements and increases productivity at the same time.
Whether fabricators like it or not, they realize that finding employees who can accurately read a tape measure is becoming more and more difficult. Even worse, fabricators that rely on manual stops and C-clamps during cutting learn that they are slow to set up and often inaccurate over time.
The cost to your operation in terms of miscut parts, rework, assembly issues, poor quality, incorrect field installation, and field complaints far outweighs the cost of buying a CNC automated stop. An automated stop increases the speed at which parts are cut, and does so accurately every single time (see Figure 2). This improvement in accuracy means a decrease in costly rework and in scrap from miscut parts.
Many companies optimize operations in the back office, sending either paper or electronic cut lists directly to the cutting station. The obvious reason for doing so is to reduce waste.
The problem with this is that back-office optimization software is batch-based and creates cutting patterns based on the entire job. One miscut part, one change in the field, or one missing segment of a raw material length disrupts the entire list and forces you back into the back office to redo the job list. This is why these systems are such a hassle and so expensive to use.
Most of these systems require you to track your inventory and drops (remnants that the back office optimizing job software could not find a good solution for in the last batch), which they then use in the next batch. But the work to track and store these parts adds significant time, cost, and confusion to the operator’s day. Ultimately, back office optimization systems do increase yield, but simultaneously increase labor costs.
Alternately, optimizing job order at the machine solves all these problems. You can scan raw material lengths as they are placed on the processing table and compare them to a cut list to maximize yield. An automated cutting system with optimization software (see Figure 3) at the machine gives you a better yield, reduces labor cost, eliminates rework, and ends the need to track remnants and raw materials. Also, shops can avoid the hidden costs associated with the back office optimizing shop floor cutting operations.
With optimization software at the machine, all you need to do is remember “worst first.” Translated, that means “introduce your worst parts first (remnants or usable scrap) at the beginning of your cut list.” Once the remnant length is entered, the software determines if the part is usable. If the remnant length corresponds with a job that needs to be cut, you are ready to proceed. If the part is not usable, you simply mark the remnant with a tick and move to the next piece.
Once you have remnants with three ticks on them, you know to put them in the scrap bin for good. Watch that pile of drops and usable scrap disappear. You also won’t have the hassle of keeping track of drops and defective material because they are placed in bins and used later on in the manufacturing process.
Also keep in mind that a number of processing systems allow you to print individual part labels for easy identification and sorting on the production floor. Investing in the right equipment allows you to start whittling down your scrap rate, rework rate, and labor costs.
You hear a lot about key performance indicators, or KPI. Well, your scrap bin should be one of your top performance indicators.
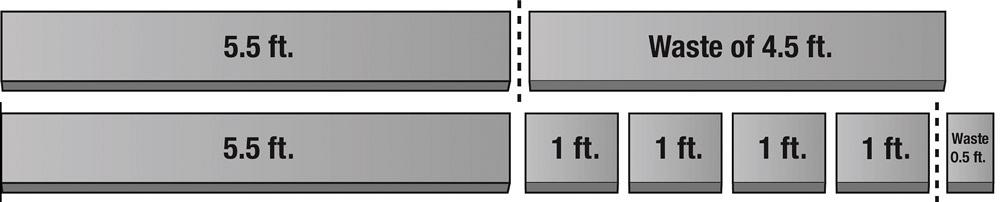
Figure 3
When batch-based cutting jobs are thrown at a saw, waste is often the result, as seen in the top graphic where a job called for only one 5.5-ft. section. Job optimization software, however, can organize the cut schedule so that four 1-ft. cut sections follow the 5.5-ft. cut length, which results in only 6 in. of scrap, instead of 4.5 ft.
When mistakes are made on the floor, where do they go to hide? Into the scrap bin, of course. This is where they disappear without a lot of questions.
Take some time and analyze why each piece of scrap is there. Is it because of human error? Machining errors? Process errors? The answer is quite telling to what is going on in your manufacturing organization.Following these four steps will keep those bins empty and produce a big boost to your company’s bottom line.


The Fabricator is North America's leading magazine for the metal forming and fabricating industry. The magazine delivers the news, technical articles, and case histories that enable fabricators to do their jobs more efficiently. The Fabricator has served the industry since 1970.
start your free subscription
Easily access valuable industry resources now with full access to the digital edition of The Fabricator.

Easily access valuable industry resources now with full access to the digital edition of The Welder.

Easily access valuable industry resources now with full access to the digital edition of The Tube and Pipe Journal.

Easily access valuable industry resources now with full access to the digital edition of The Fabricator en Español.
In this episode of The Fabricator Podcast, Caleb Chamberlain, co-founder and CEO of OSH Cut, discusses his company’s...


