


Contributing Writer

Figure 1
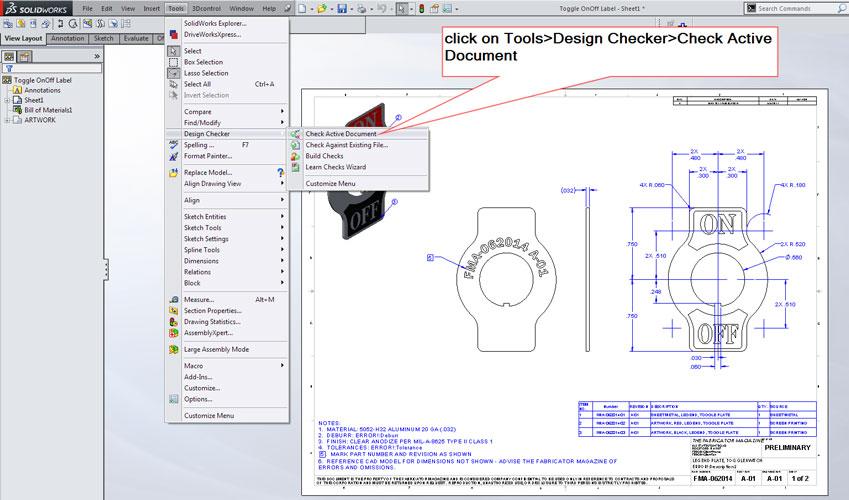
Design Checker is an add-in and must be enabled prior to use. From the menu bar click on Tools->Add-Ins>Design Checker.
In a time when typewriters and drafting boards were state-of-the-art, proofreading could be accomplished only with the labor of another human. Software advancements, however, have replaced both of those antiquities with text editors and CAD systems.
Many text editors and most word-processing systems have grammar and spelling tools. Meanwhile, some mainstream 3-D CAD systems have analogous tools that serve as design checkers. Specifically, the 3-D CAD software used in support of preparing this article features a tool called Design Checker. The check-box setting to enable this add-in is shown in Figure 1. Design Checker can be used as a spelling checker, but it has the wits to be much more useful to a CAD jockey.
From personal experience I can tell you that the spelling and grammar tools built into the word processor do not improve the substance of what is written. Rather, such proofreading tools prune away the distractions that might be obscuring the brilliance of the prose. Similarly, Design Checker can be a useful tool to identify and to minimize the nuisance of complying with a variety of standards—from spelling to ANSI/ISO. However, it does not check the function of the modeled invention.
Muses (our own euphemism for that which is the purpose of the design effort) are still needed to inspire both the invention as well as how best to evaluate the virtual prototype. We recommend delegating the mundane proofreading to Design Checker and thus enabling the CAD jockey to spend more quality time with the muses.
Suppose that someone is not able or is unwilling to use a gizmo like Design Checker. That is not a problem. Simply use the antiquated buddy-check proofreading of yore, or worse, rely upon yourself to not make typos. This manual method of proofing—opening the CAD document and scrolling through myriad document properties to perform data entry to control the fonts, arrow sizes, and other standardized settings—can lead to problems, of course. Note in Figure 2 that at least one custom property is mismatched between the drawing template and the component shown in the drawing. Design Checker can be taught to report on all such missing properties to spare the human the effort of mind-numbing searching.
Design Checker compares the current document, which could be a drawing, a 3-D part, or an assembly of such parts, to a selected standards document. It doesn’t take much time or effort to build a custom standards file. (Keep in mind that the standards document must exist prior to checking the design document with Design Checker.)
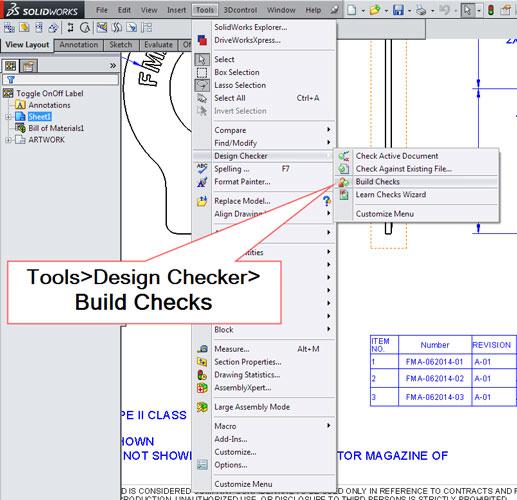
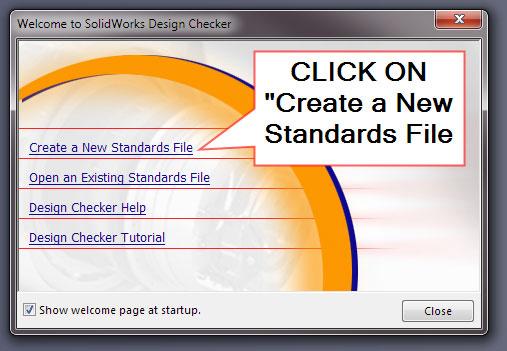
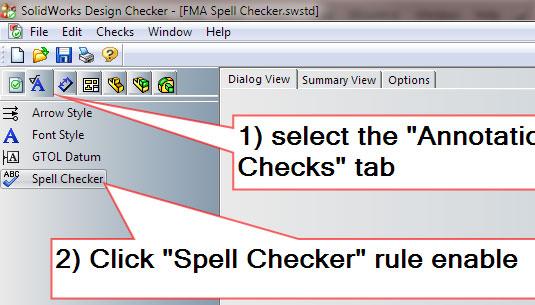
As a step-by-step demonstration of creating and using a rule to check spelling on a drawing, follow Figures 3a through 4c:
We’ve drawn on the similarity between CAD proofreading tools and spelling checkers. The reporting capabilities of Design Checker go beyond spelling and can be used to auto-correct some features of an archive of old CAD into good compliance with current standards. In situations where several CAD documents require the identical proofreading and corrective treatment, a combination of Task Scheduler and Design Checker can be used to process multiple documents in a folder.
We recommend improving your document templates with Design Checker, as well as using it to check production work. Templates are a frequent source of things that need to be retyped. By cleaning them up, you make Design Checker’s job easier.
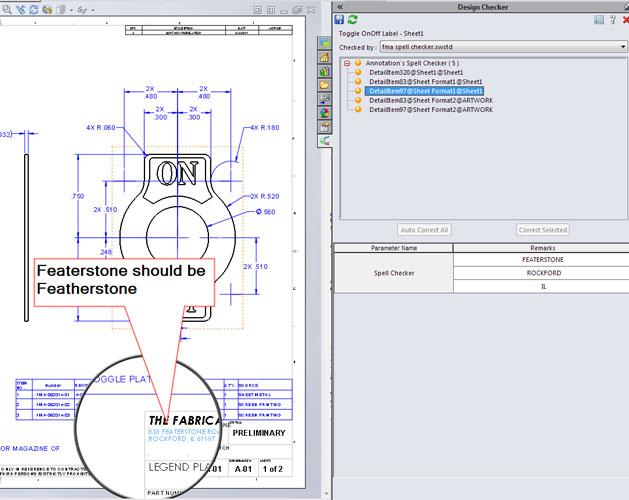
Repetitive tasks sneak their way into the CAD work flow—changing the street name from “Featerstone” to “Featherstone,” for example. Correcting such an error is a simple task. The problem persists because it is perceived to take more time to correct the template, or whatever source of the problem, than it does to just enter the corrected information each time a drawing is created. If you do it often enough to never forget to do it, then you’re probably wasting time by not correcting the source of the problem.
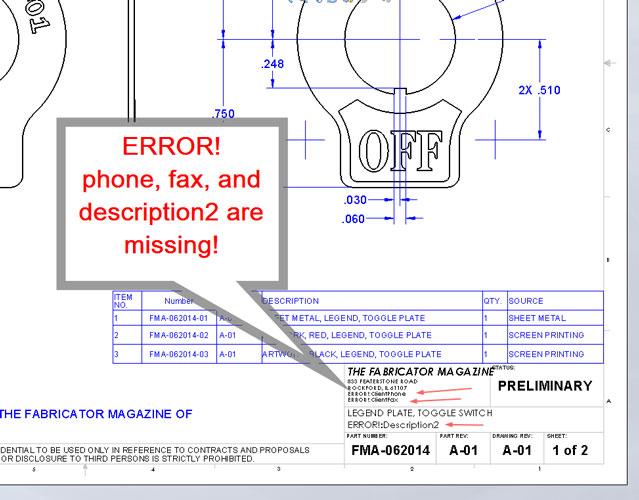
Figure 2
The 2-D sheet format for this drawing is reporting errors: missing custom properties in the 3-D model. You easily can create rules to report on all missing custom properties. You perform the correction and Design Checker just reports.
Avoiding repetitive typing is not the only reason to use Design Checker as part of the routine work flow. Perhaps you work in a job shop that is producing shop drawings from customer-supplied models. Organizational mergers sometimes require documents to be revised to comply with new internal standards. Making Design Checker a part of your regular CAD work flow will brighten your smile and improve relations with collaborators.
You might find it convenient to establish a library of standards, each with a specific proofreading assignment. It is easy to select more than one standard for simultaneous scanning of the current document. But processing time, detection of irrelevant errors, and scope of responsibility are just some of the reasons not to apply all possible checks to each document.
Design Checker makes it convenient to select which combination of your standards to apply during an evaluation. If computer time is an issue, using specific and targeted standards might be a timesaver. On the other hand, if consistency is the most important result, it might be better to simplify the work flow. Put all design checks into a single standards file and use it to check all documents. In that situation, the challenge boils down to remembering to use Design Checker before every document is declared done.
Using Design Checker to detect sketches that are not fully defined is so much easier than scanning an assembly by eyeball. Have you ever released a drawing with a missing datum for a GTOL callout? Design Checker to the rescue!
Gerald would love to have you send him your comments and questions. You are not alone, and the problems you face often are shared by others. Share the grief, and perhaps we will all share in the joy of finding answers. Please send your questions and comments to dand@thefabricator.com.


The Fabricator is North America's leading magazine for the metal forming and fabricating industry. The magazine delivers the news, technical articles, and case histories that enable fabricators to do their jobs more efficiently. The Fabricator has served the industry since 1970.
start your free subscription
Easily access valuable industry resources now with full access to the digital edition of The Fabricator.

Easily access valuable industry resources now with full access to the digital edition of The Welder.

Easily access valuable industry resources now with full access to the digital edition of The Tube and Pipe Journal.

Easily access valuable industry resources now with full access to the digital edition of The Fabricator en Español.
In this episode of The Fabricator Podcast, Caleb Chamberlain, co-founder and CEO of OSH Cut, discusses his company’s...


