


Contributing Writer
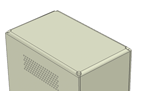
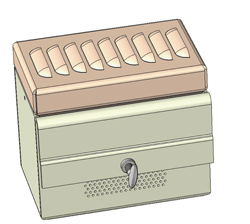
Figure 1: This enclosure could be harder to manufacture than it needs to be.
With the right combination of technology, materials, and labor, it is possible to build almost anything. The challenge is to find a cost-effective combination that satisfies the constraints of the schedule.
A well-informed CAD operator can use several tricks for sheet metal modeling that can keep the design in the realm of can-do manufacturing—the land where the tooling and metal processing technologies are commonly available.
Figure 1 shows an enclosure design that features a thumbscrew to clamp the unit to a mounting rail. The top cover has louvers for ventilation and is held in place with snap-in bumps for quick removal. There is a perforated section in the box for air intake.
This is a designer's dream and a functional nightmare. What could be done to improve the design?
The thumbscrew thread size is #10-32. The sheet metal thickness is 0.062 inch. That means the tapped hole in the sheet metal will have almost two threads to hold the screw. If the hole is chamfered for deburring, the screw will have fewer threads to hold it in place. This is a very unreliable design. The thumbscrew will be very easy to strip out of the sheet metal.
One option to hold the screw in place more firmly is to extrude a hole in the sheet metal prior to tapping (Figure 2). Tooling is used to stamp the extruded feature into the sheet metal. This process takes only a few seconds, and machinery does all the work.
The advantages of speed and accuracy, however, may be offset by difficulty in deburring. A wide-belt sander treats an extruded hole as if it were just a large burr.
Additionally, because the extruded hole and corresponding threads are all formed from the sheet metal, thread strength and durability may be an issue if the sheet metal alloy is soft.
Depending on the sheet metal alloy, an extruded hole generally can stick above the surface by the same length as the material's thickness. The design limit is with the pilot hole that is made prior to extruding the flange. With an extruded flange length of 1.5 times the material thickness, the pilot hole in 16-gauge steel for a #10 screw extrude can get very small. In the CAD model shown in Figure 2, the part calls for a 0.040-in.-diameter pilot hole.
In general terms, the smallest hole that can be punched is equal to the material thickness or 0.040 in., whichever is greater. Of course, with a laser, smaller holes are possible. Hard tooling is required to form the extruded flange. So, for some extruded holes, a combination laser/punch may be required. Some extrude tooling will lance the pilot instead of requiring a round hole.
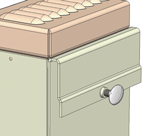
Figure 2: An extruded tapped hole provides a more robust mounting for the thumbscrew.
In any event, the extruded hole solution requires dedicated tooling. The prudent CAD designer will check with manufacturing to be certain of the availability and capability of the tooling.
One parting shot before moving to another solution for threading. The extruded hole in Figure 2 is probably too close to the jog bend. The jog tooling will crush the extruded flange. To remedy this situation and others, keep extrudes away from bends and edges (and other extruded features) by at least three material thicknesses. Again, it is best to check with manufacturing for its specific tooling clearance requirements.
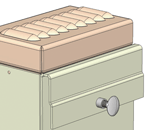
Figure 3 shows a #10-32 captive nut swaged into the sheet metal. The teeth and ring on the captive nut keep it from twisting or falling out. The thumbscrew fits smoothly and securely into this machined component. Where extruded holes may have a competitive advantage in large-volume production, captive hardware allows strategic selection of alloy, thread type (locking or nonlocking), and other characteristics that may improve the final product's performance.
Those of you who are already familiar with captive nuts are probably gritting your teeth as you study Figure 3. The screws installed in captive nuts are supposed to pull the nut more tightly into the sheet metal.
In Figure 3 the thumbscrew would do exactly the opposite. As the screw is tightened in final assembly, it will try to tear the nut out of the sheet metal. The designer should consult the captive-nut manufacturer's catalog to determine the maximum pullout strength. If the screw is likely to tear the nut out of the sheet metal, then another design is needed.
Captive standoffs commonly are used to mount printed circuit boards. In Figure 4 a captive standoff is used in place of the captive nut. The captive standoff is swaged in from the opposite side; as the thumbscrew is tightened, the standoff will be pressed even more securely into the sheet metal. The standoff offers even more thread length to engage with the thumbscrew.
If you had access to the CAD models, you would be able to verify that the jog flange has grown longer from Figure 1 through Figure 4. Each solution has its own minimum distance requirements. In this design, those requirements were easy to accommodate.
In sheet metal parlance, jogging refers to a bending operation that forms a material offset in the part. These features are useful for creating seams with a smooth transition. They also add stiffness to the part.
During a recent lecture, I recommended using jogs just for that reason. A member of the audience pointed out that the tooling for a jog bend requires setup time, and setup time increases the cost of the part. If all you need is a stiffening flange, then the most cost-effective design uses tooling that is already set up for other bends in the part. I countered that a jog can be more compact than a 90-degree flange, particularly when air bending. However, his observation about minimizing the tooling setup in the press brake makes sense.
In Figure 4 the function of the jog is to keep the threads in the standoff away from the clamping bar (not shown) to give some space for the dog point on the thumbscrew.
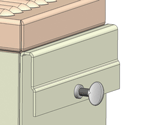
Figure 3: A captive nut provides a strong thread but may pull out in this application.
When it comes to press brake setup, one frequent oversight in sheet metal design has to do with corners where two flanges meet. In general, the easiest corner to manufacture has a gap. The gap allows the flange to be overbent slightly to allow for material springback. The gap also makes it easier for the press brake operator to align the part with the tooling during the forming operation.
Sometimes the corner gap just does not satisfy the design goal. It might be desirable to have an overlapped corner to control dust, to improve ergonomics, or to facilitate welding.
When no other design constraint prevails, the rule of thumb for overlapped corner design is to overlap the short side as shown in Figure 5. This allows the four bends to be made with a single tooling setup. The long section of tooling that is fitted for the long bend will be used first to bend the short sides and then finish up with the long sides. Less setup time translates into lower manufacturing expense.
If the overlap went the other way (overlap the long side), then two separate tooling setups would be needed—one setup with the tooling fitted for the short side and a second setup with tooling fitted for the long side.
The press brake professionals reading this article probably found Figure 5 to be a rather poor example of sheet metal design. The tearing in the corners is bad design practice for several reasons. The sharp burrs are dangerous for handling, the tearing process can cause the part to shift during forming, and the tears can easily propagate into cracks.
Figure 6 shows a small change in the design that eliminates the problem tearing in the corners; just punch away the stuff you don't want to tear. Using round bend reliefs minimizes the problem with crack propagation. Your manufacturing department probably has some strong recommendations for the size and placement of corner reliefs.
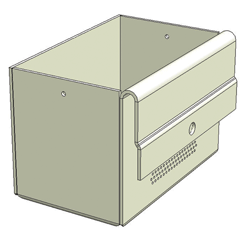
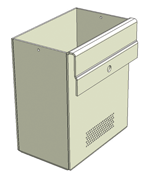
We now turn our attention to the box shown in Figure 7. If the material is thin enough, press brake tooling already available on the shop floor could be used to bend this part. A folding machine (as opposed to a press brake) might have an easier time of it, but it is still a challenging piece.
One problem is that the bends are way down deep in the box. The guideline is to have a direct line of sight to the inside of the bend at about 45 degrees (split the 90-degree bend angle). This allows a sturdy piece of tooling to apply pressure to the inside of the bend during the forming operation.
A possible solution is to consult with manufacturing to determine the available gooseneck tooling and what the maximum reach of that tooling is. Then, adjust the design to match the tooling.
A second problem is with the narrow U that forms the mounting detail. Custom tooling probably would be required because that pair of 90-degree bends are so close together. Here, a solution might be to combine the two bends into a single 180-degree bend.
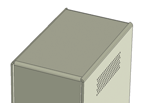
Figure 5: When possible, use the overlap-the-short-side design rule.
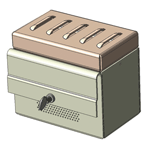
Figure 8 shows a design that will be much easier to manufacture.
Louvers are found in many sheet metal designs for products that require ventilation with restricted access. The tooling that is used to stamp the louvers has a stripper/clamping plate that sets the minimum distance between the louvers. Figure 9 shows a design that would probably be rejected by manufacturing because the louvers are too close to each other. Generally, 0.625-in. spacing is a minimum, but that depends on the specific louver tooling.
Another problem in Figure 9 is the closeness of the louvers to the bends. The guideline is to leave at least eight times the material thickness from the start of the louver to the outside of the bend.
The revisions made between Figure 1 and Figure 10 were all made with manufacturing in mind and presumed that the function of the enclosure was not impaired. That worked in this tutorial situation, but sometimes reality may get in the way. However, you have a few tricks in reserve next time you have an otherwise arbitrary design decision to make.
By the way, the perforated hole pattern at the bottom of the box may have some problems, details like holes too small and custom tooling required. If you spot any other opportunities for improvement, let me know!
Gerald would love to have you send him your comments and questions. You are not alone, and the problems you face often are shared by others. Share the grief, and perhaps we will all share in the joy of finding answers. Please send your questions and comments to dand@thefabricator.com.


The Fabricator is North America's leading magazine for the metal forming and fabricating industry. The magazine delivers the news, technical articles, and case histories that enable fabricators to do their jobs more efficiently. The Fabricator has served the industry since 1970.
start your free subscription
Easily access valuable industry resources now with full access to the digital edition of The Fabricator.

Easily access valuable industry resources now with full access to the digital edition of The Welder.

Easily access valuable industry resources now with full access to the digital edition of The Tube and Pipe Journal.

Easily access valuable industry resources now with full access to the digital edition of The Fabricator en Español.
In this episode of The Fabricator Podcast, Caleb Chamberlain, co-founder and CEO of OSH Cut, discusses his company’s...


