President
- FMA
- The Fabricator
- FABTECH
- Canadian Metalworking
Categories
- Additive Manufacturing
- Aluminum Welding
- Arc Welding
- Assembly and Joining
- Automation and Robotics
- Bending and Forming
- Consumables
- Cutting and Weld Prep
- Electric Vehicles
- En Español
- Finishing
- Hydroforming
- Laser Cutting
- Laser Welding
- Machining
- Manufacturing Software
- Materials Handling
- Metals/Materials
- Oxyfuel Cutting
- Plasma Cutting
- Power Tools
- Punching and Other Holemaking
- Roll Forming
- Safety
- Sawing
- Shearing
- Shop Management
- Testing and Measuring
- Tube and Pipe Fabrication
- Tube and Pipe Production
- Waterjet Cutting
Industry Directory
Webcasts
Podcasts
FAB 40
Advertise
Subscribe
Account Login
Search
21st century stamping material specifications
- By Edmund Herman
- July 11, 2006
- Article
- Bending and Forming
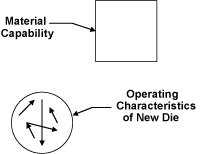 |
| Figure 1 The performance of a traditional new die is represented by the circle, and the capability of the sheet material is represented by the square. The arrows in the circle indicate that the die's performance can be altered with changes in the operating conditions. A new die is never in the operating window of the material. |
Art Hedrick's Die Science column in the May 2006 STAMPING Journal®, "Defining material specifications," related an all too familiar experience in which the allowable material variation exceeded the die and process capabilities. It is time to rethink the industry's approach to material specifications and standards and move it into the 21st century.
Rethinking the approach does not mean improving, or even changing, the material, only the way we quantify those materials we have. Advances in computer use throughout the sheet metal stamping industry have made the traditional approach to material specification, selection, and supply a crippling limitation on the stamping process. With today's technology, the situation reported by Hedrick should never happen, except with the old-fashioned practice for specifying sheet metal materials.
Traditional Methods
Traditionally the binder developments for sheet metal draw dies were created by pattern-makers who built shapes in plaster (and other easily worked materials) around a precision (usually wooden) model of the final part shape. The pattern-makers did not have the modern engineer's computational abilities, nor could they extract the measurements or modify designs as easily as is now possible with CAD systems. So, the constitutive equations that describe the physical behavior of the sheet metal in plastic deformation, the calculated effects of friction between the sheet metal and the die, and the kinematics of the sliding motion of the sheet metal in the die could not be used to help create the shape of the binder and the addendum material. Binder development was an experienced-based guess, and the resulting dies never worked. The dies were made to work (more or less) with a process called tryout. Tryout costs and lead-times equaled the time it took to construct the die.
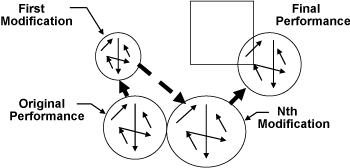 |
| Figure 2 After several die modifications, the die performance is compatible with the material under specific operating conditions |
The circle in Figure 1 represents the tryout die's performance. The material's ability to form into the die shape is illustrated by the square in the figure. Actual die performance can vary, as indicated by the arrows in the figure, by changing operating conditions such as binder force, lubrication, blank location, blank size, and blank shape. The tryout explores these "process" variables first and then goes through a series of modifications of the actual die shape, which changes the operating characteristics of the die as illustrated by the sequence of circles in Figure 2. Eventually, under specific operating conditions, the die produces acceptable parts as illustrated in the figure by the overlapping area of the circle and square. (In practice, the definition of "acceptable" changes as the start-of-production date nears and as the budget runs out.) At this point the die is pressed into service.
One problem with the tryout process is that the die will make acceptable parts only if it is used with the correct process settings. Operating personnel often find it difficult to keep the die operating within the narrow parameters required.
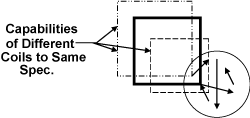 |  |
| Figure 3 Different sheet metal coils made to the same specification will perform differently. | Figure 4 The material should be specified to normal and reasonable steelmaking capability, and the die should be created to perform within that capability. |
Another problem is the one Hedrick described. The tryout material is nearly always from a single coil and represents one condition of the specified material. Material made to the specification will not always be the same as shown in Figure 3. A coil actually may have less total formability but work better in the die and therefore appear to be better material. Another coil might not work at all. But if the material variability can be reduced and the die's performance be better fitted to the material's capability, as shown in Figure 4, the problem (as Hedrick stated) will go away.
21st Century Methods
Today the constitutive equations that describe the physical behavior of the sheet metal in plastic deformation, the calculated effects of friction between the sheet metal and the die, and the kinematics of the sliding motion of the sheet metal in the die routinely are used to help create the shape of the binder and the addendum material. All design is done with CAD systems that allow the designer to retrieve any measurement needed.
In most instances the first design in the binder development process still is an experienced-based guess, but this guess is checked with computer simulations and modified until it works long before a physical die is built. (This author has packaged the equations into an Excel spreadsheet to help designers determine the correct sizing of the addendum and binder features as they are creating them the first time.) The resulting dies actually work when the material meets the performance characteristics assumed in the simulations.
Limited measurement, computing power, and capabilities are no longer issues. The design's fidelity is limited only by the designer's (or analyst's) knowledge of the range of the material's performance properties that can be expected during the product's life. As Hedrick so aptly pointed out, the industry's standards for the materials fall short. The material specifications do not support the engineering technologies that are in place today for both the product and die designs.
Next Steps
Each steel or aluminum mill has some intrinsic capability to meet a specification for a particular material grade, as depicted in Figure 5. If the capabilities of all mills for the same material grade are superimposed, industry capabilities can be quantified as shown in Figure 6. The industry standard for a specific grade should equal the industry's capability.
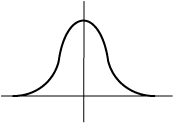 | 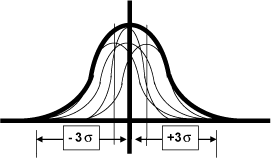 |
| Figure 5 Every material producer can produce within some pattern of variation. | Figure 6 The industry's capability of producing a specific grade of material can be quantified where each producer usually will have less variation than the total industry. |
Once the total variation range for a material grade is known, it now is technically possible to design stampings and the dies to make those stampings to work with that grade, or to determine which grade is required for the particular stamped part.
The next issue is to determine the meaningful measures to specify. Sheet metals traditionally have been specified by minimum yield strength, typical or minimum tensile strength, and sometimes by minimum or typical n and R values. In some instances, upper yield strengths are specified. Calculating material behavior during forming requires a reasonable description of the stress-strain curve as generated from a tensile test. The specification for a grade should therefore include two stress-strain curves that bound all acceptable material variation, as illustrated in Figure 7.
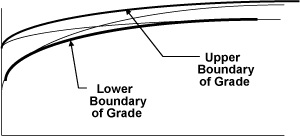 |
| Figure 7 The specification for a material grade can be described as two curves that bound all acceptable stress-strain curves. |
Since this article's whole argument is that the dies can and must be made robust to normal and reasonable material variation, it is not necessary to have the exact stress-strain curve representation. The so-called "power law" representation of the stress-strain curve is quite adequate. It also turns out that (for reasons beyond the scope of this article) the yield strength is not a good parameter to anchor the stress-strain curve, so the power law uses a parameter referred to as the K value. A modern and useful material specification will include, but not be limited to:
A set of k and n values that describe the upper boundary curve
A set of k and n values that describe the lower boundary curve
A maximum and minimum n value (to describe possible and likely shape variations within the boundaries)
Maximum and minimum R-bar and delta R values
The specification also can include the allowable range of yield strengths, or it can have a range of another parameter e0 instead of the yield strength. Forming the part in the draw die increases the yield strength significantly (the specific amount is known from the computer simulations), so the actual yield strength of the purchased material is nearly irrelevant.
Significance
The archaic practice for specifying sheet metals is a major road block to maximizing their usefulness. The practice must be updated to be compatible with the industry's engineering capabilities if a material's full potential is to be realized.
About the Author
Edmund Herman
Creative Concepts Co.
P.O. Box 183072
Shelby Township, MI 48315
586-532-0063
subscribe now

The Fabricator is North America's leading magazine for the metal forming and fabricating industry. The magazine delivers the news, technical articles, and case histories that enable fabricators to do their jobs more efficiently. The Fabricator has served the industry since 1970.
start your free subscription- Stay connected from anywhere

Easily access valuable industry resources now with full access to the digital edition of The Fabricator.

Easily access valuable industry resources now with full access to the digital edition of The Welder.

Easily access valuable industry resources now with full access to the digital edition of The Tube and Pipe Journal.
- Podcasting
- Podcast:
- The Fabricator Podcast
- Published:
- 04/16/2024
- Running Time:
- 63:29
In this episode of The Fabricator Podcast, Caleb Chamberlain, co-founder and CEO of OSH Cut, discusses his company’s...
- Trending Articles
AI, machine learning, and the future of metal fabrication

Employee ownership: The best way to ensure engagement

Steel industry reacts to Nucor’s new weekly published HRC price

Dynamic Metal blossoms with each passing year

Metal fabrication management: A guide for new supervisors

- Industry Events
16th Annual Safety Conference
- April 30 - May 1, 2024
- Elgin,
Pipe and Tube Conference
- May 21 - 22, 2024
- Omaha, NE
World-Class Roll Forming Workshop
- June 5 - 6, 2024
- Louisville, KY
Advanced Laser Application Workshop
- June 25 - 27, 2024
- Novi, MI


