- FMA
- The Fabricator
- FABTECH
- Canadian Metalworking
Categories
- Additive Manufacturing
- Aluminum Welding
- Arc Welding
- Assembly and Joining
- Automation and Robotics
- Bending and Forming
- Consumables
- Cutting and Weld Prep
- Electric Vehicles
- En Español
- Finishing
- Hydroforming
- Laser Cutting
- Laser Welding
- Machining
- Manufacturing Software
- Materials Handling
- Metals/Materials
- Oxyfuel Cutting
- Plasma Cutting
- Power Tools
- Punching and Other Holemaking
- Roll Forming
- Safety
- Sawing
- Shearing
- Shop Management
- Testing and Measuring
- Tube and Pipe Fabrication
- Tube and Pipe Production
- Waterjet Cutting
Industry Directory
Webcasts
Podcasts
FAB 40
Advertise
Subscribe
Account Login
Search
Controlling slug pulling with hole lapping
A step-by-step method to eliminate the problem
- By Wilson J Cubides
- January 15, 2008
- Article
- Bending and Forming
Ever since the invention of the die and punch, the die industry has been plagued by punched slugs pulling up as the punch leaves the die. These slugs embed themselves into the hole cavity that was just made, impeding the forward advancement of the strip. High speed and thin materials can sometimes exacerbate this condition.
While knockout pins often are installed in the punches for slug control, they cannot be installed in very small punches. In the semiconductor industry, for instance, 30 to 60 punches with diameters of less than 0.042 inch and shaving punches with diameters around 0.056 in. might have to perforate material from 0.032 to 0.056 in. at speeds of 300 to 450 strokes per minute. Knockout pins cannot be used in this case. But if any of those slugs were to pull up, it could result in the machine being stopped, production being stopped, or, worse yet, a miss that causes breakage of the small carbide pilots, wiping out the day's production.
The use of progressive dies, coupled with high speed and a great number of punches, contributes to this problem. As presses run faster, slugs must not be too tight; otherwise, punches can break. More clearance may be provided between the punch and die to try to solve this problem, but then the slug might pull up. The greater the number of punches, the more possibilities of a slug pulling though the strip.
Of course, it takes just one slug to stop the strip. And when the strip stops, the press will stop, an expensive miss might happen, the press will have to be started again, the natural production flow will stop, and production numbers will suffer.
Slug-pulling Solutions
Sometimes holes are made with an initial straight top land of 0.060 to 0.125 in. to prevent slugs from pulling up. Other holes are tapered from 0.15 to 0.5 degree to allow the slug's easy exit. Either method works well 99 percent of the time. With two punches, you might just put up with the 1 percent failure rate, but with four punches, the chances of failure or slugs pulling up have just doubled.
Over the years diemakers have offered a variety of solutions for slug-pulling problems, such as knockout pins, vacuums, punch or die dulling, oil viscosity, wire EDM hole slots, punch/die clearance changes, edge shearing, mechanical grippers, air jets, and cup-shaped punches.
At one time or another, each of these solutions has been the correct one for a particular application at a particular time. None of these solutions is incorrect. Each is valuable if it serves to correct and prevent the problem of slug pulling. This method is most valuable in holes with a shaved slug.
Hole Lapping to Prevent Slug Pulling
Another method to help stop slug pulling is bell-mouthing the die, which essentially involves cutting a funnel shape around the hole. If done properly, it needs to be done just once, when a die is new or any time after a steel or carbide section is ground. It does not need to be done again after the next sharpening.
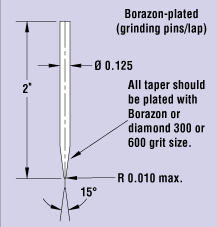
The tool is made from a simple 1⁄8-in.-diameter rod, with a tip ground at a 15- degree included angle to a sharp point and then coated. Any grit higher than 300 to 600 works well, and the finer the grit, the easier it is to control the shaping or the bell-mouth desired on the die cavity.
The execution of this task might sound a little difficult at first, but it quickly becomes routine. It begins with a tool (see Figure 1) that helps lap the top of the hole with a consistent angle. The operation can be made on the drill press with speeds of about 2,500 RPM or faster. Make sure the table of the drill press and the die section are clean so that the die section moves easily on top of the drill table. Otherwise, place a clean piece of paper between the die and table to allow for easy movement.

Figure 1A method to help stop slug pulling is bell-mouthing the die, which essentially involves cutting a funnel shape around the hole. It begins with a tool that helps lap the top of the hole with a consistent angle.
Once the die is in position and the lapping tool chucked to run as true as possible, set the spindle to run at 2,500 RPM or faster. As the spindle turns, bring the lapping tool into the hole. As you start to make contact with the die, you must maintain two distinctive movements: the up and down slow motion of the lap and the circular motion of the die around the lap.
Try to lap about a 0.010-in. to 0.015-in. zone into each hole. The best way to measure is by comparison under a microscope, looking at your scale and the die cavity. Remember that while you are lapping the hole, you must continue the up-and-down movement as you move the die section circularly around the lap to prevent grooving the lap or distorting the hole. As you lap the hole, do not push too hard against the lap; pressure must be minimal to allow the lap to cut.
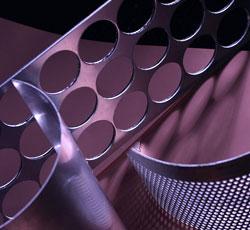
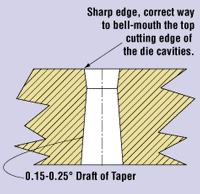
At the end of this operation, the hole mouth should appear as in Figure 2,with a sharp cutting edge all around the hole.Figure 3shows the effects of an incorrectly radiused edge: dull edges that in turn will develop a burr.
The Results
When the edge geometry is correct, the first 0.010 to 0.015 in. of the top of the die has a negative draft that is larger on top and smaller at the bottom. As the punches perforate the material, the slug will be choked or retained by the negative draft. The slug at the bottom of the stroke may or may not pass this point; it does not matter, because the slug will be trapped at this zone. Once the slug passes this tight zone, it enters the zone of positive draft—the original taper in the hole—and exits with no resistance.
The bell-mouthing method can eliminate slug pulling, increase punch/die clearance, retain the slug, and increase punch life and press uptime.
Maintaining the Funnel Edge
As the die wears out (seeFigure 4), the original funnel shape at the top of the die gets longer, and the cutting edge becomes dull. The worn-out zone is easily visible under a good stereoscopic microscope, allowing you to assess how much to grind.
The trick is not to whip out the entire funnel shape, or all of the cutting cavities might have to be funneled again. In general, 0.003 to 0.005 in. is enough to re-establish a good cutting edge, but it will depend on the depth of the worn-out zone as viewed through the microscope.
About the Author
Wilson J Cubides
625 Joyce Kilmer Ave.
New Brunswick, NJ 08901
732-545-8888
subscribe now

The Fabricator is North America's leading magazine for the metal forming and fabricating industry. The magazine delivers the news, technical articles, and case histories that enable fabricators to do their jobs more efficiently. The Fabricator has served the industry since 1970.
start your free subscription- Stay connected from anywhere

Easily access valuable industry resources now with full access to the digital edition of The Fabricator.

Easily access valuable industry resources now with full access to the digital edition of The Welder.

Easily access valuable industry resources now with full access to the digital edition of The Tube and Pipe Journal.
- Podcasting
- Podcast:
- The Fabricator Podcast
- Published:
- 04/16/2024
- Running Time:
- 63:29
In this episode of The Fabricator Podcast, Caleb Chamberlain, co-founder and CEO of OSH Cut, discusses his company’s...
- Industry Events
16th Annual Safety Conference
- April 30 - May 1, 2024
- Elgin,
Pipe and Tube Conference
- May 21 - 22, 2024
- Omaha, NE
World-Class Roll Forming Workshop
- June 5 - 6, 2024
- Louisville, KY
Advanced Laser Application Workshop
- June 25 - 27, 2024
- Novi, MI


