


Contributing Writer
Taking a little extra time when performing routine maintenance on your stamping tools can produce big dividends in tool life and reliability.
Production stamping tools typically use hardened tool steel insert components, such as punches, matrixes, and die steels, to perform cutting, perforating, and blanking operations. The cutting edges of these components require routine maintenance to keep them sharp.
As these components wear, perforated holes get smaller, trim dimensions change, and burrs become larger. To reduce wear and related problems, either the face (working end) of the punch and matrix or the top surface of a die plate is sharpened by grinding to restore the cutting edge.
Questions to ask about punch and matrix sharpening are: How far should I grind the punch? and Should the matrix also be sharpened?
Enough material needs to be removed to restore the profile (cutting dimensions). The wear-affected area typically is equal to the amount of burnish or shear in the hole of the part material and will vary depending on the clearance between the punch and matrix. Because a punch wears much faster than the matrix, the matrix may need to be sharpened only a half to a third as often as the punch.
Sharpening punch and matrix components with surface treatments such as nitride, titanium nitride, and titanium carbonitride also raises a question: Will the surface treatment lose its effectiveness after it has been removed from the face after the first sharpening?
While a surface-treated component may lose a portion of the treatment's initial benefit, it still should outperform an untreated component. Additionally, with their superior wear resistance, surface-treated components will require less material removal during sharpening, which in turn will reduce the frequency of their replacement.
 |
| Figure 1: To ensure proper pin extension when sharpening, insert a keeper key into the side vent hold of the punch to retain the ejector pin while grinding. |
Punches with ejector pins require extra attention in the sharpening process. One of two approaches can be taken to ensure proper pin extension after sharpening.
One approach is to remove the ejector pin from the punch, grind equal amounts from the end of the pin and punch, and reassemble the components. To avoid potential ejector pin head breakage and spring failure, it is important that you do not overenter the set screw at assembly. Ideally, the set screw should be entered just flush with the mounting surface end of the punch.
The best approach to ensure proper pin extension when sharpening is to insert a keeper key into the side vent hole of the punch to retain the ejector pin while grinding (see Figure 1).
While all of this may appear to be basic, take precautions when sharpening punch, matrix, and die components to eliminate damage caused by heat buildup and to provide a smooth cutting edge. This heat can be particularly damaging to wear-resistant surface treatments.
|
| Figure 2: To ensure proper pin extension when sharpening, insert a keeper key into the side vent hold of the punch to retain the ejector pin while grinding. |
These precautions require a little extra time. If the heat generated in the sharpening process is too great, tool life will be shortened.Most grades of tool steels possess good through-hardening characteristics, which means that the hardness is consistent throughout the entire part. Likewise, wear resistance and strength will be consistent throughout the part. If a tool steel component wears prematurely, or it chips or breaks after sharpening, it likely has suffered from some form of surface-grinding damage.
To understand how to prevent grinding damage, it is important to know how it occurs and what the residual effects are.
Grinding operations inherently heat the immediate surface of the part being ground, causing that surface to expand (see Figure 2). If the heat is great enough to cause the outer surface to expand significantly faster than the rest of the part, it creates stress and tension between the hot surface and a much cooler center. As the part cools, the surface generally becomes softer, reducing its strength and wear resistance while creating even greater stress in the part. In cases of severe grinding heat, some tool steels reharden as they cool, masking the damage.
The severity of the damage can range from minor surface stress, which may be undetectable to the naked eye, to obvious discoloration, cracks, and flakes. If in fact there are any visible signs of cracks or burn, that item is severely damaged and is likely beyond repair.
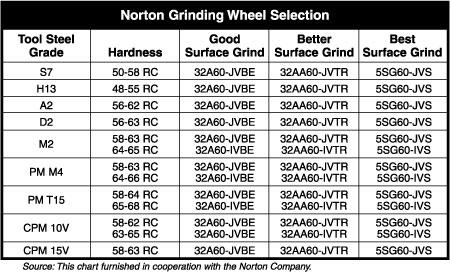 |
| Figure 3: A grinding wheel chart can help determine the best wheel for a particular application. |
The following options can help to minimize potential grinding damage. Selecting a tool steel grade with good temper resistance is a good place to start. Look for tool steel grades with relatively high levels of refractory elements, such as tungsten, molybdenum, and cobalt. Grades such as A2 and D2 have minimal amounts of these elements and therefore are prone to heat-related damage at temperatures as low as 350 degrees F.
Tool steels with accumulative amounts of tungsten, molybdenum, and cobalt that meet or exceed the levels found in M2 steel generally are considered to be high-speed steels. These grades of tool steels, when tempered at or higher than 1,000 degrees F, typically can withstand heat up to approximately 900 degrees F, giving them considerable advantage over cold-work tool steels.
The potential for grinding damage also can be affected by grinding wheel selection and the type of grinder used. Take care to select the best grinding wheel for a particular tool steel grade and hardness.
A relatively coarse-grit grinding wheel with a soft bond can remove the greatest amount of material with the least burning. Unfortunately, it is difficult to hold size and provide a smooth surface with this type of wheel.
As the wheel grit becomes finer and the bond becomes harder, the potential for grinding damage becomes greater. The ideal action when removing large amounts of material may be to rough-grind the punch or matrix using a coarse wheel, and finish grinding with a fine-grit wheel. This, however, requires additional time to change and dress two wheels.
To help determine the best grinding wheel for your application, refer to the grinding wheel chart in Figure 3, or contact your grinding wheel supplier for recommendations.
To save time, it may be tempting to use a hand grinder to sharpen punches while the die is still in the press. Although this is relatively easy to do, it is nearly impossible to control feed rate, surface finish, or potential for burn. When sharpening tooling components, take the time to set the part up on a surface grinder with a flood coolant. And always remember to remove the grinding burr with a stone and demagnetize the sharpened component before putting it back into service.


The Fabricator is North America's leading magazine for the metal forming and fabricating industry. The magazine delivers the news, technical articles, and case histories that enable fabricators to do their jobs more efficiently. The Fabricator has served the industry since 1970.
start your free subscription
Easily access valuable industry resources now with full access to the digital edition of The Fabricator.

Easily access valuable industry resources now with full access to the digital edition of The Welder.

Easily access valuable industry resources now with full access to the digital edition of The Tube and Pipe Journal.

Easily access valuable industry resources now with full access to the digital edition of The Fabricator en Español.
In this episode of The Fabricator Podcast, Caleb Chamberlain, co-founder and CEO of OSH Cut, discusses his company’s...


