- FMA
- The Fabricator
- FABTECH
- Canadian Metalworking
Categories
- Additive Manufacturing
- Aluminum Welding
- Arc Welding
- Assembly and Joining
- Automation and Robotics
- Bending and Forming
- Consumables
- Cutting and Weld Prep
- Electric Vehicles
- En Español
- Finishing
- Hydroforming
- Laser Cutting
- Laser Welding
- Machining
- Manufacturing Software
- Materials Handling
- Metals/Materials
- Oxyfuel Cutting
- Plasma Cutting
- Power Tools
- Punching and Other Holemaking
- Roll Forming
- Safety
- Sawing
- Shearing
- Shop Management
- Testing and Measuring
- Tube and Pipe Fabrication
- Tube and Pipe Production
- Waterjet Cutting
Industry Directory
Webcasts
Podcasts
FAB 40
Advertise
Subscribe
Account Login
Search
Using NDT systems to monitor welded tube production
Two methods are better than one
- By Christopher McAllister, Don Wells, Donald Bugden, Greg Maurer, and Kris Whitmore
- November 15, 2001
- Article
- Testing and Measuring
Although tube producers almost universally accept that using some form of nondestructive testing (NDT) is a requirement in tube production, many place too much emphasis on cost when purchasing test equipment.
Any savings realized in the purchase price can quickly evaporate if an inappropriate or inadequate system is put into service. Rather than basing a purchasing decision on price, tube producers should consider how the equipment finds defects and how the test results will be used.
Tube producers can choose from two main types of NDT equipment—eddy current and ultrasonic—each of which has capabilities and limitations. Tube producers should thoroughly investigate both types before selecting a system. Making an uninformed choice can cut into profits because of missed defects or decreased yield. A practical approach requires investing in results—not hardware.
Types of Defects and Methods of Finding Them
Defects usually are classified into two categories—major flaws that can cause tube failure and minor variances that have no effect on tube use.
Which category a defect fits into depends on the nature and magnitude of the defect and the tube's intended use. A tube with a small defect might be acceptable for use as a handrail; the same tube with the same defect might not be acceptable for carrying liquids under high pressure.
Missed Defects. Using a test method that is not sensitive enough can result in shipping defective tubes. A defective product can fail during a subsequent fabrication process or after it has been installed and put into service.
The costs of shipping such defective product are difficult to quantify. However, the risks and costs associated with repairs, loss of customers, or subsequent legal action are potentially huge—they are the main impetus for installing NDT equipment in the first place. To protect themselves against these losses, tube producers need to answer the following questions:
- What types of defects are likely to occur as a result of the production process and at what stage are they introduced?
- Which variances in the tubular product are tolerable? Which defects may lead to failure?
- Which variances can only an eddy current test find? Which can only an ultrasonic test find? Which variances can either method detect?
Decreased Yield. Pushing an NDT method or device beyond its inherent capability—for instance, increasing the sensitivity setting to identify every imperfection as a defect—to prevent shipping defective products results in unnecessary amounts of scrap. Furthermore, the simplistic assumption that using both eddy current and ultrasonics on the same product will produce too much scrap does not take into account each method's unique capabilities to detect different types of defects.
It also does not take into account that choosing eddy current and ultrasonic devices that incorporate sophisticated options to enhance the ability to distinguish between detrimental defects and innocuous variations should actually reduce scrap.
The use of two methods together, with each set up to detect a specific type of defect that is within its realm of reliability, creates a synergy that can't be obtained by using one method alone.
Test Procedures and Results. Individual procedures are available from the American Society for Testing and Materials (ASTM) and other institutions that prescribe recommendations for eddy current or ultrasonic testing on tubular products. At this time no procedure exists that covers a system that incorporates the two methods simultaneously.
The Little Rock Division of Wheatland Tube Co., Little Rock, Ark., recognized the need to enhance its existing NDT capabilities and proceeded to use both types of equipment and devise its own testing procedure. However, the company's intent is not to merely ship tube that passes the tests; the driving force behind expanding the company's testing capabilities is to ship tube that meets or exceeds customer expectations.
Adding an ultrasonic system and upgrading its existing eddy current equipment improved defect detection as well as on-time information to the tube mill operators. The results were improved product yield, reduced shipments of nonconforming product, and a higher level of confidence in overall product quality.
Operating NDT Systems
Before incorporating and operating eddy current and ultrasonic NDT systems, it is critical to consider the capabilities of each method, take advantage of computer-based instrumentation, and calibrate the equipment and document the calibration and the results.
Method Capabilities. Eddy current testing and ultrasonic testing each has inherent capabilities that are superior to the other method for specific criteria. For tube production applications, which require high throughput speeds for maximum profitability, eddy current testing is well-suited to detecting small, short, incomplete welds; inclusions; voids; or cavities.
Ultrasonic testing normally is used to find long, continuous defects, such as incomplete seam welds. It is possible to use ultrasonic testing to find small defects; however, this requires transducers with limited beam coverage. Effective use of this type of transducer requires reducing the tube mill throughput to unacceptably slow speeds.
Computer-based Instrumentation. The capabilities of each type of instrument are based on the power of computers. In general, these are:
- Options for testing parameters, such as multiple channels, choice of frequency, and choice of test modes.
- Options for signal processing and analysis, such as time-based gates, multiple thresholds, and logic for discarding spurious signals.
- Choices for data processing and analysis for comparison to eventual destructive evaluation of rejects.
Options for data storage in terms of quantity, detail, and duration.
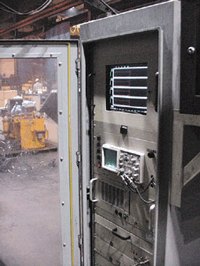
Figure 1 shows a computer-based ultrasonic instrument, including a four-channel electronic strip chart.Calibration and Recordkeeping. Before initiating the dual test method on the mill, personnel from three companies—the quality assurance and manufacturing group of Wheatland Tube Co. and technical services representatives from Magnetic Analysis Corp. and Reliant Technologies—reviewed specific requirements and objectives.
As demonstrated at Wheatland, once the methods and apparatus are chosen, it is critical that they are calibrated using optimum settings for the product being run to detect defects with a high level of repeatability while still maintaining maximum yield.
Because the NDT equipment very often is inserted into a production line—in this case, a welded-tube mill— changeovers often are done by the quality technicians, who also document the calibrations and the ultimate results of the testing. Permanent records can be integrated with tube mill processing reports to verify that the testers were calibrated properly and to document the results.
Figure 2 shows a computerized eddy current station. The coils through which the tube passes are seen to the right. Figure 3 is a close-up view of those coils.
The ability to store setups for a variety of products permits NDT specialists to take advantage of the sophisticated signal processing capabilities available in computer-based instruments, while delegating to the production worker only the simple task of recalling the appropriate setups from the instrument memory. These computer-based features provide a means of ensuring that a certified NDT technician has originated the test parameters.
For welded tubing, eddy current systems typically are calibrated using drilled holes and filed transverse notches as artificial defects. Ultrasonic systems usually are calibrated using longitudinal notches along the inside diameter (ID) and outside diameter (OD).
Calibrating an eddy current system to ultrasonic standards or an ultrasonic system to eddy current standards to meet customer specifications very well may lead to an excessive number of rejects—a result that easily negates any apparent savings from investing in and operating only one test method.
To meet the customer's full range of specifications, using both methods may be the most economical and accurate in the long run. Figure 4 shows an ultrasonic transducer system mounted on a mill. The ultrasonic system has the ability to track the weld as it wanders from its nominal circumferential location, as it is prone to do on small-diameter tubing.
The Results of Using a Combination System
Figure 5 shows a weld defect detected by both the eddy current and ultrasonic systems. Figure 6 shows a pinhole detected by the eddy current system but not the ultrasonic system. Figure 7 is a microphotograph of a cross section of the tube wall showing a long weld flaw detected by the ultrasonic system but not the eddy current system.
The current technologies available for eddy current and ultrasonic test equipment, with their individual defect detection capabilities, have added to their ease of operation and interpretation, with minimal operator input. Using the two technologies together can be a positive and effective method for enhancing product quality and customer satisfaction.
About the Authors
Christopher McAllister
8200 Frazier Pike
Little Rock, AR 72206
501-490-1900
Don Wells
President
Route 1 P.O. Box 143
Linden, TX 75563
903-756-5656
Donald Bugden
535 S. 4th Ave.
Mount Vernon, NY 10550
914-699-9450
Greg Maurer
Quality Assurance Manager
8200 Frazier Pike
Little Rock, AR 72206
(501)-490-1900
Kris Whitmore
General Foreman, Quality Control
1 Council Ave.
Wheatland, PA 16161
724-342-6851
About the Publication
subscribe now

The Tube and Pipe Journal became the first magazine dedicated to serving the metal tube and pipe industry in 1990. Today, it remains the only North American publication devoted to this industry, and it has become the most trusted source of information for tube and pipe professionals.
start your free subscription- Stay connected from anywhere

Easily access valuable industry resources now with full access to the digital edition of The Fabricator.

Easily access valuable industry resources now with full access to the digital edition of The Welder.

Easily access valuable industry resources now with full access to the digital edition of The Tube and Pipe Journal.
- Podcasting
- Podcast:
- The Fabricator Podcast
- Published:
- 04/16/2024
- Running Time:
- 63:29
In this episode of The Fabricator Podcast, Caleb Chamberlain, co-founder and CEO of OSH Cut, discusses his company’s...
- Trending Articles
Team Industries names director of advanced technology and manufacturing

Orbital tube welding webinar to be held April 23
Chain hoist offers 60-ft. remote control range
Push-feeding saw station cuts nonferrous metals
Corrosion-inhibiting coating can be peeled off after use

- Industry Events
16th Annual Safety Conference
- April 30 - May 1, 2024
- Elgin,
Pipe and Tube Conference
- May 21 - 22, 2024
- Omaha, NE
World-Class Roll Forming Workshop
- June 5 - 6, 2024
- Louisville, KY
Advanced Laser Application Workshop
- June 25 - 27, 2024
- Novi, MI


