Contributing Writer
- FMA
- The Fabricator
- FABTECH
- Canadian Metalworking
Categories
- Additive Manufacturing
- Aluminum Welding
- Arc Welding
- Assembly and Joining
- Automation and Robotics
- Bending and Forming
- Consumables
- Cutting and Weld Prep
- Electric Vehicles
- En Español
- Finishing
- Hydroforming
- Laser Cutting
- Laser Welding
- Machining
- Manufacturing Software
- Materials Handling
- Metals/Materials
- Oxyfuel Cutting
- Plasma Cutting
- Power Tools
- Punching and Other Holemaking
- Roll Forming
- Safety
- Sawing
- Shearing
- Shop Management
- Testing and Measuring
- Tube and Pipe Fabrication
- Tube and Pipe Production
- Waterjet Cutting
Industry Directory
Webcasts
Podcasts
FAB 40
Advertise
Subscribe
Account Login
Search
GTAW the thin line
Best practices prevent common problems when welding thin material
- By Jack Fulcer
- August 26, 2008
- Article
- Arc Welding
Thin is in—for materials, that is. Because of stringent weight, space, and design requirements in sectors ranging from tube processing to aerospace, more applications frequently call for materials such as stainless steel, mild steel, and aluminum inch and thinner. And often these applications specify gas tungsten arc welding (GTAW).
GTAW creates a narrower heat-affected zone (or HAZ, the area between the weld deposit and the base metal) compared to other welding processes. This is important, because the less heat generated when welding thin materials, the less chance of problems like burn-through or warping.
Other problems when welding in. or thinner materials include starting or stopping porosity and pinholes, small areas in the weld caused by gas entrapment from either the atmosphere or the shielding gas. Some materials, like stainless steel, tend to buckle and crack with too much heat.
While these problems have solutions, the goal in GTAW of thin materials is to prevent the problems in the first place. A few best practices can help.
Power Up: Machine Selection and Parameters
Aluminum that is in. or thinner is best welded with an AC inverter with square-wave technology, available from most power source manufacturers. It provides a narrow and focused arc; and when the foot pedal is pressed, the arc initiates almost immediately. This minimizes heat input and lessens the chance of burn-through. These inverters also offer continuous high-frequency arc starts, which help sustain the arc at the necessary low beginning amperages. Aluminum also can be welded using a pulsing power source, which varies the current from a high peak amperage to a low background amperage, also minimizing heat.
Maintaining the correct parameters is crucial when welding thin aluminum with AC. A range of 3 to 200 amps is recommended. Keep the amperage setting toward the low end for aluminum thicknesses from 0.040 to 0.060 in., and increase accordingly toward 200 amps for aluminum closer to in. thick. Set the balance control toward the electrode positive (EP) around 60 percent. This will provide ideal cleaning action to remove aluminum's oxide layer, which has a higher melting temperature than the base material: The oxides melt at approximately 3,600 degrees F, and the aluminum melts at 1,260 degrees F. If the oxide layer isn't removed through cleaning action—provided by that 60 percent EP side of the AC waveform—the process must use excess heat to melt through the oxide layer. That excess heat makes the aluminum base metal prone to burn-through.
To gas tungsten arc weld materials such as thin stainless steel and mild steel, choose a DC power source with high-frequency arc-starting capabilities. A standard DC power source or an inverter-based machine will provide good results, but an inverter offers reliable low-amperage arc starts and a narrow, focused arc to lessen the chance of burn-through. Set either type of machine on straight polarity (DCEN, or direct current electrode negative). The recommended amperage range for DC welding thin mild or stainless steel is 1 to 200 amps.
Consumables: Be Choosey
A pointed, 2 percent ceriated (color code: orange) tungsten is recommended for welding -in. and thinner materials. Ceriated tungsten provides good arc starting at low amperages, as well as arc stability in both AC and DC. For materials 14 gauge (0.07470 in.) to 30 ga. (0.00120 in.), choose a 1/16-in.-diameter tungsten. A 3/32-in.-diameter tungsten will work better for materials 12 ga. (0.146 in.) up to in. thick.
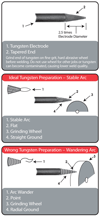
When grinding tungsten to a point, take care to do so lengthwise. Do not grind around the end of the tungsten as it creates ridges that can cause arc wandering (see Figure 1). Use a grinding wheel (250 grit or finer) designated for the intended purpose to avoid contamination that can lead to arc trouble or weld discontinuities.
The type of filler metal to use will depend more on the workpiece material than its thickness. However, because less filler metal is needed to weld thin material, choose a small-diameter rod. For example, when welding 0.010- to 0.060-in.-thick material, choose a 1/16-in.-diameter rod. For thicker materials up to 1/4 in., use a 3/32-in.-diameter filler metal. Both diameters are available in industry-standard cut lengths of 36 in. for GTAW on most materials.

Figure 1 Click image to view larger Grind the tungsten lengthwise for the best results. Grinding the tungsten around its end can create ridges that cause the arc to wander.
The two most common filler metals for AC GTAW of aluminum are ER4043 and ER5356 (ER designates the filler is for GTAW). For DC welding stainless steel, the filler metal choice depends on the AISI stainless steel type, as shown in Figure 2.
Next, choose the right torch. A 200-amp (maximum) torch can weld -in. and thinner materials and comes in air- or water-cooled models. Which torch you choose will depend on the weld location, on personal preference, and the equipment available.
Air-cooled torches, which are less expensive than water-cooled ones, do not require a water cooler, which makes them highly portable. However, they tend to be a bit heavier and larger, and may be more difficult to maneuver. Choose one in the 150-amp range, as it will be slightly lighter and easier to control on thin materials. If you have a power source with an integrated or separate water cooler, a water-cooled torch offers the advantage of a smaller handle and body, lighter weight, and the ability to reach into smaller or difficult-to-reach joints.
With either torch, consider using a gas lens as added protection against problems such as pinholes and starting porosity. This lens replaces the standard collet body and helps improve shielding gas coverage. A typical gas lens consists of a copper and/or brass body with layered mesh screens of stainless steel that help evenly distribute the shielding gas around the tungsten and along the weld pool (see Figure 3).
Perfecting Prep and Technique
Final steps that can help ensure welding success on thin materials include proper joint preparation; fixturing (when needed); and some good, basic GTAW technique.
It is common to create a butt, lap, or inside-outside corner joint when welding thin aluminum with AC. Thin materials welded with DC, on the other hand, tend to encompass a wider range of configurations, including fillet welds, outside corners, and pipe bevel joints. In all instances, the tolerances must be tight to prevent problems. Gaps between two pieces of thin material require more filler metal to fill in the space and create a sound weld. Filler metal, however, requires more heat to melt, which on thin metal can cause burn-through or warping.
To avoid this, ensure tight joint fit-ups. If necessary, place small tack welds along the joint or clamp the materials together. In high-production applications that require repeatable welds, fixturing may be a viable option. For smaller parts, stick to good joint preparation and tack welds as a best precaution.
Finally, use the same reliable GTAW techniques for welding -in. or thinner materials as you would for thicker ones. Be certain to find a comfortable position, brace yourself against a table or the workpiece if needed, and hold the torch in a way that offers the most control. Many welding operators prefer to hold the torch like a pencil.
A torch angle of 5 to 20 degrees perpendicular to the base material offers good visual control over travel speed and maintains optimal shielding gas coverage and arc length. Hold the torch approximately 1/8 in. away from the base material to maintain a focused, stable arc. The trick, especially with thin materials, is to keep the arc length consistent so that it doesn't wander or become too broad, both factors that can lead to excess heat and poor weld results. Practice is the best recommendation for achieving this consistency.
A steady travel speed is very important when welding thin material; lingering too long in one area can cause heat buildup and increase the chances of burn-through. It will also create an unnecessarily wide weld bead. Use the push technique, moving the torch so that the weld pool is always visible and ahead of the torch. A good rule is to move the torch and add filler metal at a pace that creates a weld approximately twice the size of the tungsten being used. This travel speed also will ensure good shielding gas coverage for top-quality welds on thin materials.
Low Heat, Tight Control, Good Weld
As with any precision process, GTAW of thin material takes practice and patience. However, maintaining the correct power source parameters, minimizing heat input, choosing the right consumables, and using proven techniques can prevent many of the common problems—and preventing these problems is better than fixing them after the fact.
About the Author
Jack Fulcer
2741 N. Roemer Road
Appleton, WI 54911
800-752-7620
Related Companies
subscribe now

The Fabricator is North America's leading magazine for the metal forming and fabricating industry. The magazine delivers the news, technical articles, and case histories that enable fabricators to do their jobs more efficiently. The Fabricator has served the industry since 1970.
start your free subscription- Stay connected from anywhere

Easily access valuable industry resources now with full access to the digital edition of The Fabricator.

Easily access valuable industry resources now with full access to the digital edition of The Welder.

Easily access valuable industry resources now with full access to the digital edition of The Tube and Pipe Journal.
- Podcasting
- Podcast:
- The Fabricator Podcast
- Published:
- 04/16/2024
- Running Time:
- 63:29
In this episode of The Fabricator Podcast, Caleb Chamberlain, co-founder and CEO of OSH Cut, discusses his company’s...
- Trending Articles
Capturing, recording equipment inspection data for FMEA

Tips for creating sheet metal tubes with perforations

Are two heads better than one in fiber laser cutting?

Supporting the metal fabricating industry through FMA

Hypertherm Associates implements Rapyuta Robotics AMRs in warehouse

- Industry Events
16th Annual Safety Conference
- April 30 - May 1, 2024
- Elgin,
Pipe and Tube Conference
- May 21 - 22, 2024
- Omaha, NE
World-Class Roll Forming Workshop
- June 5 - 6, 2024
- Louisville, KY
Advanced Laser Application Workshop
- June 25 - 27, 2024
- Novi, MI


