Contributing Writer
Paying close attention to filler metal selection, cleanness, and use of the shielding gas are three steps to successful TIG welding titanium tube and pipe.
Titanium is 45 percent lighter than steel, 60 percent heavier than aluminum, and more than three times stronger than either of them. While it is much more expensive than many other metals, it has greater corrosion resistance, lower life-cycle costs, longer service life, and drastically lower maintenance and repair costs than most. Common applications for titanium include military, aerospace, marine, chemical, power generation, oil and gas extraction, and medical devices.
Titanium is a reactive metal that interacts readily with oxygen, making it prone to oxidization and contamination, and making it difficult to weld. However, meticulous preparation, a steady hand, and lots of practice lead to successful welds.
This article focuses on gas tungsten arc welding (GTAW, also known as TIG welding, or tungsten inert gas welding) on titanium tube and pipe using ASTM Grade 5 titanium (Ti6Al4V) as a reference.
Welding titanium tubing requires extreme cleanness—the base metal, filler metal, and welding environment must be immaculate. Contamination by natural body oils, oils from the forming and drawing process, shop dust, paint, dirt, cutting fluids, and lubricants all can lead to embrittlement and weld failure.
Start by cleaning the work area and ridding it of any debris, and be certain to choose a place with minimal airflow so as not to disturb the shielding gas during welding. Next degrease both the filler rod and the base metal: Wear nitrile gloves dedicated to this purpose to prevent body oils from rubbing off on these items. Then apply methyl ethyl ketone (MEK) to a clean, lint-free cloth and wipe the titanium to remove any remaining surface contamination. At this point place the filler rod into an airtight container to prevent further contamination.
Before welding, remove the oxide scale, which forms when the titanium reacts with oxygen, from the surface of the tubing. This oxide layer provides titanium with its notable corrosion resistance. Still, it must be removed before welding because it melts at a higher temperature than titanium and can enter the molten weld pool to create inclusions that weaken the weld.
Either a die grinder with a carbide deburring tool or a carbide file—both dedicated to titanium—works best to remove the oxide layer from the weld joint. Steel wool and abrasives are not recommended because they can cause contamination. Remember to use a low grinding speed to prevent excessive heat. Wipe the joint once more with MEK or acetone-soaked cloth after the oxide layer has been ground away. Wait for the solvent to fully evaporate before striking an arc, because some solvents have low flash points.
Joint fit-up is arguably more important on titanium tubing than on any other metal tubing because it is critical to prevent oxygen from entering the weld. The joint should be square (do not create a V-notch), which helps minimize the amount of heat and weld metal needed to fill the joint; this in turn lowers the chance of burn-through and contamination.
Clamp the pieces into a positioner or on a workstation to make sure the two ends are butted together as tightly and accurately as possible.
You do not need to preheat most thin-wall titanium tubing and pipe. However, consult with your welding equipment supplier if you plan to weld titanium more than ⅛ inch thick, because some preheat and postheat may be beneficial.
Pure argon is recommended for welding titanium because of its high purity and low moisture content. A 75/25 mixture of argon/helium may be used to improve stability and increase penetration only when specified.
The American Welding Society (AWS) recommends measuring welding gas purity to make sure it meets the standards set for each application. Typical specifications suggest that shielding gas be at least 99.995 percent pure with no more than 20 parts per million (PPM) of oxygen and a dew point greater than -76 degrees F. Other applications require a 99.999 percent pure flow of argon.
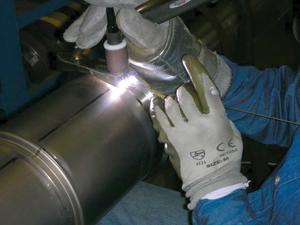
Outfitting your welding torch with a trailing shield is critical—otherwise the risk of oxygen contamination rises, and with it the potential for cracking. Some welders fabricate their own trailing shields, although many styles are available for purchase. Trailing shields conform to the shape of the tube and follow the GTAW torch around the pipe. The shields provide an extra protection of argon over the weld after the torch and its argon flow have passed. Setting the torch and trailing shield gas flow at 20 cubic feet per hour (CFH) provides the best coverage.
Purging, a process that eliminates the oxygen contained within the pipe, also
is required when welding titanium tubing. This process can be completed with any kind of purge dam: water-soluble dams, rubber gaskets, specialty tape, or inflatable bladders. Argon flows into the dammed area to replace the oxygen contained within the tubing. Allow the argon to flow long enough to replace the oxygen 10 times over to ensure the purest welding environment.
Always use a clean, nonporous plastic hose to transport the shielding gas to the torch, trailing shield, and purge. Do not use rubber hose; rubber is porous and absorbs oxygen that could contaminate the weld.
Use a filler metal when welding titanium tubing thicker than 0.010 in. (see Figure 1). Typically, you should match the filler metal to the grade of titanium being welded—it should be an exact match. Some applications allow exceptions, such as a filler metal with a lower yield strength than the base metal to improve ductility. Any variation, however, should be carefully tested and investigated to make sure it meets process demands and specifications.
| Recommended Titanium Filler Metal Alloys | ||||||
|---|---|---|---|---|---|---|
| Base Filler | AWS A5.16 ERTi-2 | AWS A5.16 ERTi-2 | AWS A5.16 ERTi-3 | AWS A5.16 ERTi-5 | AWS A5.16 ERTi-9 and ERTi-9ELI | AWS A.16 ERTi-23 |
| Grade 1 (CP-1) [Commercially Pure] |
X | |||||
| Grade 2 (CP-2) | X | X | ||||
| Grade 3 (CP-3) | ||||||
| Grade 5 (Ti6A14V) | X | |||||
| Grade 9 (Ti3A12.5V) | X | X | ||||
| Grade 23 (Ti6A14V ELI) (extra-low interstitial) | X | |||||
| Figure 1 | ||||||
GTAW gives the welder more control over heat input and the puddle than any other welding process. A GTAW inverter with high-frequency arc starts, remote amperage control capabilities, a postflow timer, and an output of at least 250 amps, will weld titanium nicely.
Always set the machine's polarity to direct current electrode negative (DCEN). DCEN offers deeper penetration and a narrower bead in comparison to direct current electrode positive (DCEP).
Match the inverter with either an air- or water-cooled torch. An air-cooled torch provides good performance if you're welding below 150 amps and it costs less than a water-cooled torch. On the other hand, a water-cooled torch is smaller, more maneuverable, and permits welding at higher amperages for extended periods, although most welds on titanium are short and created at output levels below 150 amps.
Use a 2 percent ceriated tungsten electrode ground to a point and matched to the welding current as follows:
Use a gas lens to distribute the shielding gas evenly and to create a smooth gas flow over the weld puddle.
First, cut off the end of the filler rod to expose a pure, contaminant-free point to start the weld. Start the argon gas flowing for a few seconds before striking the arc to ensure the weld area is fully covered.
Use the inverter's high-frequency arc-starting feature to strike an arc. Torch angles, torch speed, and filler wire angles similar to those used in welding stainless steel provide optimal conditions for welding titanium tubing.
It is fairly easy to create the weld puddle with titanium, but it may not move easily. Pushing the weld puddle along with the arc and the filler rod generally provides the best results, but you must keep the filler rod within the shielding gas envelope while welding. It's also important to minimize heat input because excessive heat can crack the weld. Use a dab technique (at a steady travel speed) with the filler metal instead of leaving the rod in the puddle at all times.
Once you are finished with the weld, allow 20 to 25 seconds of postflow to protect the seam as it cools down below the 800-degree-F threshold. This is the point at which oxygen no longer reacts with titanium. Some welding codes may require postflow until the temperature drops below 500 degrees F, so always follow the written procedure.
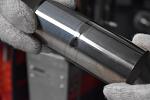
Titanium offers the benefit of showing its true colors once the weld is finished. The final color of the weld joint indicates how well the shielding gas protected the weld from contaminants and how thick the oxide layer is (see Figure 2). In addition to visual inspection, dye penetrant inspection, hardness testing, X-ray, ultrasonic, and destructive tests determine the quality of titanium welds.
| Color Acceptance Criteria | |
|---|---|
| Weld Color | Quality Indication |
| Bright Silver | Acceptablea |
| Silver | Acceptablea |
| Light Straw | Acceptablea |
| Dark Straw | Acceptablea |
| Bronze | Acceptablea |
| Brown | Acceptablea |
| Violet | Unacceptableb,c |
| Dark Blue | Unacceptableb,c |
| Light Blue | Unacceptableb,c |
| Green | Unacceptableb,c |
| Gray | Unacceptable |
| White | Unacceptable | Figure 2. Note: Discoloration comes in various shades, hues, and tones. |
a. Discoloration must be removed before further welding. | b. On the weld and in the HAZ up to 0.03 in. beyond the weld. | c. Violet, blue, and green discolorations are cause for rejection if additional welding is to be performed. Blue and green discoloration are acceptable on finished welds but must be removed before subsequent processing. |


The Tube and Pipe Journal became the first magazine dedicated to serving the metal tube and pipe industry in 1990. Today, it remains the only North American publication devoted to this industry, and it has become the most trusted source of information for tube and pipe professionals.
start your free subscription
Easily access valuable industry resources now with full access to the digital edition of The Fabricator.

Easily access valuable industry resources now with full access to the digital edition of The Welder.

Easily access valuable industry resources now with full access to the digital edition of The Tube and Pipe Journal.

Easily access valuable industry resources now with full access to the digital edition of The Fabricator en Español.
In this episode of The Fabricator Podcast, Caleb Chamberlain, co-founder and CEO of OSH Cut, discusses his company’s...