Leaning on press brake tooling
4 ways to apply lean concepts to bending tools
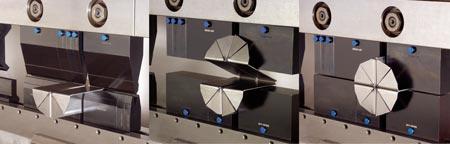 |
| Staged bending can make short runs more cost-effective because each part is handled only once. |
Most of today's original equipment manufacturers (OEMs) and contract manufacturers have embraced the principles of lean manufacturing. Many of the obvious offenders—the most wasteful processes and excess inventory—have been revamped and streamlined. But reaching the next level of lean is more challenging. It requires that manufacturers dig deeper, carefully examining each piece of the manufacturing puzzle for potential improvements.
Press brake tooling is an area in which a closer look reveals room for improvement. In fact, bending tools can play a significant role in minimizing setup time, reducing work-in-progress (WIP), increasing throughput, and minimizing waste. Thanks to today's press brake tooling technology, these initiatives can be accomplished with little stress or work flow disruption.
1. Staged Bending: Short Runs Simplified
As OEMs move to reduce inventory and continue to call for just-in-time (JIT) manufacturing, small-batch press brake runs are increasingly common.
Smaller doesn't necessarily mean easier or more efficient, however. Taking setup time for multiple bends into account, it can be difficult to justify the expense of more complex short-run jobs. That's where staged bending makes small runs cost-effective—by simplifying complex bending sequences and handling each part only once.
Staged bending is the execution of multiple bends in a single press brake setup. All bends on a single part are bent in succession, with only one setup.
For example, manufacturing a component such as a cabinet requires a 30-degree bend with hem, an offset bend, a 60-degree bend, and four 90-degree bends. Using the traditional method, the operator would set up the 30-degree bend with the 30-degree hemming punch and die and perform the bend on all of the parts, handling each part one at a time. Then the operator would either remove the 30-degree hemming punch and die or reposition them so the top and bottom tool would not collide. Next, the operator would set up the offset punch and die and make the offset bend on all of the parts, again handling each part another time.
Once the offset bends were complete, the operator would either remove the offset punch and die or reposition them so the top and bottom tool would not collide. Then the operator would set up the 60-degree punch and die and make this bend on all of the parts, handling the parts for the third time. When finished with this bend, the operator would again have to remove or reposition the 60-degree punch and die so the top and bottom tool would not collide.
Finally, the operator would set up the 90-degree punch and die and complete the four 90-degree bends, handling the parts for the fourth time. This method of manufacturing would require the operator to complete four separate setups and create or load four separate programs.
Using staged bending to bend the same part, the operator would set up the 30-degree hemming punch and die, the offset punch and die, the 60-degree punch and die, and the 90-degree punch and die at the same time, creating or loading only one program. These tools would be set up in progressive order. On the same blank, the operator would complete the 30-degree hemming, the offset bending, the 60-degree bending, and then the four 90-degree bending operations and have a completed component. The part would need to be handled and set up only once.
Generally, because of the amount of setup time and programming time required using a traditional method, large batch sizes are run to gain the economies of scale needed to absorb the non-value-added time (setup, teardown, and part handling). With staged bending, much smaller production runs are feasible, because setup, teardown, and part handling are eliminated or minimized. This allows the fabricator to make what is needed when it is needed, reducing both WIP and excess inventory.
 |
| Figure 1 By requiring only one setup for multiple bends, staged bending reduces setup time, part handling, and work-in-progress. |
Staged bending requires that each set of tools share a common shut height, which is the total height of the punch and die when the press brake is closed (see Figure 1). Although it is possible to achieve this by applying special risers and custom shims to traditional press brake tools, tooling is currently available that offers a common shut height as a standard feature, making the process fast and simple. This seemingly minor change with staged bending offers significant gains toward lean manufacturing. It makes smaller lot sizes more feasible and reduces setup time, part handling, and WIP.
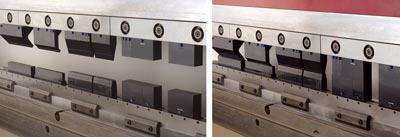
2. Tool Loading: Speed and Safety
Yesterday's fabricators would think today's fabricators spoiled with the tool loading technology now available. With older tool types, punch and die installation was the most time-consuming aspect of press brake setup. Thankfully, the protracted process of manually tightening screws has given way to a more efficient method.
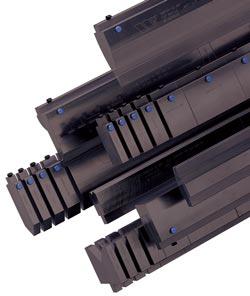 |
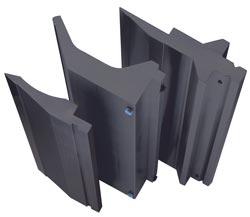
| Figure 2 Sectionalized tooling divides punches and dies into manageable-sized pieces that are easy and safe to handle; allows mix-and-match tooling; and requires just one operator for loading and unloading. |
Today's tooling features a push-button mechanism that, when depressed, retracts a safety tang, or a clamp lever, both of which release the tooling. This accelerates tool loading and unloading. Also, the push-button system is safer than sliding the tooling from the side because the safety tang eliminates the possibility of the tool falling and potentially causing injury when the upper beam is unclamped.
If the beam in the American-style brake has a groove to receive the safety tang (T-shaped groove), the tool can be loaded in either direction.
Push-button tool loading is a key example of an advancement that may seem minor on the surface but that saves time. Most press brake models can be retrofitted to accommodate this technology.
Sectionalized tooling is another major boost for lean manufacturing and safety. Sectionalized tooling divides punches and dies into manageable-sized pieces that are easy and safe to handle, as well as inexpensive to replace (see Figure 2). It also provides the ability to mix and match tooling to meet the necessary length, reducing the tool inventory needed for various jobs. If the sectionalized tooling is lightweight enough, one operator may be able to load it. Sectionalized tools are loaded vertically into the brake.
3. Precision Tooling Promotes Repeatability
Lean manufacturing is about minimizing waste—both in terms of time and materials. Reducing scrap and remanufacture time requires perfection on every bend executed. To accomplish that, tooling must approach perfection as well.
Using imperfect tooling can cause nonuniformity in the bending process from one tool to another, especially in sectional tooling. Typically with nonprecision tooling, the tool's centerline is out of alignment, creating more bow and twists in the tools, all of which will result in less accurate parts. For lean manufacturing to work, the bends must be correct the first time and every time.
With the use of precision-ground tooling with tolerances of ±0.0008 inch (0.02 millimeter) on all critical dimensions, fabricators can achieve high levels of repeatability. When tooling is mixed and matched, or when a punch or die needs replacing, this high level of precision provides consistent results throughout the run. These tight tolerances are especially useful for air bending, in which even slight variations can cause problems.
 |
| Figure 3 By increasing hardness up to 70 HRC, surface enhancements can extend tool life. |
4. Enhancing Tool Life
Press brake tooling's primary role in lean manufacturing is maintaining bending quality from start to finish. Adding a surface enhancement to the tool can extend its life significantly (see Figure 3). This allows the tooling to uphold the required level of quality for an extended period of time while also reducing the number of setups and replacement costs.
Some surface enhancement processes can increase the surface hardness up to 70 Rockwell C. They provide lubricity characteristics that lower the coefficient of friction as the material slides over the V opening of the die, reducing galling and sheet marking while extending tool life. Tool rust is another problem these tooling treatments can eliminate. A surface enhancement can penetrate to 0.02 in. below the tool surface to help ensure resistance to corrosion.
Fabricators who purchase precision-ground press brake tools must keep the tools clean and properly stored for extended tool life and continued accuracy. The initial cost of purchasing precision-ground tooling is higher than that of nonprecision tooling, but in the long term, cost savings can be realized in reduced scrap, time, setup, and tool replacement. In addition, having the ability to manufacture what is needed—when it is needed—is likely to enhance business opportunities.
Pat Campbell is the press brake tooling division manager for Wilson Tool International® Inc., 12912 Farnham Ave., White Bear Lake, MN 55110, 800-445-4518, marketing@wilsontool.com, www.wilsontool.com.
About the Author
About the Publication

subscribe now

The Fabricator is North America's leading magazine for the metal forming and fabricating industry. The magazine delivers the news, technical articles, and case histories that enable fabricators to do their jobs more efficiently. The Fabricator has served the industry since 1970.
start your free subscription- Stay connected from anywhere

Easily access valuable industry resources now with full access to the digital edition of The Fabricator.

Easily access valuable industry resources now with full access to the digital edition of The Welder.

Easily access valuable industry resources now with full access to the digital edition of The Tube and Pipe Journal.

Easily access valuable industry resources now with full access to the digital edition of The Fabricator en Español.
- Podcasting

In this episode of The Fabricator Podcast, Caleb Chamberlain, co-founder and CEO of OSH Cut, discusses his company’s...