


Owner, Brown Dog Welding
In this episode of In the Workshop, welder-fabricator Josh Welton shares how to assemble and troubleshoot problems with a TIG torch. Learn how each part of the torch functions whether using a traditional collet and collet body or using a gas lens, and when to replace parts on the welding torch.
We live in a deterministic world. If a rock moves, it’s because a force was exerted against it. A mark on a piece of paper is the result of the graphite from a pencil pressed on it. A finger bleeds when a sharp edge breaks its skin. Cause and effect.
The world of welding is no different. While I was working during the last week, I made notes of some of the routine causes and effects I see in my daily grind. Considering how much time off I’ve had over the last two years for my surgeries, I’m probably a bit more aware of certain things right now, things I’d normally take for granted as second nature.
TIG torch assembly is something often taken for granted. And while so many of the manufacturers’ parts are interchangeable, they’re always going to have some slight variations and probably have been built to different tolerances. You want to install the consumables into the torch body in a certain order for them to work best and last the longest.
The collet body or gas lens (I’ll refer to both as a collet body from here on out) should be threaded into the torch body first. It’s common that a cup will be left (or seized) on the collet body, but it really should be screwed on separately.
Once the collet body is in the torch, the cup can be screwed onto the collet body. Turn it until it’s tight, but not too forcefully. After all, it is typically ceramic onto brass.
At this point, you can slide the collet into the collet body through the back side of the torch (or if it was sitting in the collet body already, that’s also cool). Then you can turn the backing cap into the torch body. But don’t twist it in too far until the tungsten is in the torch.
In the real world, these steps often are turned and flipped around a little bit or a lot, but if you’re having problems sliding the tungsten into the collet body, or maybe it won’t tighten and stay put, it’s good to go back to basics.
There’s always a root cause for your issue. By having the cup on the collet body already or screwing in the backing cap first, you’re potentially causing the same issue, which is preventing the collet body from threading all the way into the torch body. When this happens, the collet doesn’t seat properly, which means the tungsten won’t stay in place. Then your instinct will be to tighten the cap more, which will twist the collet out of shape to grip the tungsten. When the collet is twisted, it eventually stops functioning, no matter if you assemble the torch the right way or not.
Another quick observation: A length of hose, usually 12.5 or 25 ft. long, runs between the TIG or MIG torch and the welding machine. And there’s the hose length in the machine, and the length connecting the machine to the bottle. Gas moves quickly, but it’s not instantaneous. Especially when a machine has been sitting for more than a few minutes, it’s a good idea to pull the trigger or blip the pedal to purge the line of air and fill it with gas. If you don’t do this, you may end up with some porosity with that first arc.
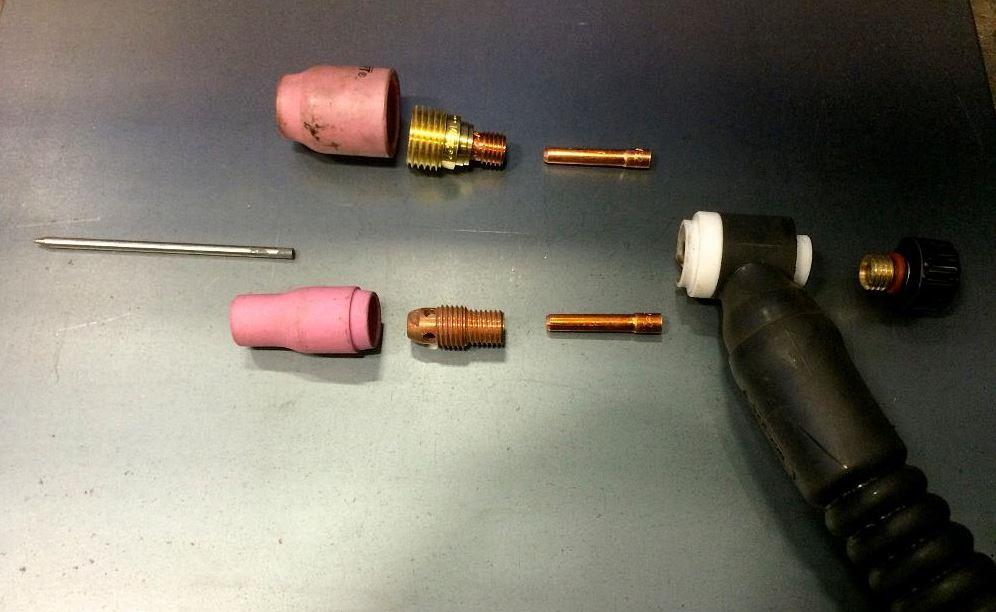
TIG torch parts await assembly. Brown Dog Welding
And last, something I’ve said before but it bears repeating: Sandblasting is not cleaning, at least not for welding. Think about it. You’re literally shooting dirt at metal. The severity of how much it affects the weld depends on the “sand” or media, the porosity of the metal, and the type of welding, but I like to make sure that, at the very least, I’m wire wheeling the material postblast before I weld it.
Stay tuned for more In the Workshop videos from my Detroit welding shop, as I offer up all kinds of helpful advice for welders. Whether it’s leading one-on-one workshops, helping college classes, or having a family member throw on a helmet and lay some beads, I love teaching and seeing the light bulbs go on.
Be sure to watch the first episode about how to clean a MIG torch.
Have welding questions? Feedback? Feel free to email me and follow me on Instagram.

The Fabricator is North America's leading magazine for the metal forming and fabricating industry. The magazine delivers the news, technical articles, and case histories that enable fabricators to do their jobs more efficiently. The Fabricator has served the industry since 1970.
start your free subscription


Easily access valuable industry resources now with full access to the digital edition of The Fabricator.

Easily access valuable industry resources now with full access to the digital edition of The Welder.

Easily access valuable industry resources now with full access to the digital edition of The Tube and Pipe Journal.

Easily access valuable industry resources now with full access to the digital edition of The Fabricator en Español.
In this episode of The Fabricator Podcast, Caleb Chamberlain, co-founder and CEO of OSH Cut, discusses his company’s...


