


Contributing Writer
As if gas tungsten arc welding (GTAW) weren't already difficult to master, GTAW torches have numerous interchangeable parts and designs to further complicate matters. This holds true for water- and air-cooled torches, as well as those with remote amperage controls. To help ensure your chances of welding success, it is important to know how to assemble and install your GTAW torch properly.
GTAW torches come in a variety of shapes and sizes for added flexibility, accessibility, and operator comfort. An air-cooled torch is almost always larger and heavier than its water-cooled counterpart, but the cooling capacity required for a particular application always dictates which one to use. For example, air-cooled GTAW torches are better-suited for low-amperage applications, whereas water-cooled torches are recommended for applications requiring more than 200 amps. Likewise, air-cooled torches work well outside because they do not require a separate water cooler, and water-cooled torches are better for use in the shop.
Before assembling your GTAW torch, consider briefly each of its components. First, know that air-cooled torch components, like collets and collet bodies, are noticeably larger than those built for water-cooled torches. This is because air-cooled torches rely on the ambient air plus argon gas to cool the torch and need the additional surface area of the components to help dissipate the heat. Conversely, a water-cooled torch has a constant source of coolant removing the heat and therefore has smaller front-end torch parts.
In a GTAW torch, the nozzle (or cup) directs shielding gas onto the weld puddle and protects it and the tungsten electrode from outside contaminants. Nozzles range in size from ¼ in. (#4) to 1 in. (#16) and are made primarily of alumina or lava.
The tungsten electrode conducts heat to the arc. The kind you use depends on the base material's thickness and type, and whether you weld with alternating or direct current. A 3⁄32-in., 2 percent ceriated tungsten electrode is a common choice, as it can be used for welding at 5 to 200 amps. Other electrode options include pure tungsten, 2 percent thoriated, 1.5 percent lanthanated, zirconiated, and rare earth.
The collet and collet body hold the tungsten in place, and the size of the tungsten determines the size of each that you need. For example, a 3⁄32-in. collet holds 3⁄32-in. tungsten in place. These components are usually constructed of copper or a copper-tellurium alloy, which both provide good conductivity.
When you require greater joint access or better shielding gas coverage, you can replace a collet body with a gas lens. Gas lenses are recommended for welding on highly reactive alloys that have the added risk of volatile reaction to oxygen and atmospheric contaminants. All air- and water-cooled GTAW torches are compatible with gas lenses, and the amperage requirements, tungsten size, and joint configuration will determine the gas lens and corresponding nozzle sizes.
Top off your GTAW torch with either a short, medium, or long back cap, all of which tighten the collet against the collet body to hold the tungsten in place. The length you choose depends on the joint access you require.
Finally, determine whether you want a rubber or vinyl hose and power cable. Vinyl works well for light-duty applications, but braided rubber hoses resist heat and kinking and tend to last longer. Rubber hoses also maintain flexibility and durability in cold environments better than vinyl.
Once you've identified the torch components you need, you're ready to assemble your GTAW torch, the steps of which are the same whether you have an air- or water-cooled model.
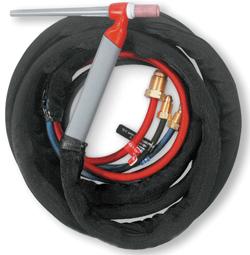
Figure 1Water-cooled torches have color-coded hoses to ease installation. The output water hose is blue, the return water hose/power cable is red, and the gas hose is black.
First assemble the collet and collet body; then insert the tungsten electrode. Make sure you have a tight fit between the collet and tungsten, as this helps guarantee good conductivity and a stable arc. Insert the back cap into the torch body but do not tighten it. Insert the tungsten/collet/collet body assembly and then tighten the back cap. Tightening the back cap at this stage creates a vise effect that ensures a secure fit of the tungsten and the collet within the collet body. Now add the nozzle and adjust the tungsten to within ¼ in. beyond the end of the nozzle. Don't forget that replacing a collet body with a gas lens allows you to extend the tungsten further (up to ½ in. beyond the nozzle), but will also require a larger nozzle. The gas lens should also be inspected for spatter or damage before being inserted to ensure proper gas flow to the weld puddle.
Make sure that all of the torch component threads and connections are tightened properly to prevent problems with electrical conductivity and gas flow that could lead to torch damage or weld discontinuities. Also check all O-rings and gaskets for deterioration or failures that could allow air to be drawn into the shielding gas stream.
The first rule of safety in GTAW torch installation: Before installing any torch, turn off the power source!
Air-cooled Torch. If you have an air-cooled torch, installation will likely be quicker than a water-cooled torch, because there are fewer hoses to connect. First, select the appropriate power cable adapter for your GTAW power source and connect it to the torch's power cable. Use the power cable adapter that came in your GTAW torch accessory kit or consult with your welding distributor for the correct one for your welding machine. Then connect your power cable adapter to the electrode terminal of the power source, making certain this connection is snug—a loose connection can cause overheating and damage the torch cable.
Next, connect the gas hose to the gas-out connection on the front of the machine and attach a flowmeter regulator to the cylinder. The flowmeter regulator ensures precise control of the shielding gas flow. Then connect the gas hose from the flowmeter regulator to the gas-in connection on the back of the machine, tighten it, and open the gas cylinder valve. Remember, tight connections eliminate shielding gas loss and ensure a steady flow of shielding gas at the torch, leading to good weld quality.
It's now time to connect either your foot pedal or fingertip remote control. The remote control connects to the remote 14-pin receptacle on the front of your power source. The foot pedal control is ideal while welding at a bench, and a GTAW torch with a fingertip remote control offers greater mobility and enables welding in tight spaces or awkward positions.
You're now ready to weld—attach your work clamp from the work output terminal of the machine to the workpiece and prepare to strike your arc.
Water-cooled Torch. To install a water-cooled GTAW torch, take similar steps as when installing an air-cooled torch, and then a few extra! First check that the required water cooler has enough coolant, usually about 3 gallons. Use only distilled water or an approved welding coolant available through your distributor; never use city water, antifreeze, or any other rust-inhibiting compounds.
When connecting the water-cooled GTAW torch to the water-cooling system, it is important that you set up the water flow properly (seeFigure 1). First, connect the torch's output water hose (smaller left-hand fitting—blue hose) to the water-out connection on the cooler. Then connect the water return/power cable (larger left-hand fitting—red hose) to the power cable adapter, and connect that adapter to the output terminal (seeFigure 2). Next plug the water cooler into the welding machine receptacle. This water flow ensures optimal cooling capacity for the torch head and the power cable.
As with air-cooled torches, connect the gas hose from the flowmeter regulator to the gas-in receptacle on the back of the machine. Now connect the gas hose to the gas receptacle on the front of the machine, and connect the foot pedal or remote fingertip control.
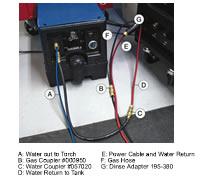
Figure 2Click image to view larger This diagram shows the proper connection of a water-cooled GTAW torch from the water cooler to the power source
Once all connections have been made, attach the work clamp to your workpiece and turn on the power source. Now you're ready to weld with a water-cooled torch.
These steps and information are more than enough to get you started, but they just scratch the surface of the intricacies involved in GTAW itself. Don't forget to practice and test your system to find what works best for you, and consult your local welding distributor to discuss other best practices that may help improve your GTAW application.

The Welder, formerly known as Practical Welding Today, is a showcase of the real people who make the products we use and work with every day. This magazine has served the welding community in North America well for more than 20 years.
start your free subscription
Easily access valuable industry resources now with full access to the digital edition of The Fabricator.

Easily access valuable industry resources now with full access to the digital edition of The Welder.

Easily access valuable industry resources now with full access to the digital edition of The Tube and Pipe Journal.

Easily access valuable industry resources now with full access to the digital edition of The Fabricator en Español.
In this episode of The Fabricator Podcast, Caleb Chamberlain, co-founder and CEO of OSH Cut, discusses his company’s...