- FMA
- The Fabricator
- FABTECH
- Canadian Metalworking
Categories
- Additive Manufacturing
- Aluminum Welding
- Arc Welding
- Assembly and Joining
- Automation and Robotics
- Bending and Forming
- Consumables
- Cutting and Weld Prep
- Electric Vehicles
- En Español
- Finishing
- Hydroforming
- Laser Cutting
- Laser Welding
- Machining
- Manufacturing Software
- Materials Handling
- Metals/Materials
- Oxyfuel Cutting
- Plasma Cutting
- Power Tools
- Punching and Other Holemaking
- Roll Forming
- Safety
- Sawing
- Shearing
- Shop Management
- Testing and Measuring
- Tube and Pipe Fabrication
- Tube and Pipe Production
- Waterjet Cutting
Industry Directory
Webcasts
Podcasts
FAB 40
Advertise
Subscribe
Account Login
Search
Press brake bending basics: How to avoid a sharp bend
How do you prevent a sharp bend? Analyze the tonnage
- By Steve Benson
- July 17, 2018
- Article
- Bending and Forming

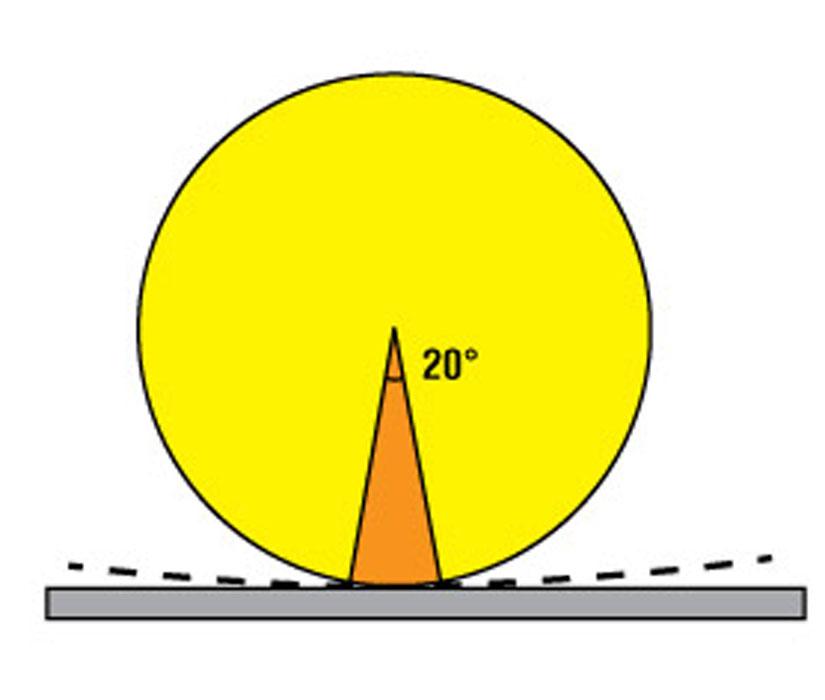
Figure 1
The circle represents the punch tip, and the red area shows the degrees of contact the tip makes just as the metal starts to bend, as represented by the dotted line. This varies, but for our purposes, we can use a constant of 20 degrees.
Question: First, let me say that I have enjoyed reading your articles and books related to forming theory. I have been applying the principles you’ve covered in the shops I’ve worked for.
I recently started with a different OEM to assist with its fabrication department. We use 304 stainless steel almost 95 percent of the time. I have been working with quality and engineering to get our bend tables ironed out, so our parts will come out correct the first time, within a 0.0100-in. variance per bend. I have gathered data from our suppliers on ultimate tensile strength and yield strength and composed tables with averages to apply to the formulas to better predict blank lengths. Our problem is that the punch tip seems to be diving into our stainless material.
Using American-style tooling, we air-bend 0.075-in.-thick, 90-KSI stainless steel with a 0.062-in.-radius punch nose and a 0.500-in. die opening, giving us an approximate 0.117-in. floated inside radius. We’ve tried using the 0.125-in.-radius punch nose, but our blank grows even more. We’ve even gone up to a 0.625-in. die opening, mainly to reduce tonnage requirements, but we’ve seen no noticeable difference in how far the part is from what we initially calculated.
I assume we may be sharp bending using our 0.062-in. punch tip radius and thereby exceeding the material’s punching tonnage. Where would be a good starting point to solve this problem?
Answer: Everything you have just stated is consistent with air forming theory. Three factors come into play here: sharp bending, the 20 percent rule, and the punch nose radius.
Let’s begin with the sharp bend—or, as you put it, having the punch nose “dive” into the material and creasing the center of the radius.
A sharp bend is not a minimum-radius bend. A minimum-radius bend is the smallest radius that can be free-floated in an air form. Any punch nose radius less than the minimum radius will “dive” into the center of the bend.
A sharp bend will amplify variations within the material that cause the bend angle to change from part to part. These include differences in thickness, grain direction, as well as yield and tensile strengths. A sharp bend is caused by three things: the metal’s shear stress limits, the land area where the tonnage force is applied, and the total tonnage required to bend the workpiece over a given die opening.
To find where the bend turns sharp, what we call the sharp value, we’ve adapted a standard punching tonnage formula to bending. For our purposes, we’ll call it piercing tonnage, since it tells us how much force is needed for the punch tip to pierce and crease the material—which, of course, we want to avoid. The formula doesn’t adapt perfectly, and the results are only an approximation, but it works well enough to be very useful in the fab shop.
Before we get to the formula, though, we need to determine the land area, the initial contact area between the punch tip and the material. In past columns we’ve used the punch radius to calculate this area of contact. This gets you close enough for many applications, but in truth, this does not reflect what’s actually going on during an air bend.

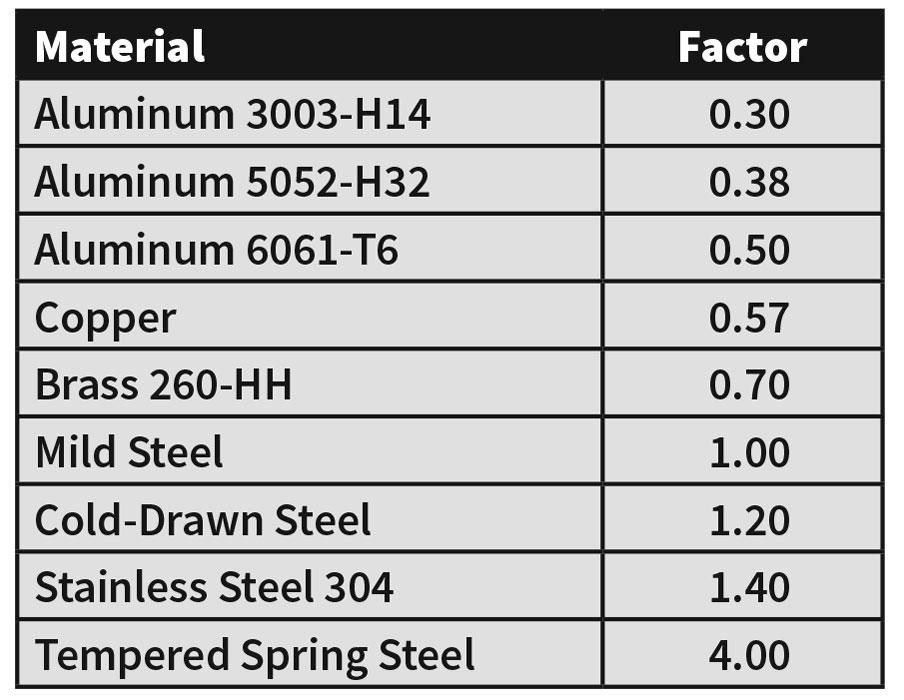
Figure 2
These material factors adjust the punching tonnage formula to account for materials with different tensile strengths.
If you recall from high school geometry, a radius is half the diameter of a circle, and that’s just what it is on the end of a punch tip. If you were to measure the curved area at the bottom of a 0.062-in.-radius punch tip, it would not equal 0.062 in. The curved area would instead equal the portion of a circumference, or an arc length. Extend the curve to a circle, divide that circle’s diameter in half, and you’d get 0.062 in., the punch tip radius.
Again, using the punch radius to calculate piercing tonnage works well enough. But to predict piercing tonnage more accurately, we need to find the arc length—and not just any arc length, but the arc length that makes initial contact with a material at the moment of bending.
We find the arc length by determining the degrees of contact the punch tip makes before the metal starts to bend, as shown in Figure 1. This can vary greatly. Some material starts to bend immediately after just a few degrees of contact; other materials start to bend only after many more degrees of contact. The math to determine this precisely gets very complex, so for our purposes here, we’ll use 20 degrees of contact as a constant.
By incorporating the degrees of contact and the punch radius (R) into the following equation, we determine the arc length and ultimately the total land area:
Land area = Arc length × Length of bend
Now it’s on to the piercing tonnage formula. Note that the original formula has a variable called a shear factor to account for the size and shape of material. For our purposes, we’ll assume the material is flat, which has a shear factor of 1.0. This doesn’t affect our result, so we’ve omitted it from the equation. Again, while this formula is not perfect for this application, it is close enough for our needs to find the necessary values:
Land area × Material thickness
× 25 × Material factor
The constant “25” comes from factoring in the strength of common mild steel grades at the time the formula came into being, hence the need for the material factors values (see Figure 2). The material factors adjust the tonnage to match with current material yield and tensile values.
Now that we have the piercing tonnage, we need to calculate the forming tonnage necessary to bend the workpiece. We do this by finding the point at which the metal enters its plastic state, bends, and stays bent. This point is where the yield is “broken” in the material. Note that this is not the same as the forming loads at the bottom of the stroke in a bottoming or coining operation. Bottoming and coining tonnage calculations are at best just guesses as they are very operator-dependent.
The following equation, in which Mt is material thickness, solves for the tonnage value where the yield breaks, giving us the tonnage per inch we need for the material to form. And as with piercing tonnage, we need to incorporate a material factor, as shown in Figure 2. If you don’t see the material you’re working with, you can simply divide your material’s tensile strength by the tensile strength of our baseline material, 60,000-PSI mild steel.
Die opening/12]} × Material factor
The piercing tonnage gives us an estimate of how much force it will take for a tool to pierce, crease, and “dive into” the bend line. To avoid creasing the bend, you need to make sure the piercing tonnage is more than the forming tonnage per inch. This way, the material will resist the piercing pressure from the punch tip.
Now we’re ready to run the calculations. Note that in the following, all dimension values are in inches. Also, you didn’t mention a bend length, so for this example, we’ll just use a bend length of 12 in.
90 KSI stainless steel
Material factor = 90 KSI/60 KSI = 1.5
Bend length = 12 in.
Die opening = 0.500 in.
Punch radius = 0.062 in.
Arc length = 2πR × (Degrees of contact/360)
Arc length = 2 × 3.1415 × 0.062 × (20/360) = 0.021 in.
Land area = Arc length × Bend length
Land area = 0.021 × 12 = 0.252 in.
Piercing tonnage = Land area × Mt × 25 × Material factor
Piercing tonnage = 0.252 × 0.075 × 25 × 1.5 = 0.708 ton
Forming tonnage per inch = [(575 × Mt2)/
Die opening/12] × Material factor
Forming tonnage per inch =
[(575 × 0.0752) / 0.500/12] × 1.5 = 0.808 ton
As you can see, the forming tonnage per inch is 0.808, while your piercing tonnage is 0.708. The required tonnage to form exceeds the material’s capacity to resist the piercing force!
But Wait, There’s More
Compare what happens with the three different die openings that fall within the 6 to 8 times material thickness range. Our piercing tonnage stays constant, at 0.708 ton, but look what happens to the forming tonnage:
Forming l thickness (Mt) = 0.074 in.
0.375-in. die opening = 1.078 tons per inch
0.500-in. die opening = 0.808 tons per inch
0.625-in. die opening = 0.646 tons per inch
Notice what happens when you open the die width from 0.500 to 0.625 in. The pressure to form is now less than the tonnage to pierce. This means that the punch tip should no longer be “diving” into the center of the bend, and the bend should no longer be in a “sharp” relationship to the material.
Not only that, but as you noted, the inside radius has changed just as it should. This is the 20 percent rule at work. In your note, you indicated that you were achieving a floated inside radius of 0.117 in. over a 0.500-in. V die. The 20 percent rule states that for 304 stainless with an 85,000-PSI ultimate tensile strength (UTS), the floated radius should range between 20 and 22 percent of the die opening. Sure enough, 22 percent of 0.500 is 0.110 in. Grain direction, measurement inaccuracies, and the fact that you’re working with 90,000-PSI UTS material would account for the minor discrepancies. Your material is holding an inside bend radius equal to 23 percent of the die opening.
Based on all that, the inside radius resulting from forming over a 0.625-in. die opening should be 0.143 in. (0.625 × 0.23 = 0.143 in.), and you should have no visible signs of creasing at the bend line. At the same time, your forming tonnage has dropped from 0.808 to 0.646 ton per inch.
The Best Choice of Punch Radii
The 0.125-in. punch radius will grow the inside bend radius in both the 0.375- and 0.500-in. die openings. That’s because the punch nose radius is larger than the naturally occurring radius in the material—and when that happens, the part will tend to take on the larger punch nose value. When you have a larger radius, you get a larger bend deduction, and you get a different part.
On the other hand, the larger nose radius of the punch will not affect the bend radius or bend deduction in the 0.625-in. die. The punch nose at 0.125 in. is less than the naturally occurring radius of 0.143 in.
The best strategy in this situation is to use a punch nose radius as close as possible to the natural radius without exceeding that value—unless, of course, you plan for it right out of the gate and incorporate the larger radius and bend deductions into your calculations.
Standardize Your Tool Usage
You mentioned that when switching to a 0.625-in. die you’ve seen “no noticeable difference” in how far the part is from your initial calculations. What’s behind this depends on what those initial calculations were, including your length of bend (this example assumes a 12-in. bend length). Regardless, when you change the die opening, you change the radius and the bend deduction. Remember, when air bending, a new die opening effectively changes everything.
There’s still more to know about sharp bends and how they affect the bending process. I recommend you review the four-part series that ran September through December 2015, “A grand unifying theory of bending on a press brake.” You may find material on the parabola effect on sharp bends especially helpful. You can peruse the magazine archives at www.thefabricator.com or type the series title into the homepage search bar.
I have one last and important point to make about air forming. Some operators might be making sharp bends while others might not be, and it’s all due to die width changes. All operators in the shop must use the same tools every time—that is, the set of tools the part was designed to use. Change the die opening and you change the radii.
About the Author

Steve Benson
2952 Doaks Ferry Road N.W.
Salem, OR 97301-4468
503-399-7514
Related Companies
subscribe now

The Fabricator is North America's leading magazine for the metal forming and fabricating industry. The magazine delivers the news, technical articles, and case histories that enable fabricators to do their jobs more efficiently. The Fabricator has served the industry since 1970.
start your free subscription- Stay connected from anywhere

Easily access valuable industry resources now with full access to the digital edition of The Fabricator.

Easily access valuable industry resources now with full access to the digital edition of The Welder.

Easily access valuable industry resources now with full access to the digital edition of The Tube and Pipe Journal.
- Podcasting
- Podcast:
- The Fabricator Podcast
- Published:
- 04/16/2024
- Running Time:
- 63:29
In this episode of The Fabricator Podcast, Caleb Chamberlain, co-founder and CEO of OSH Cut, discusses his company’s...
- Trending Articles
How to set a press brake backgauge manually

Capturing, recording equipment inspection data for FMEA

Tips for creating sheet metal tubes with perforations

Are two heads better than one in fiber laser cutting?

Hypertherm Associates implements Rapyuta Robotics AMRs in warehouse

- Industry Events
16th Annual Safety Conference
- April 30 - May 1, 2024
- Elgin,
Pipe and Tube Conference
- May 21 - 22, 2024
- Omaha, NE
World-Class Roll Forming Workshop
- June 5 - 6, 2024
- Louisville, KY
Advanced Laser Application Workshop
- June 25 - 27, 2024
- Novi, MI


