


Senior Editor

Figure 1: In blasting, it’s the media—be it angular grit or round shot (a magnified view depicted here)—that does the work. Image courtesy of Rosler Metal Finishing USA.
A fabricator can spend serious time manually preparing workpieces to obtain an optimal finish. If the paint or coat coming off the line doesn’t adhere properly, often it’s because someone skipped a surface preparation step, or didn’t prepare the entire surface completely. A company can ensure a finishing team knows the best techniques for all this, or, if volumes are sufficient, buy or send the part out for blasting. The latter seems much, much simpler.
But blast cleaning really is anything but simple. Consider the common wheel blast system (see Figures 1 and 2). It could be an inline system, where a monorail or conveyor carries parts in a continuous flow; or a batch system, where batches of parts are placed in a blast cabinet. In both systems, a blast wheel rotates and throws shot or angular grit toward the workpiece, cleaning off rust and mill scale and prepping the surface for paint. That’s the ideal, when all variables are adjusted properly for the job at hand.
If they aren’t adjusted and monitored as they should be, the operation can go awry. At best, a worker may find that paint isn’t adhering to a batch of parts and trace it back to a problem in the blasting system—say, an improper abrasive mix. At worst, a blasting cabinet’s liner can deteriorate to the point where the machine self-destructs.
It comes back to the fundamentals, the “basic basics” of blast system operation and maintenance. The heart of the system beats inside the wheel housing (see Figure 3). Inside this unit, an impeller pumps the blast media through what’s known as the control cage located in the center of a rotating wheel, and onto the blades that throw the media toward the workpiece in an arc or wave.
This is how the machine produces a blast pattern on the part. The pattern usually is several inches wide and can be several feet long, depending on the machine and the wheel’s distance from the workpiece. The farther the wheel is from the part surface, the larger and less concentrated (that is, fewer media impacts per square inch) the blast pattern becomes. And as sources explained, it’s the abrasive media that really does the work. Four, eight, or more wheels strategically placed in a system can ensure the shot or grit impacts all workpiece surfaces that need to be cleaned and paint-prepped.
Some variables aren’t under the operator’s control. A blast machine must be designed or purchased for the application—for a specific part or part family, or, at a job shop, to handle the majority of parts requiring paint prep. If a machine doesn’t have enough wheels in the right place for a certain part, there’s little a fabricator can do but send the part out to a company that does have such a system, or prep the part manually.
But other problems are under the operator’s control. As with manual paint prep, piece parts must be degreased and cleaned. And when parts reach the machine itself, the operator needs to ensure all variables are correct for the job at hand. These include media type, size, concentration, and mix, as well as basic preventive maintenance (PM).
The basics start at the end of the line: the parts coming out of the paint or powder coating booth. What are their coating coverage requirements, and what surface finish does the powder or paint manufacturer specify to achieve the best results? What’s the average peak-to-valley depth of the abraded surface (measured in mils, with 1 mil equivalent to 25 microns, or 0.001 in.)?
“If it’s a high-pitch peak count per inch, then you’ll use a grit media, because [compared to round shot] the angular grit can get you many more impacts in a given surface area,” said Rick Roth, blasting product manager for Rosler Metal Finishing USA, Battle Creek, Mich.
Blasting imparts kinetic energy onto the sheet metal surface, and too little or too much energy can lead to problems. The amount of energy depends on the size of the blasting media particle as well as its speed.
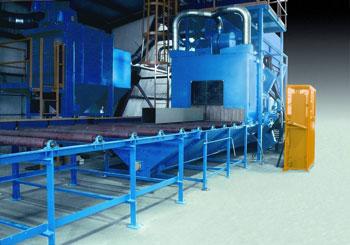
Figure 2: A blasting system preps part surfaces for coating quickly and completely—if, of course, it’s properly set up and maintained. Photo courtesy of Wheelabrator Group.
Industry charts might show that to obtain a 3-mil surface profile a blast machine needs to be loaded with a certain media size. As Roth explained, most standard tables, from the Society of Automotive Engineers and elsewhere, are calculated with the assumption that the media is moving between 245 and 250 feet per second. (The machine and wheel characteristics determine the speed of the abrasive media. For a speed approximation, multiply the wheel diameter by its RPM and divide by 180.) But if large shot were to hit the surface of a 10-gauge sheet at that speed, the particles would warp the surface.
“In blasting, you build up compressive stresses,” said Peter Mosier, applications and sales manager at Wheelabrator Group, Burlington, Ont. “If you do that to only one side of the part and not the other, you’re going to cause the part to bend or warp.”
Round shot can have a particularly effective peening action when it hits the surface, which is why the media is used in shot peening, a far more controlled process that’s designed to induce compressive stresses on a workpiece.
“If you’re using round shot, you may intend to clean the surface, but you will also be peening it at the same time,” said Steve Seabrook, applications engineer at Wheelabrator. “If you’re cleaning 0.5-inch steel plate, a little bit of peening on the surface doesn’t matter. But if you’re cleaning light-gauge parts, you may want to use small-sized grit, which helps avoid putting excessive compressive stresses onto the part. You can control [these stresses] in a lot of different ways, depending on the kind of media you’re using, the workpiece exposure time in the blast zone, as well as the velocity and volume of the media being thrown.”
An encyclopedia could be written on the various abrasive types and mixes available, but as sources described, one common thread is the importance of the proper media mix. A cleaning application may call for S-280 shot (called such because 85 percent of the shot particles are retained on a 0.0280-in. mesh screen).
The particles, though, break down into smaller particles after use as they cycle repeatedly through the machine. So what starts as S-280 eventually becomes S-230, S-170, S-110, and smaller before being separated out into a hopper.
Having an even balance between different particle sizes is critical, which is why adding media to a machine can be a delicate affair. As the machine discards used, too-small-to-be-effective abrasive, the same amount of new, larger abrasive should be fed into the system.
“The rule of thumb is that you will consume, in pounds per hour, half of what your wheel horsepower is,” said Tyler Cotton, president of Blast Abrade Inc., Elyria, Ohio. “So if you have a single blast wheel that’s 20 horsepower, you’ll consume about 10 pounds of shot per hour. If you have four 20-HP blast wheels, that’s 80 HP altogether, so you’ll consume about 40 pounds of media per hour.”
Many machines add media automatically, but some systems require operators to add media as needed. To do so they monitor an ammeter that measures the amperage load on the wheel. For most efficient usage, that ammeter should be at a fully loaded reading, as specified by the equipment manufacturer.
But say an operator on a prior shift didn’t pay attention to the ammeter and fails to replenish the system with media. So as small particles separate out and exit the system, the abrasive level declines significantly. This puts a serious damper on blasting efficiency, but it also throws the media mix off-kilter.
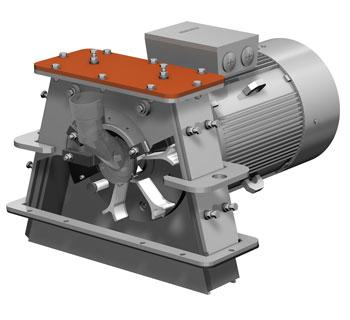
Figure 3: The wheel turbine is the heart of the blasting system. Photo courtesy of Rosler Metal Finishing USA.
An inexperienced operator on the next shift might notice that the abrasive level is low and so dump a large amount of fresh media into the system, only to find he’s still having trouble. The ammeter shows the wheel is fully loaded, but the mix level remains uneven, with too many large particles. This swings the pendulum the other way, making the blasting action much too aggressive. In this case, he must cycle the media through the machine (with test pieces, to avoid accelerated machine wear) until enough particles wear, re-creating the optimal mix of media sizes in the system.
“Fluctuations in media consistency in your blast system can really throw a monkey wrench in your processes down the line,” Seabrook said, adding that along with monitoring media levels, operators need to keep an eye on parts exiting the system. “Some parts can carry a lot of abrasive media out of the machine.”
When setting up a machine, the operator needs to read the blast pattern, often called “checking the hot spot” because the impacted area becomes hot to the touch. Running a painted test piece through the machine (30 seconds of media exposure usually does the trick) can reveal what that blast pattern looks like.
“If you blast for 30 seconds, you feel the area on the part, and it’s not hot, well, it’s hot somewhere,” Cotton said. “The media may be hitting the roof or floors [of the cabinet], so you have to make the adjustments until you get that hot spot on your setup piece.”
The position of the control cage opening determines where the abrasive shot or grit wave will start and, ultimately, the resulting blast pattern. The size of the control cage opening determines how long the pattern will be and, hence, how dense the impacts are on the workpiece (see Figure 4 and Figure 5).
The abrasive media’s path between the control cage opening and the workpiece isn’t a straight line. Once the media exits the control cage, the wheel blades rotate and propel the particles in a completely different direction. To account for this, control cages are set to positions analogous to a clock face. A control cage set at, say, 1 o’clock may propel a wave of shot or grit downward, close to the 6 o’clock position, depending on the wheel diameter, RPMs, and other parameters.
But not everyone in a plant may know this. “A classic problem occurs when an inexperienced factory maintenance person looks at the cage opening and thinks that’s where the media comes out, and so aims that opening directly toward the workpiece,” Roth said. “But it takes up to 180 degrees to come off the blades. So when he’s done, the system blasts media right up into the wheel housing, and the shot or grit is batting around everywhere. You can destroy a wheel housing very quickly doing this.”
When components wear, things go awry, and their causes may not be obvious. A.W. Mallory, in his back-to-basics guide Guidelines for Centrifugal Blast Cleaning, describes a situation in which the operator sees the ammeter drop below full load. This means the wheel isn’t throwing enough abrasive and is below its maximum cleaning power—so he should add more media, right?
Not necessarily. If the operator shuts off abrasive flow to the wheel and sees the ammeter jump briefly to full load before falling off to a no-load reading, the wheel actually may have excessive abrasive flow and, like a car engine, be choked or flooded. If the needle just drops after shutting off abrasive flow, then the wheel is indeed being starved of media.
However, lack of media in the hopper still may not be the problem. Both a flooded or starved wheel may be caused by a malfunctioning flow-control valve, worn wheel parts, power loss from motor drive problems, or obstructions in the abrasive recirculating system.
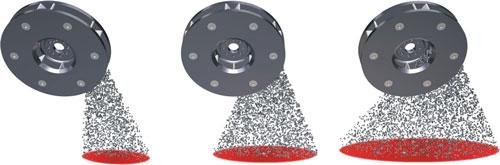
Figure 5: Optimizing the blast pattern for the job at hand is critical for proper blast machine setup. Image courtesy of Rosler Metal Finishing USA.
The last includes an air-wash separator system that removes scales, fines, and tramp metal from used abrasive, and also filters out abrasive particles that are too small to use—again, to maintain the optimal abrasive mix. Spent abrasive and particles from the workpiece are moved via gravity, or rotary-screw or shaker conveyors, from the base of the blast cabinet, up an elevator conveyor system, through a screen mesh, and to the air-wash separator, where the media falls in what should be a uniform curtain. Air flows through the curtain to separate out the waste particulate, which falls into a collection hopper, while dust and fines are blown to a dust collector (see Figure 6). The good abrasive flows back into the system for reuse.
“The length of that curtain is critical to maintaining your abrasive mix,” Seabrook said. “If it’s too long, you don’t get the right air-to-shot ratio. If it’s too short, your abrasive curtain is too thick for the air to flow consistently. We recommend that the operator check to ensure he has a full curtain of abrasive [in the separator] at least once a day.”
As Mallory’s guide details, too much airflow through the curtain can remove excessively large particles; too little airflow won’t remove fines; either problem negatively affects the blast media mix. Airflow problems also can come from holes or leaks in the separator housing. If the abrasive curtain is uneven, something may be lodged in the screen mesh above the separator unit, or the baffles or spreader bars may be improperly adjusted.
The air-wash separator can’t work properly if the dust collector isn’t properly maintained. The dust collector needs to be maintained and cartridges changed periodically to achieve a certain differential pressure, specified by the manufacturer. “If you open the blast cabinet and see a puff of dust, you may have problems,” Roth said.
Other high-wear items include internal blast-wheel components, including the impeller, control cage, and blades on the wheel itself. “As those internal components start to wear—especially the impeller and control cage—the blasting media does not flow to the blades properly. This can cause abrasive turbulence inside the wheel, increasing wear and causing the abrasive wave to spread out farther, thereby making it less concentrated than it once was,” Seabrook said. This all makes blasting less efficient.
“If your blades start to wear as well,” Seabrook said, “blast media will go all over the place. If they wear too much, you can actually shatter the components inside the wheel.”
The cabinet liner is another component that needs to be regularly checked and replaced. “A telltale sign of a failed liner is a hole in your cabinet and high-speed shot sailing across the shop,” Seabrook said.
Basic wheel-blast operation and maintenance haven’t changed for decades, but that doesn’t make the process any less critical. In any fab shop, blast cleaning occurs near the end of the manufacturing process. A lot of upstream labor—cutting, bending, welding, grinding—goes into any part entering the blasting system. The later a problem occurs in manufacturing, the more expensive that mistake is.
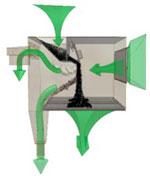
Figure 6: In an air-wash separator, air flows through the curtain to separate out the waste particulate, which falls into a collection hopper, while dust and fines are blown to a dust collector. The good abrasive flows back into the system for reuse. Image courtesy of Wheelabrator Group.


The Fabricator is North America's leading magazine for the metal forming and fabricating industry. The magazine delivers the news, technical articles, and case histories that enable fabricators to do their jobs more efficiently. The Fabricator has served the industry since 1970.
start your free subscription
Easily access valuable industry resources now with full access to the digital edition of The Fabricator.

Easily access valuable industry resources now with full access to the digital edition of The Welder.

Easily access valuable industry resources now with full access to the digital edition of The Tube and Pipe Journal.

Easily access valuable industry resources now with full access to the digital edition of The Fabricator en Español.
In this episode of The Fabricator Podcast, Caleb Chamberlain, co-founder and CEO of OSH Cut, discusses his company’s...


