


Product Manager
Your laser cutting machines run faster than ever. Operators set up press brakes quickly, send formed parts on to welding, then grinding and finishing operations. The problem is, you see pallets of parts piled up in front of the grinding department. Workers scurry about, and you hear the almost constant whine of grinding wheels. Everyone’s certainly working hard. Still, the grinding and finishing bottleneck persists.
Even worse is the rework. Errors anywhere aren’t good, but when an operator makes a mistake in laser cutting, for example, he can add that part to another nest on the next run. When grinders and finishers make mistakes, they can damage or even ruin a part that’s nearly complete. If they ruin the part, all the value that’s been added to it—the cutting, the bending, the welding—is effectively destroyed.
Like any manufacturer, metal fabricators care about throughput, governed not by the speediest machine but by the slowest manufacturing step—the constraint. Grinding and finishing often end up being that constraint. You may have slow material removal rates, the need for secondary operations, along with excessive downtime for changeovers. The same could be said for the manual cutting of tube, angle, and other pieces using power tools with cutting discs.
Manual grinding, surface finishing, and cutting may seem like small pieces of the productivity puzzle, but they can have a dramatic impact on a shop’s productivity and bottom line. These manual tasks can be truly arduous if workers aren’t given the right tools and training to succeed. A fabricator is only as strong as its weakest link. But if you follow best practices, that weak link doesn’t have to be in manual cutting, grinding, and surface finishing.
Select the wrong product for the application and you’re sure to incur excessive downtimes and processing times. From the start, consider what must be accomplished and then choose the right abrasive product and tool for the job.
Before selecting a wheel or disc, determine what you need to accomplish. What’s the base material? What’s the desired outcome? Are there specific finish requirements?
Certain materials, such as stainless steel and aluminum, present specific challenges in cutting, grinding, and finishing. Aluminum has a low melting point, which can cause it to melt and adhere to the abrasive product during grinding. Heat buildup during stainless steel cutting or grinding can cause the material to “blue” or discolor, which can be a problem if the part won’t be painted or coated. Stainless and other material can be sensitive to contaminants, so make sure you choose an abrasive and wheel that are designed for such material.
Next, learn about the range of products available for cutting and grinding. Cutting wheels come in various sizes, thicknesses, and styles. A 0.045-in.-thick cutting wheel is a common choice for general fabrication. When cutting thinner materials, consider 1-mm wheels. These produce less friction as they move through the cut. They also create less heat, fewer burrs, and a precise cut—and no burrs means you don’t need to remove them prior to welding.
Grinding and surface finishing rely on three types of consumables, and which to use depends on the application.
1. Grinding wheels, which provide a fast, aggressive cut rate from the start, are the most durable but provide the roughest surface finish. They come in various grains and grades that must be matched to the application to achieve the greatest output.
2. Flap discs, which provide a fast cut and an adequate life, last much longer than resin fiber discs but not as long as grinding wheels. Flap discs grind and finish in one step, taking the place of two separate products, which saves time in applications where surface finish is important.
3. Resin fiber discs are arguably the most aggressively coated abrasive product, but they have a short life compared to grinding wheels and flap discs. They have extremely fast material removal rates (also known as “cut rates”) and low initial investment costs. And, with the correct backing pad, they can be tailored to the application.
When grinding and surface finishing, start with the coarsest product for the job and step down in intervals. Don’t skip too many intervals; you wouldn’t want to start with a bonded wheel and jump straight to a polishing product. This will increase the overall time and result in an undesirable finish.
Each changeover might take a few minutes, 20 minutes, or even more, depending on how far you need to walk to the tool crib to get a new wheel. Whenever possible, store discs and wheels as close as possible to the point of operation.
Also, make sure you have the changeover tool you need when you need it. Even better, choose a wheel with a hub design that allows quick changeover without the need for tools.
For grinding, the choice of abrasive affects how frequently you will need to change products. Choosing a product with the right balance of material removal rate and life for the application is key.
Cost factors into the product choice too. Products with a ceramic grain may be more expensive initially, but for the right application they can last twice as long compared to other options. Their long life means you’ll have fewer changeovers.
Grains such as zirconium and ceramic fracture and provide a fast material removal rate throughout the life of the product, so operations continue to achieve high productivity even as these products wear. Compare this to a product with an aluminum oxide grain, which gives you a fast cut speed when it’s new, but the speed tapers off with use.
Also, be sure to use cutting and grinding wheels and flap discs for their full life. If you discard them too soon, you add unnecessary downtime for changeover. You can use grinding wheels until the wheels are worn all the way to the center of the wheel, and you can use flap discs even if they look worn. Discard a flap disc only once the adhesive or epoxy is visible through the abrasive flaps.
Improving technique is typically where you can make the greatest impact on productivity. It boils down to two factors: position and pressure.
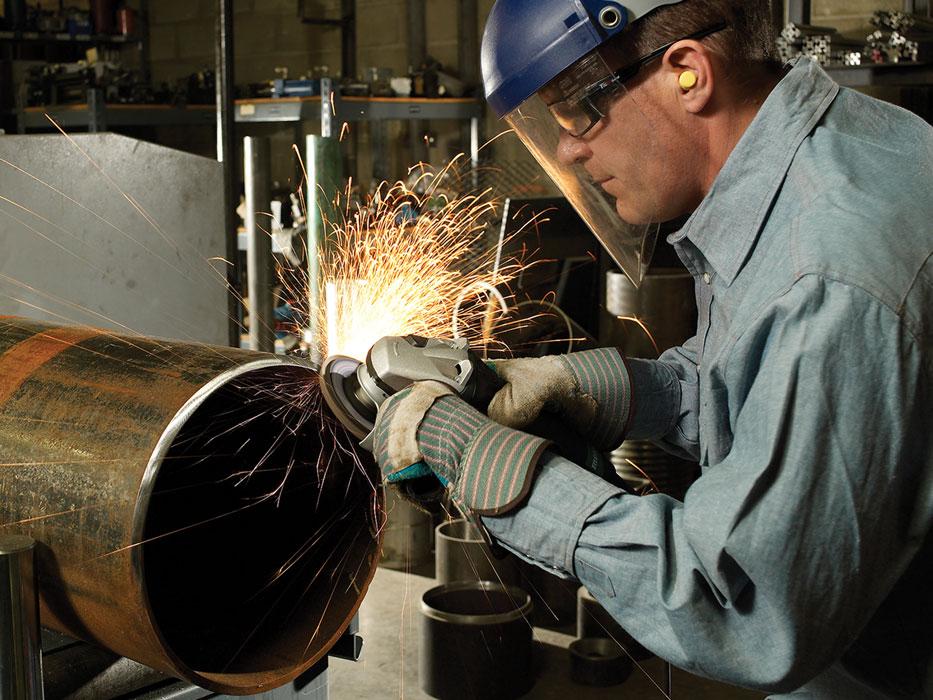
Before starting, make sure the tool guard is properly positioned between your body and the abrasive product to ensure there’s no interference in cutting or grinding. This eliminates the need to stop midway through to reposition the guard.
When either cutting or grinding, clamp the workpiece securely to minimize workpiece vibration and movement. If you don’t clamp the workpiece securely, you will become fatigued quickly as you end up fighting workpiece vibration, shortening the consumable’s life and its effectiveness. Whenever possible, position the workpiece at waist level so you can work with a stable stance and the best ergonomics.
For efficient grinding, approach the workpiece so that the front edge of the abrasive wheel makes contact at a slight angle: zero to 45 degrees for type 27 grinding wheels, zero to 15 degrees for type 27 flap discs, and 15 to 35 degrees for type 29 flap discs. Also, always start on a backstroke to reduce the chance of gouging or undercutting the material, which will require later rework.
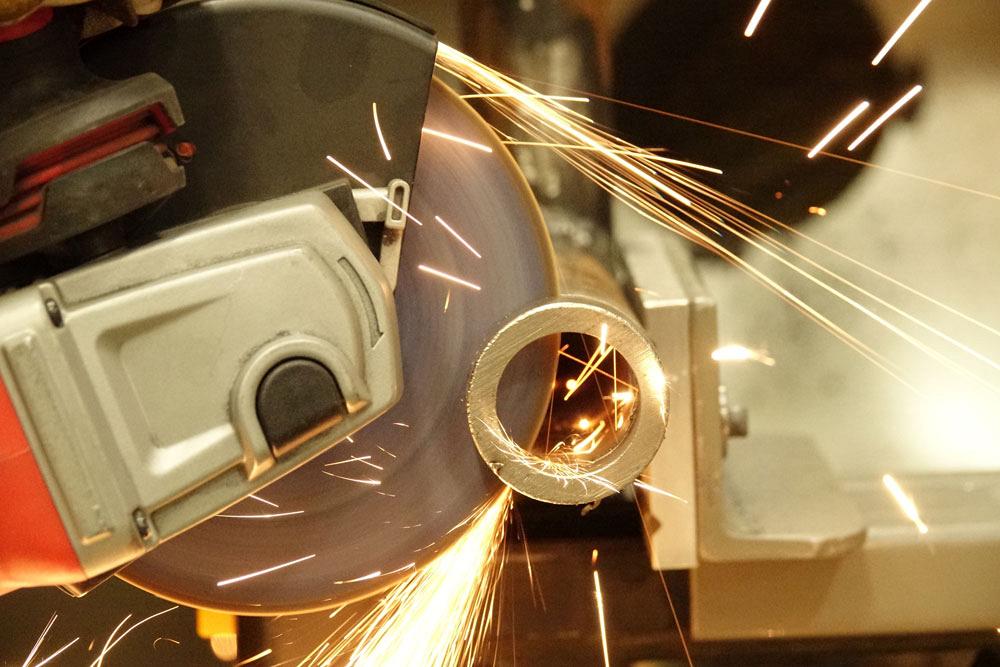
When cutting, approach the workpiece from the smallest cross section. For instance, if you are cutting a rectangular tube, clamp the piece so you can approach and start cutting from a corner rather than going across a side. Use consistent pressure and a slight rocking motion as the wheel passes through the cut.
Cutting wheels are meant to be used at 90 degrees to the workpiece. If you maintain this angle through the cut, you will reduce friction and heat and avoid binding or stressing the wheel.
Pay attention to the pressure you’re applying. Applying the correct amount of pressure can increase the life of the abrasive and increase its efficiency.
Apply too much pressure and you risk pitting, gouging, or removing too much material, all of which might require rework. Excessive pressure adds fatigue too. If you’re tired, you’re more likely to make mistakes. Of course, applying little or no pressure isn’t efficient either.
For the best results, apply consistent pressure and use smooth, even strokes. To get the job done properly, apply just a little more pressure than the weight of the power tool.The grinder itself can give you a good indication of applied pressure. If you hear a low-pitched noise, or if you feel the tool starting to bog down, you’re applying too much pressure; if the grinder skips across the work surface, you’re not applying enough.
The spark trail is another good indicator. A consistent trail of sparks from the grinder indicates consistent pressure; a spark trail that increases or decreases is a sign of inconsistent pressure throughout the stroke.
The grinder is often most difficult to control at the beginning and end of the stroke. Be sure to keep a consistent stroke and avoid dwelling in one spot for too long, which can cause heat buildup or gouging that will require a secondary operation to rework the material. To reduce the risk of gouging, try starting with an initial pull stroke rather than a push stroke.
Consistent pressure and motion also are important when using a cutting wheel. More pressure does not make the cut faster but instead can slow the cut and shorten product life. To reduce friction and heat and improve quality, use consistent pressure and rock the tool back and forth through the cut.
For light-pressure finishing applications, or for those where it’s difficult to achieve the proper pressure (such as when grinding overhead), consider an alternative product profile (type). For instance, a type 27 flap disc or a type 28 grinding wheel can help maintain a consistent material removal rate at lower angles and pressures.
No matter what product you use, always match the speed and size of the abrasive to the tool. For safety, make sure that the RPM rating of the product meets or exceeds the RPM rating of the power tool.
While the initial product cost may be a key consideration, keep in mind that choosing abrasives that deliver the right balance of faster cutting or material removal and longevity can offer a quick return on investment through labor savings. It also can minimize downtime that adversely affects throughput.
Numerous factors determine the efficiency of cutting, grinding, and surface finishing, from the type of product being used to operator technique. Choosing the right product and following best practices can help you build an efficient, effective operation. Ultimately, it will prevent cutting, grinding, and surface finishing from becoming a bottleneck.
Ben Lampi is product manager at Weiler Abrasives Group, 1 Weiler Drive, Cresco, PA 18326, 800-835-9999, www.weilercorp.com. Photos courtesy of Weiler Abrasives Group.

The Fabricator is North America's leading magazine for the metal forming and fabricating industry. The magazine delivers the news, technical articles, and case histories that enable fabricators to do their jobs more efficiently. The Fabricator has served the industry since 1970.
start your free subscription
Easily access valuable industry resources now with full access to the digital edition of The Fabricator.

Easily access valuable industry resources now with full access to the digital edition of The Welder.

Easily access valuable industry resources now with full access to the digital edition of The Tube and Pipe Journal.

Easily access valuable industry resources now with full access to the digital edition of The Fabricator en Español.
In this episode of The Fabricator Podcast, Caleb Chamberlain, co-founder and CEO of OSH Cut, discusses his company’s...


