


Transfer Press Simulation Engineer
To blaze a pathway to a productive, profitable transfer die, metal stamping operations should assess thoroughly, use simulation software, and be prepared to tweak.
When it comes to colors, stamping plants prefer green over red. No, this is not a reference to Michigan State versus Ohio State in college football. In this instance, “green” represents profit and “red” represents loss. Stampers stay “in the green” when they run continuous production without interruptions and achieve high strokes per minute (SPM) rates.
How can you be sure your transfer die ends up in the green instead of red? By applying best practices. But before you can do that, you have to understand transfer die fundamentals.
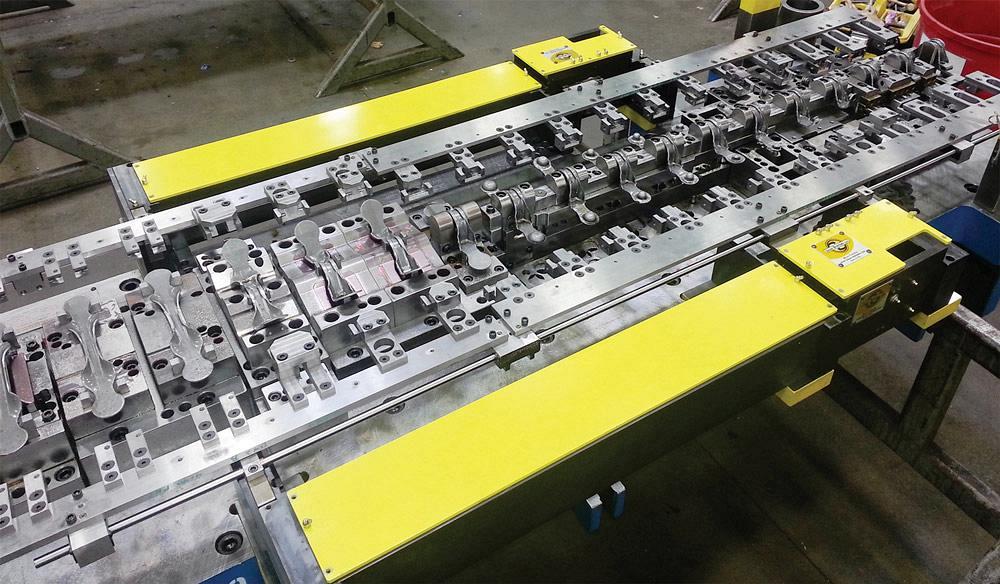
A transfer die lineup typically begins with a blank or a coil-fed strip. The blank or strip is then moved through several stations that finish or partially finish the part or parts. Unlike a progressive die, the parts do not stay connected from one station to the next. Instead, a transfer mechanism is required to move the parts from one station to the next.
The transfer mechanism can be mounted to the press, or it can be mounted to the die. The motion can be fixed (unchangeable) or it can be programmable, allowing the operator to change the travel distances and the timing for when motions begin and end.
Robotic transfers allow for even more motion freedom. Several single-station presses can be put in a line with robotic arms moving the parts press to press.
1. Evaluate Up Front. What is the first step a stamper can take to make sure a transfer die is headed in the green direction? Up-front evaluation is the foundation of the entire project. It is the key for choosing the pathway toward green or red. It can mean happiness or headaches for the entire life of the die.
Initially, engineers look at the part size and characteristics, the material used, how many parts are needed a year, and how many years the die will run. This helps them choose whether a transfer die is the best fit or not.
Typically, transfer press selection is based on die size, transfer space, tonnage requirements, press availability, and the SPM required to make money and stay in the green.
Up-front evaluation is more than just figuring out which stations should be used to form, trim, and pierce the metal. At this stage you also should decide which kind of transfer fingers to use, how many are needed, and where to place them on the parts. Where are the best locations for gauges to locate the part properly without restricting or limiting the transfer motion speed?
One important area to focus on during initial evaluation is how you will transport the blanks. Depending on the material, blanks can tend to sag and droop in the middle during transport into the first station. Make sure you have adequate fingers for transporting the blanks. Shovels that simply scoop up the corners may not work if the blank tends to sag and pull in. Gripper clamps bite hard and hold tension well. Consider using four grippers—one on each corner—to transport blanks that sag.
Unlike a progressive die, the parts do not stay connected from one station to the next in a transfer die setup. Instead, a transfer mechanism is required to move the parts from one station to the next.
Another area to focus on during processing is the last station where blanks are separated. It is common in transfer dies to see two blanks run through together, inline front to back, with a temporary carrier strap holding them together. This up-front processing and evaluation step is the right time to decide which is the best way to get the separated parts out of the last station.
If arm lengths are a concern or press columns are in the way, one method is to cut the carrier strap through as scrap. The separated parts then slide off the die onto angled ramps when the die opens. No transfer arms are needed to remove the separated panels.
If this cannot be done, keep in mind that it is more difficult to lift up and pitch-forward separated panels without the center strap there to keep the parts from sagging in the center. If you are using gripper clamps on medium-size and large panels, always try to use at least two. Place them on two different areas of the part, preferably on different angles or planes. Doing so will allow a higher G-force during the lift-up and pitch-forward motion. This will result in a higher SPM rate.
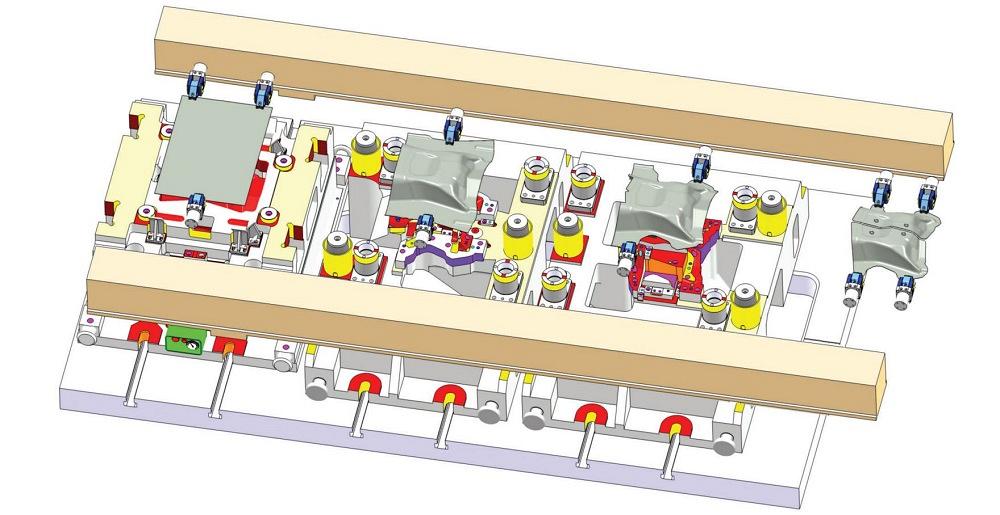
2. Use Transfer Simulation Software. The second step is to test your die design using transfer simulation software. Do it before the die is built. It is much easier to change a CAD design than a completely built die.
Ten years ago the goal of transfer simulation was just to make sure the die had a clear path so the transfer system could pick up and move the parts to the next station. Over the past decade, some software has advanced and developed into doing more.
Transfer simulation can now be used to test the die’s SPM rate capability virtually. Different G-forces can be applied to all the motions of the transfer system, and corners can be rounded so that motions gently transition from one axis to another. It can identify problem areas that are limiting the SPM rate capability of the entire die. As a result, you make sure that the die is not only clear enough to run, but that it can run a high SPM rate consistently.
For transfer simulation software to be an effective tool, the press in the software must be a digital twin to the actual press. On-site assessment is required to collect all of the press and transfer system dimensions and all transfer motion capabilities and limitations. Time must be spent gathering this critical info so that the virtual press is an exact match to the real-world press.
Talk with press operators and ask the tough questions. What problems do you see most often? What are the weaknesses of the transfer system and press you are using? Use this info to adjust your virtual press and transfer simulation process to provide the most accurate results.
3. Tweak and Repeat., The best laid plans still need some tweaking. Even the fastest race car needs minor adjustments to keep it in the lead. Using transfer simulation software right at the press can yield significant rate improvements. As you increase the SPM rate, problems may occur with the panel control, sensor faults, or other devices that hinder the production rate. That is when you adjust the transfer timing using operator feedback and transfer simulation software. New settings are entered, production resumes, and speed is increased. This will allow you to reach the highest possible SPM rate.
If you have invested in a servo ram transfer press, why not run each die at the highest possible rate? Most transfer presses use mechanical ram slides with a fixed-motion curve. Adjusting the die motion and transfer motion around it with a capable transfer simulation software is a basic step-by-step process. However, if you enter in a servo motion press, there is no longer a fixed-motion curve. So then, the press ram motion is also programmable as long as the blank’s formability and die factors are maintained.
The best designs still need some tweaking. Using transfer simulation can yield significant rate improvements. For example, you might revise the plan to include more overlap between motions to achieve a high SPM.
You can achieve the highest possible production rates with servo ram optimization using transfer simulation. This is the Holy Grail of transfer press production. Surprisingly, few stampers attempt to push for the highest rates from their servo ram presses. The potential revenue stream from doing so is significant. The few stampers who are doing this realize a very quick ROI. It frees up press time as well.
What else can you do to improve transfer press production rates? Some practical improvements you can do immediately that will help you reach higher SPM rates are:
In closing, the key to getting your transfer die in the green all boils down to your ROI. What can you do short term and long term that will not only pay for itself, but will increase revenue for months and years ahead? The importance of achieving higher, consistent SPM cannot be stressed enough.
Use an ROI calculator. Take a moment to enter a few numbers for the press, then adjust the SPM. Notice the significant results. With a little effort you can move your transfer die projects from red to green and from unprofitable to profitable.


The Fabricator is North America's leading magazine for the metal forming and fabricating industry. The magazine delivers the news, technical articles, and case histories that enable fabricators to do their jobs more efficiently. The Fabricator has served the industry since 1970.
start your free subscription
Easily access valuable industry resources now with full access to the digital edition of The Fabricator.

Easily access valuable industry resources now with full access to the digital edition of The Welder.

Easily access valuable industry resources now with full access to the digital edition of The Tube and Pipe Journal.

Easily access valuable industry resources now with full access to the digital edition of The Fabricator en Español.
In this episode of The Fabricator Podcast, Caleb Chamberlain, co-founder and CEO of OSH Cut, discusses his company’s...