


Senior Product Manager, Welding and Fabrication
When you’re preparing to weld, you want to remove impurities and coatings from the surface without removing excess surface material. Weiler Abrasives
In any application, properly preparing metal for welding is key to producing high- quality results, maintaining consistent productivity levels, and minimizing costs—especially costs related to rework and downtime.
Starting with the cleanest possible surface greatly increases the chances for a sound and strong weld. That’s why arming operators with the best practices for completing weld prep correctly and efficiently is important to streamlining the overall welding operation.
For proper weld preparation, it’s important to have a plan before getting started. Otherwise, it’s easy to jump fully into a project that seems simple and then quickly discover there are many factors that can lead to costly delays, additional steps, or rework. Having a plan also helps you resist the urge to take shortcuts when issues arise.
Consider these questions when putting together your weld prep strategy:
• What is required for the welding process I am using? If you’re shielded metal arc welding (SMAW), you can often get away with some impurities on the material surface, but the process requires more postweld and interpass cleaning. Gas metal arc welding (GMAW) and gas tungsten arc welding (GTAW) typically require more preparation and a cleaner surface to produce quality welds, but also require less effort for postweld cleanup.
• Which media is best for the material I am working with? Some materials, such as hot-rolled steel, have heavy mill scale on the surface that must be completely removed before welding. Harder materials like INCONEL alloys work-harden and require high-performance abrasives, like ceramic, for weld prep. Soft and nonferrous materials like aluminum may be more susceptible to wheel loading, sometimes referred to as clogging. This is where particles from the base material adhere to the wheel, and require an abrasive that is designed to prevent material from building up in the medium
• What is the final finish requirement? It’s important to know and understand the finish requirements when choosing your abrasive.
Once your plan is in place, the second step in preparing metal for welding is often cutting, fitting, and beveling the base material. The amount of care and preparation you put into the initial cut can reduce the amount of work that goes into cleaning later.
Many tools can be used for cutting, including a torch/plasma cutter, shears, laser/waterjet/CNC tables, and manual tools such as cutting wheels. Each type has pros and cons.
Properly preparing metal for welding is key to producing high-quality results, maintaining consistent productivity levels, and minimizing costs.
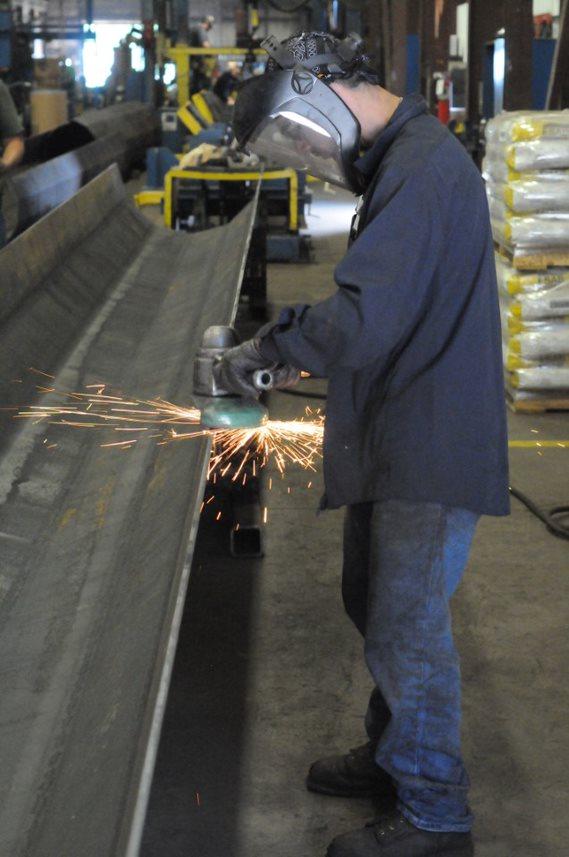
Making the initial cut as clean, straight, and consistent as possible will make it easier for you to produce quality results. Offhand cutting with a right-angle grinder is inexpensive, portable, and does not require as much setup and maintenance as most of the other options. However, to achieve clean, straight cuts, you need a fair amount of practice and skill.
A clean, consistent gap between the two pieces to be welded will produce a stronger, more consistent weld with less filler metal, reducing costs and saving time.
Once the material is cut and beveled, it’s time to prepare the surface for the initial welding pass. Removing any mill scale, chemicals, contaminants, and coatings from the base material helps ensure proper weld penetration and eliminate impurities, porosity, and inclusions. Be sure to clean the work surface thoroughly within an inch of the joint on both sides.
When cleaning some stainless steels and other alloys, you may be fine using acetone and a wire brush rather than an abrasive medium. Rust, rubber coatings, powder coat, and paint are light enough that they can be cleaned more effectively with a wire brush.
If the application requires an abrasive product for surface cleaning, consider what you’re trying to remove. For weld preparation, start with a less coarse option and increase in aggression only as necessary. With heavier coatings and mill scale, the best option is usually a grinding wheel or a flap disc.
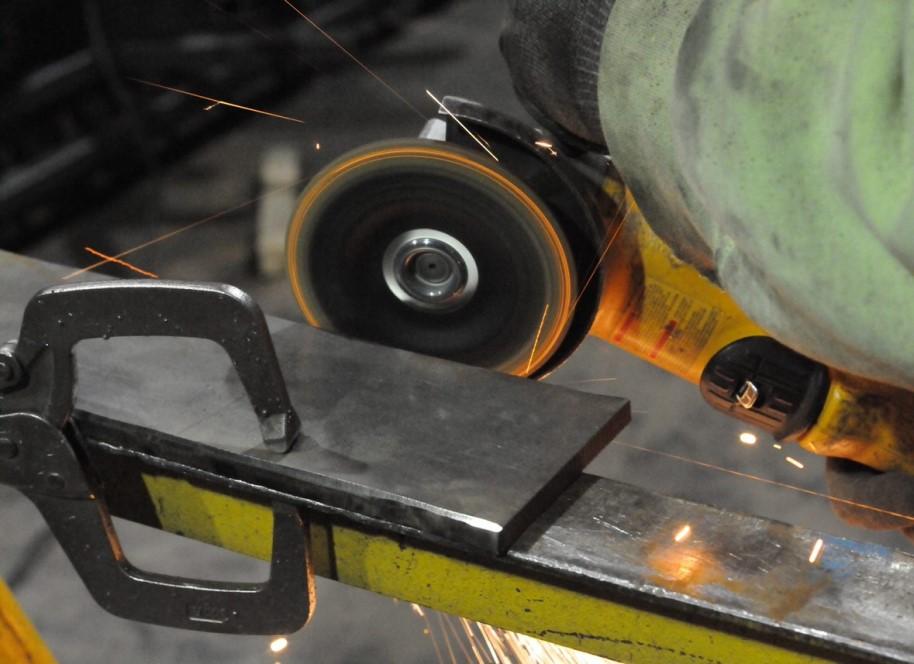
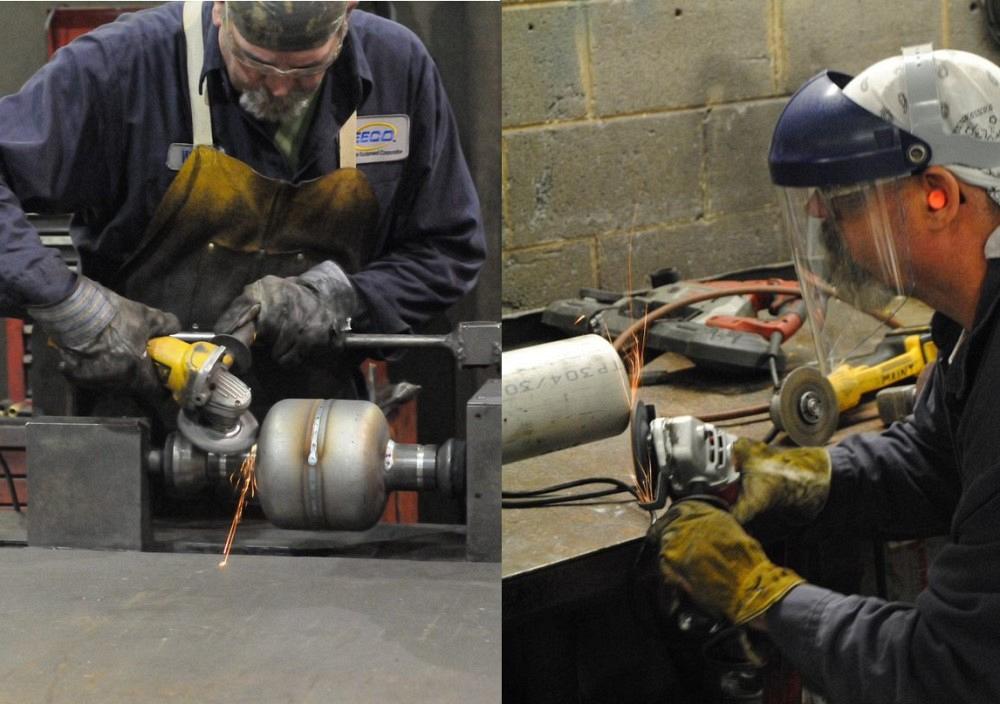
Flap discs are commonly used in weld preparation because they are easy to control and you can grind, finish, and blend all at once. A grinding wheel is more aggressive and durable, which is helpful when working with jagged or uneven seams, like torch slag. Be careful not to get too heavy-handed with a grinding wheel, because it’s easy to remove too much base material.
A common misconception is that a coarse abrasive will always get the job done faster. While it’s true that coarser, more aggressive abrasive will remove material faster, that’s not always a good thing.
Using an abrasive that is too coarse abrasive can remove excess material or damage the surface. Removing too much material may put the finished part outside final specifications and tolerance. Because the scratch pattern is coarser, it can also be more difficult to see surface imperfections and cracks during visual inspection. While you may not remove material as quickly with a finer abrasive, it’s often more productive, can minimize the number of passes needed to achieve the desired finish in less time, and can prevent rework.
The outside corner of a grinding wheel is the most aggressive, so the steeper the angle of approach, the greater the possibility the wheel will remove more surface material than desired and undercut or gouge the workpiece. A lower grinding angle helps you maximize control and reduce the risk of gouging.
For the strongest, most consistent welds, you want consistent material and wall thickness. If you use an overly aggressive abrasive, it can gouge or undercut the surface.
A hard grinding wheel will typically remove mill scale with minimal effort, but it also requires a higher level of skill to prevent removing too much material. Coarse-grit (24 and 36) flap discs and coated abrasives can also get the job done quickly, but they can load. This wastes valuable time and increases operator fatigue and frustration. You can improve results significantly by choosing an abrasive designed to clear material and minimize loading using a top coating as well as open-coat grain.
Depending on the material and its condition, a 60-grit coated abrasive flap disc can provide all the aggression necessary and ultimately get the job done more quickly than a coarse-grit flap disc. The 60-grit disc leaves a better finish and is less likely to gouge and undercut, allowing you to get the desired finish faster with fewer passes, no heat discoloration, and less effort. Whenever you can reduce the number of secondary operations, you reduce operational cost significantly.
Several abrasive profiles are available that can make the job easier or harder.
Wire wheels are much more resistant to loading but do not remove base material. That makes them a good choice for removing surface contaminants and coatings without affecting the base metal. Abrasives are designed to cut and remove base metal. Because of abrasives’ construction, heavy coatings and base material can build up between the grains and reduce their ability to cut.
A type 27 (flat profile) flap disc can create a significantly different result than a type 29 (conical profile). The wrong profile actually limits the amount of abrasive contacting the surface metal. Choose a type 27 flap disc for lower grinding angles (5 to 10 degrees) and light pressure applications like finishing and blending. Choose a type 29 flap disc when grinding at higher angles (15 to 30 degrees), which is more typical for aggressive material removal.
A wire brush also comes in various styles and sizes. Wire gauge and knot type are the most effective performers. Options include stringer bead, cable twist, and standard twist.
• A stringer bead brush has knots that are twisted very tight into a narrow profile. This brush is designed for cleaning in tight gaps and initial weld passes in pipeline and multipass welds. They are commonly used in general fabrication applications as well.
• A cable twist brush uses a knot that is twisted to the end, with more wire in the knot so it has additional width, stiffness, and aggression. It can be significantly more effective for weld prep if you don't specifically need to get into a narrow 1/8-in. gap.
• A standard twist brush’s knot is not twisted all the way to the edge, allowing the tips to spread at the end to increase conformability. They are effective for components with a lot of surface imperfections, textures, or contours. Inexperienced operators often get the most efficient cleaning with a standard twist brush because it covers a wider footprint and is easier to control
Following some best practices can help you optimize results in your weld preparation, cleaning, and grinding jobs.
• Lower the grinding angle: When you are using a grinding wheel, lower the grinding angle. That helps you maximize control and reduce the risk of gouging. The outside corner of a grinding wheel is the most aggressive, so the steeper the angle of approach, the greater the possibility the wheel will remove more surface material than you want and undercut or gouge the workpiece. By lowering the angle, you widen the wheel’s surface contact with the workpiece and reduce the wheel’s aggressiveness.
• Watch the pressure. If you use wire wheels, remember that the tips of the wires are designed to do the work. Pressing too hard can cause the wires to bend so that the tips are no longer striking the material.
• Use consistent strokes. Enter the grinding stroke on a pull rather than on a push to help control the aggression of the grinding wheel. Grind in line with the material using smooth, even strokes rather than short, choppy strokes. This provides effective results with coated abrasives and bonded abrasives.
• Avoid arm grinding. When you use only your arms to operate a grinding wheel, the wheel vibration can take a toll on your wrists and forearms. Instead, use your legs and large muscles of your body to help move and control the grinder. To minimize fatigue, move your entire body in the direction of the movement rather than just your arms.
Properly cleaning and preparing your base material is a critical first step in producing high-quality welds. Remember that when you’re preparing to weld, you want to remove impurities and coatings from the surface—you don’t want to remove excess surface material. Choosing the right product for welding preparation and following best practices can help you achieve the results you want.
Rick Hopkins is senior product manager, metal fabrication, for Weiler Abrasives,1 Weiler Drive, Cresco, PA 18326, 570-595-7495, www.weilerabrasives.com

The Fabricator is North America's leading magazine for the metal forming and fabricating industry. The magazine delivers the news, technical articles, and case histories that enable fabricators to do their jobs more efficiently. The Fabricator has served the industry since 1970.
start your free subscription
Easily access valuable industry resources now with full access to the digital edition of The Fabricator.

Easily access valuable industry resources now with full access to the digital edition of The Welder.

Easily access valuable industry resources now with full access to the digital edition of The Tube and Pipe Journal.

Easily access valuable industry resources now with full access to the digital edition of The Fabricator en Español.
In this episode of The Fabricator Podcast, Caleb Chamberlain, co-founder and CEO of OSH Cut, discusses his company’s...