


Industrial Sales Manager, North America West Region
Surface preparation for painting can get expensive. It’s dirty and can be really time-consuming. Considering all this, some might ask, Why do we bother with surface preparation before we paint? Wouldn’t it be cheaper to not do it at all?
The answer lies in a shocking fact: Experts agree that more than 75 percent of all premature coating failures occur as a direct result of improper surface preparation. In layman’s terms, the surface simply wasn’t clean before it was coated.
What does this mean for fabricators? You can have a state-of the art, incredibly complex coating system, but if the surface isn’t prepared correctly, the coating has a less than 25 percent chance of surviving anywhere close to its expected lifespan.
Considering how critical it is to have a clean surface, which surface preparation method is most effective? The answer isn’t simple. It depends on the means and methods of the coating application (as dictated by the customer or coating manufacturer), the total size of the surface-prep project, the complexity of the workpiece or substrate itself, and relevant industry standards that the prepared surface will be measured against.
Commercially available surface-prep methods include wire brushing and grinding, chemical cleaning, high-pressure water blasting, and centrifugal wheel blasting. Air-powered abrasive blasting remains one of the most popular methods. It removes rust, mill scale, and other surface contaminants; imparts a uniform surface profile with microscopic peaks and valleys on the surface; and is relatively fast compared to other methods.
These two terms often are confused with one another. Surface cleanliness, also called class of blast, is the degree of removal of rust, mill scale, and other visible contaminants from the steel substrate when inspected without magnification. Several internationally recognized standards show examples of different classes of substrate surfaces that include different levels of rust and blast surfaces. These include joint standards from the Society for Protective Coatings and NACE International.
A surface profile, or anchor profile, is the surface condition left on the substrate after blasting. When any surface (and particularly a steel surface) is blasted, the abrasive particles “dig” into the surface on impact and rebound outward. This impact creates a surface indentation, or valley, a few thousandths of an inch deep (see Figure 1). Some of the peaks in between these indentations rise slightly above the original surface. The surface profile is measured in mils, or microns, just as a coating thickness is measured. The surface profile is measured from the bottom of the lowest valley to the top of the highest peak.
Blasting a substrate increases the surface area—a lot. Believe it or not, a blasted surface has about 30 percent more surface area than an unblasted surface. All this surface area provides the anchor that a coating needs for proper adhesion.
Blasting is often the most cost-effective way to get large amounts of substrate cleaned quickly. Of course, to ensure blasting remains cost-effective, you should follow a few best practices.
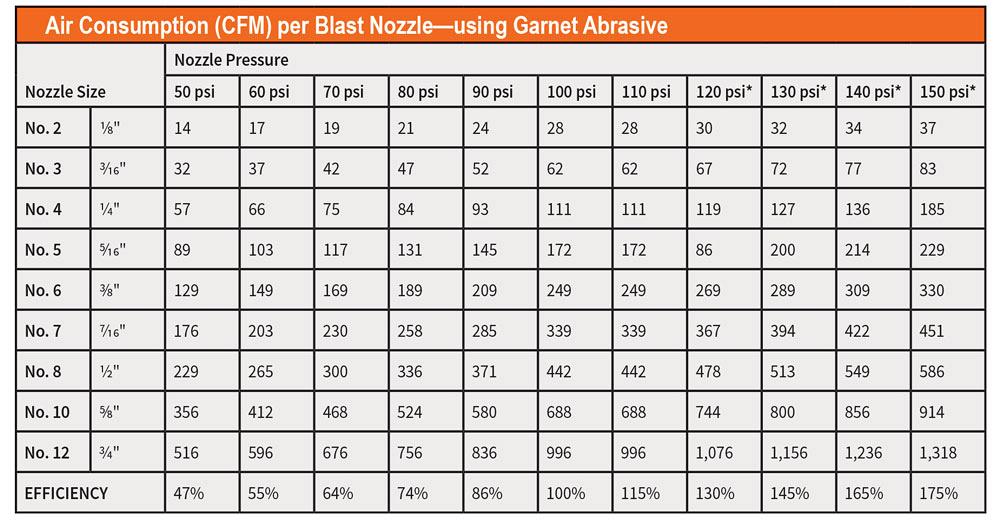
Air pressure should be at least 100 PSI at the nozzle. Maintaining 110 PSI or even higher is better. The reality is, however, that a lot of blasting operations run at pressures well below this threshold; some run at less than 90 PSI, and a few are even less than 80 PSI.

Figure 1
A profiled surface has peaks and valleys, with some peaks higher than the original, unblasted surface.
Every 1 PSI below 100 is costing you 1.5 percent in productivity. To put this in perspective, if your blaster’s nozzle pressure is 90 PSI (which, again, is far too common), you’ve left 15 percent of your productivity on the table. In a world where costs are being squeezed everywhere, that 15 percent could go a long way.
How do you ensure you have enough pressure? First, never assume that the reading on your compressor gauge is the true nozzle pressure. There are many areas of pressure loss through the entire blasting system.
So how do you actually test the air pressure at the nozzle? You can use a hypodermic needle-style nozzle pressure gauge. You can check pressure in several places, but if you have time to check only one place, the ideal location is directly behind the nozzle holder (see Figure 2).
With the abrasive flow open and a needle-style pressure gauge kit at hand, follow these steps:
You also can use this gauge to test the rest of your system to find where your pressure losses are located. For instance, you can test pressure at both ends of the long-length hose; you’ll be amazed to see how much pressure can drop.
Consider having two pressure test kits to test the air going into your blasting equipment (the pot) as well as the air pressure coming out (see Figure 3). When you do this, always make sure the needle is inserted into the hose at an angle, pointing toward the direction of airflow. If you are losing excessive pressure, the problem may be equipment-, accessory-, or compressor-related.
A common misconception is that you are going to save money by hanging on to your old blast nozzles. The reality is that the cost of a blast nozzle is extremely small in comparison to the total shop running cost, but the performance of a nozzle actually can affect a total project cost significantly.
A venturi-style abrasive blasting nozzle works like a jet engine. Air is compressed rapidly in a cone, passes through a small orifice, then expands more gradually than it compressed. This compression and expansion allow the abrasive in the airstream to pick up speed very quickly. The abrasive travels down the blast hose at between 65 and 80 MPH. After this rapid compression and decompression (called rarefaction), the abrasive is moving closer to the air speed, which can be more than 400 MPH.
The two most common liner materials for blast nozzles are tungsten carbide and silicon nitride. Both are durable and take a long time to wear, but this is an extreme environment, so wear is inevitable (see Figure 4).
As you can imagine, the area of fastest wear is the smallest point of the nozzle, called the orifice. The orifice is measured by its inside diameter (ID) in either 1/16 inch or millimeter increments. This size determines how much compressed air the blasting system will need (see Figure 5).
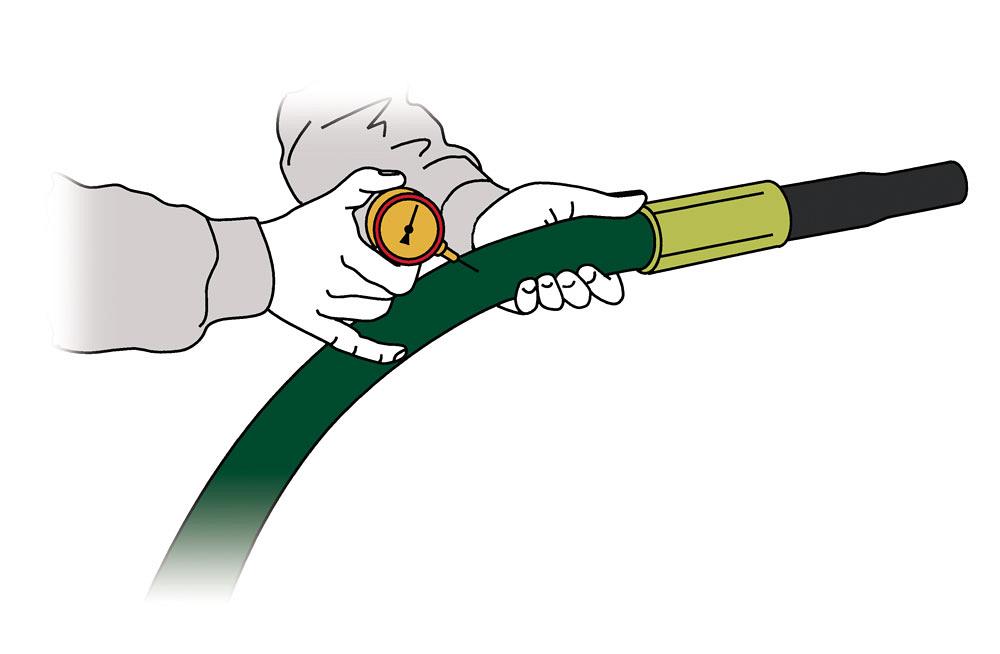
Figure 2
Using a needle-style pressure gauge, check the pressure directly behind the nozzle holder.
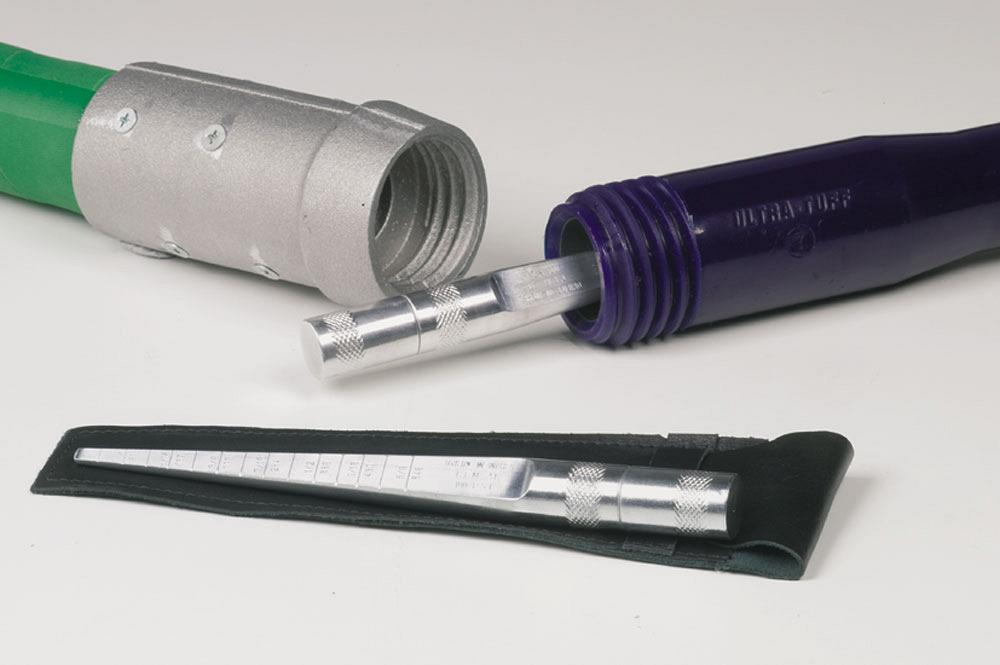
A nozzle is considered to be worn when it reaches one size larger than its original. So, a No. 4 nozzle (1/4 in.) would be considered worn if its orifice ID measures 5/16 in. To measure the nozzle orifice, you can use a nozzle size analyzer gauge (see Figure 6) and take the following steps:
Fail to select hoses properly and you’ll cripple any blasting project and put a successful result in jeopardy by reducing the nozzle pressure, slowing production, and increasing energy and abrasive consumption. The key takeaway: Never use undersized blast hoses. An undersized blast hose increases internal resistance, slowing the air/abrasive mix. In some cases this can decrease nozzle pressure dramatically.
The primary arguments against using larger blast hoses are that they are more expensive to purchase and that they’re heaver and difficult to move around. However, these factors pale in comparison with the additional costs incurred by an undersized blast hose, even for a short-term project.
Consider the pressure losses described in Figure 7. If you’re running 150 feet of a 1-in.-ID blast hose, you are likely to lose around 45 PSI just from one end of the hose to the other. So if you have 120 PSI in a blast hose when it comes out of the blast equipment, you have only 75 PSI at the nozzle. By switching to a 1.5-in.-ID blast hose, that pressure loss could be as low as 6 PSI, meaning you would be maintaining well in excess of 110 PSI at the nozzle. In other words, using the “1 PSI = 1.5 percent productivity” rule, that 39-PSI difference equals roughly 58 percent productivity.
One big mistake is to look immediately at the price of the abrasive—that is, the price per pound or price per ton. On a blasting project of any significance, you’ll find that the abrasive is a surprisingly small percentage of the total project cost. Some abrasives blast faster than others, and some abrasives have lower consumption rates than others.
To determine which abrasive to use, you first need to determine the true cost per square foot of the blasting project. A formula developed by the U.S. Navy can help:
A (B + C) + D + E/X
Where: A = Abrasive consumed
per nozzle per hour, in pounds
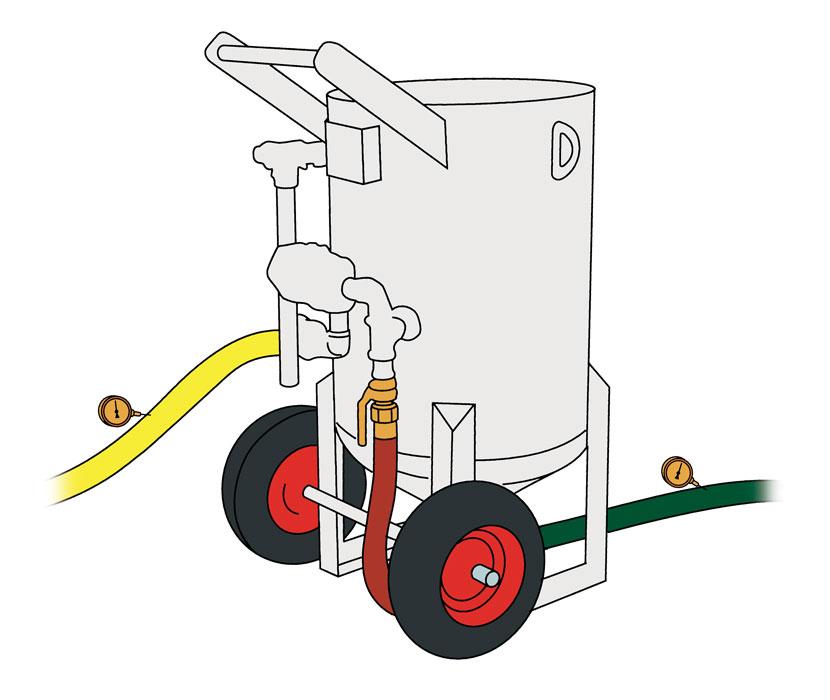
Figure 3
Use two needle-style pressure gauges to check the PSI going into and out of the blasting pot.
B = Abrasive cost delivered per pound
C = Cleanup and disposal costs
per pound
D = Labor costs per nozzle per hour
E = Equipment running cost
per nozzle per hour
X = Square feet blast cleaned
per nozzle per hour
Using this formula when evaluating different abrasives can help you take a completely different perspective. When used correctly, this formula often reveals that an abrasive that costs more per pound can yield better overall results.
Before making your final choice of abrasive, ask yourself two questions. First, what will my blasting speed be for each abrasive in this application? Second, what will my hourly consumption be with each abrasive? This second question in particular will affect the material you purchase and pay to have delivered and removed.
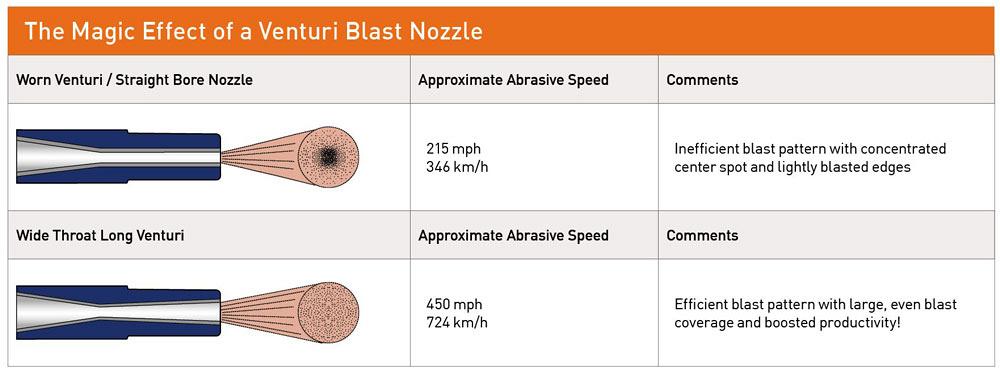
Figure 4
A worn venturi in a blast nozzle (top) produces an inefficient blast pattern with a concentrated center spot.
It all boils down to four basic best practices. One, make sure you have an accurate air pressure reading at the nozzle. Two, don’t overuse blast nozzles, and throw them away when the ID wear is more than one size larger. Three, don’t hinder production by using small blast hoses; take a serious look at what hose sizes you are currently using. Four, consider both the blasting speed and consumption rate of any abrasive before looking at the price.
Following these best practices will help you keep compressed-air abrasive blasting one of the most cost-effective surface preparation techniques available.
Brian Kenimer is industrial sales manager, North America west region at BlastOne International, 4510 Bridgeway Ave., Columbus, OH 43219, 614-476-3000, www.blastone.com.

The Fabricator is North America's leading magazine for the metal forming and fabricating industry. The magazine delivers the news, technical articles, and case histories that enable fabricators to do their jobs more efficiently. The Fabricator has served the industry since 1970.
start your free subscription
Easily access valuable industry resources now with full access to the digital edition of The Fabricator.

Easily access valuable industry resources now with full access to the digital edition of The Welder.

Easily access valuable industry resources now with full access to the digital edition of The Tube and Pipe Journal.

Easily access valuable industry resources now with full access to the digital edition of The Fabricator en Español.
In this episode of The Fabricator Podcast, Caleb Chamberlain, co-founder and CEO of OSH Cut, discusses his company’s...


