


Applications Technician
What causes punch tools to wear prematurely? For that matter, how do you define premature wear? It’s a matter of perception. You may think that if your punches don’t last beyond 100,000 hits, they’re wearing prematurely; another person may believe that he should be able to get only 5,000 hits. Both of you may be right—but it all depends.
Many factors come into play. Is the punch new or resharpened? What material type and thickness is it punching? Are the tools set up and aligned properly? What is the punch press’s condition, and how old is the machine? The questions go on.
The act of punching wears tooling over time. From a broader perspective, the punching process changes the tooling, and it is the rate of change that you need to monitor. If you usually get 100,000 hits from your punches before they require maintenance, and then you find you’re getting only about 50,000 hits, something is accelerating that change. Various factors can cause this, and it’s not always the tooling itself.
Begin by examining the tools for uneven wear. Check slugs to see what they tell you. Listen to the press during operation. Is it noisier or running differently than normal? These early questions often can provide fast answers that lead to corrective action. However, much more regarding premature tool wear calls for further investigation.
Under ideal conditions, new standard-shaped single punches may produce up to a million holes before requiring maintenance. This depends on the tool steel, workpiece material type and thickness, tooling treatments or coatings, die clearance, sheet lubrication, and other factors. In this same ideal application, a similar resharpened tool may produce fewer hits than the new tool and require earlier maintenance, simply because it has been used. In contrast, special-shaped punches and cluster tools carry a heavier punching load. They therefore require more frequent sharpening and may show premature wear after 100,000 hits, depending on the application.
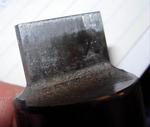
Know the capability of your tools, and be sure you select the right ones for every job. For instance, nibbling and partial hits create side loading, which can cause tools to wear earlier (see Figure 1). In these cases, specific tools can help.
If you are using a 0.5-inch round punch and are nibbling out radiuses or holes 1.5, 2.5, or 3 in. in diameter, consider using a special punch such as a banana tool or one with a multiple-radius configuration. These can nibble a longer radius per hit than a smaller, round tool, reducing the hit count by half or even more. Using a dedicated, larger-diameter tool to punch the hole in one stroke, rather than nibbling many strokes, can save time and reduce press and turret wear.
When using tools with square corners or sharp points, a minimum radius on the punch corners will help increase tool life and keep the tool edge at its maximum strength. Moreover, that minimum corner radius will not be noticeable in the final punched piece.
In most modern punch presses, hit counters show information on a particular tool’s performance and its turret station. If you’ve been getting 300,000 hits out of a tool and the hit counter is set for that number, the press will sound an alert as it nears that maximum hit count. Then it is time to visually inspect the tool to see if it requires sharpening.
Hit counters are especially helpful when operating presses over multiple shifts with multiple operators. Tracking the hit count becomes easier when everyone is trained to react to the numbers at the right time. Even then, a particular tool will perform differently doing the same job in different presses. The machine model and age, as well as the turret condition, will require different hit-count maximums.
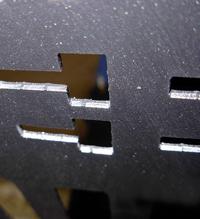
Figure 1: A nibbling application in which the tool and hit used are too aggressive for the material causes an irregular edge and puts too much stress on the tool.
Finally, store tools in an organized library, and do not drop them into a box haphazardly, potentially damaging them in the process. Unorganized tool storage can cause unnecessary downtime as you hunt for the right tools for the job.
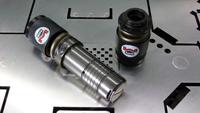
Even if you use the perfect tool for the job, it still may wear prematurely if other press components are not working as they should. Make sure the guides, keys, keyways, and turret bores are kept clean, aligned, and replaced when worn. This will help maintain punching accuracy and minimize excessive play in the turret (see Figure 2). When a guide or bore becomes worn, it stresses other components in the assembly. This leads to more wear on the components, the tooling, and the press itself.
When any of these alignment components are worn or not functioning properly, even a single degree of play in a keyway can increase play substantially at the punch tip. Over many press hits, such misalignment grows worse quickly, resulting in not only premature tool failure, but also poor part quality.
Tool handling and placement in the turret also affect bore keys and alignment. Dropping tools into the turret can create wear and burrs on the keys. Instead, slide the tools gently into the bore and carefully align them. Inspect the keys and replace worn keys promptly. A new key is inexpensive insurance to prevent premature tool wear, and it can extend the life of other components in the turret assembly. In a high-production environment, replace keys annually.
Suited for general punching applications, fully guided tooling may be best utilized for nibbling and punching holes smaller in diameter than the material thickness. These tools have closer tolerances overall than standard tooling, especially in the stripper assembly. This tighter fit keeps the punch tip straight and aligned where side loading may otherwise occur.
Knowing the differences between unguided and fully guided tooling and their application is important when managing tool wear. This is where the experience of the machine operator is really important. An unguided system includes a stripper that secures the workpiece to the die surface. As the toolholder descends, the stripper contacts the workpiece and holds it on the die. The punch penetrates the workpiece to produce the hole, and then the stripping springs expand to retract the punch tip through the material.
In contrast, the stripper in a fully guided system performs a second function: It supports the tip of a punch as it penetrates the material. This ensures that the punch tip enters the center of the die, thus maintaining the correct die clearance. Unguided systems allow the punch to deflect, which causes the punch tip to enter the die off-center. This is especially prevalent when nibbling. Fully guided systems guide the punch tip and thus eliminate punch tip deflection.
Fully guided tooling may not be a good option when punching soft materials such as aluminum and hard materials such as stainless steel. When galling occurs, material adhering to the punch tip makes the punch point larger, which in turn reduces the die clearance. This can cause sticking, stripping, and premature tool wear. When punching these materials, consider tool coatings to help reduce or eliminate galling and, thus, extend tool life.
Forming tools also require special attention. While the programmer may do all of the preproduction planning and setup for a particular job using forming tools, operator experience and skills are needed to carefully manage punching quality, press speeds, lubrication requirements, hit count, and machine performance. Forming tool use is not a simple matter of hitting a switch and operating the press at top speed, as might be the case with a high-volume, straightforward hole-punching job.
An incorrect clearance for the application can shorten tool life (see Figure 3). Use die clearances that are designed for the material type and thickness. Die clearances that are too tight will dull tools faster because they require more tonnage to push the punch through the material. The tighter clearance also puts more wear on the tool’s cutting edge.
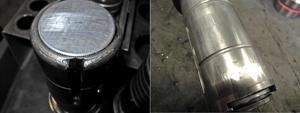
Figure 2: A damaged keyway (left) and worn guide (right) require prompt replacement. Inspect these components regularly
Here, slug characteristics can be telling. An ideal, perfectly aligned punch stroke creates a slug with a fracture plane on its edge with the same angle from top to bottom. This keeps the punching force to a minimum and forms a clean hole with little burr.
When the clearance is too large, slugs will show a rough fracture plane, and the hole may have a large rollover. When the clearance is too small, the slugs will have a fracture plane with little angle, and the hole may have a small rollover.
Frequent sharpening generally prevents premature tool wear. Always use coolant when sharpening tools, because little or no coolant can cause extreme heat in the punch tip during sharpening. This will change the tool steel’s properties and accelerate tool wear.
Sharpening at frequent intervals requires less material removal from the punch tip with each sharpening, which helps tools achieve maximum life expectancy (see Figure 4). Also, be sure to demagnetize the tool after sharpening and before inserting it in the machine turret. If a tool is not demagnetized before punching steel or any other magnetic material, slugs and metal debris adhere to the punch tip, which can cause galling and tool failure. After sharpening, use a fine stone to break the edge or remove the burr left on the tool’s cutting edge.
Frequently used tools with high hit counts should be ordered with specific coating or nitride treatments, which can help with stripping and prevent galling buildup. Such surface treatments also can reduce the frequency of required tool maintenance.
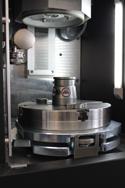
Too often tooling is blamed for problems caused by alignment deficiencies in the press turret. These can be corrected using a tool calibration system for aligning and verifying the precision of the CNC punch press’s turret. Certain calibration systems have aligning functions that restore the concentric and angular alignment of each press turret station to the same level of precision as the initial machine installation.
The turret press itself, its motor, electrical, and age all affect how tools wear. Certain materials cause extra stress on tools if, for example, the setup is not planned properly or the press speed is too high. The tooling may be new or refurbished and in satisfactory operating condition. But if the press and material aren’t right, premature tool wear is bound to occur.
A Check List for Extending Punch Life

The Fabricator is North America's leading magazine for the metal forming and fabricating industry. The magazine delivers the news, technical articles, and case histories that enable fabricators to do their jobs more efficiently. The Fabricator has served the industry since 1970.
start your free subscription
Easily access valuable industry resources now with full access to the digital edition of The Fabricator.

Easily access valuable industry resources now with full access to the digital edition of The Welder.

Easily access valuable industry resources now with full access to the digital edition of The Tube and Pipe Journal.

Easily access valuable industry resources now with full access to the digital edition of The Fabricator en Español.
In this episode of The Fabricator Podcast, Caleb Chamberlain, co-founder and CEO of OSH Cut, discusses his company’s...


