


Contributing Writer
Fabricators, contractors, maintenance personnel, artists, and do-it-yourselfers who experience a hand-held air plasma arc cutting machine rarely want to return to oxyacetylene cutting or mechanical cutting processes such as saws, cutoff wheels, shears, and snips.
Plasma cutting can improve productivity and lower cutting costs. It does not require a preheat cycle, cuts any metal that conducts electricity, permits portability around job sites, minimizes the heat-affected zone (HAZ), and yields a cut with a small kerf. Plasma units also can gouge, pierce, bevel, cut holes, and trace shapes.
See Figure 1for an illustration of these steps. If the sparks are not visible at the bottom of the plate, the arc is not penetrating the metal. This can be caused if you move the torch too quickly, have insufficient amperage, or fail to direct the plasma stream straight into the metal.
Traveling at the right speed produces a clean cut with less dross on the bottom of the cut and little or no distortion of the metal. Slow travel speeds can overheat the metal, causing dross to accumulate. To minimize dross, increase travel speed or reduce amperage.
For an indication of how fast to move the torch, refer to the machine's cutting speed graph or check the speed for a rated cut. Dross also accumulates when you push a machine to cut a material at its maximum thickness. The only cure for this is a bigger machine.
To remove old or imperfect welds, use a gouging tip. The hole on a gouging tip is three to four times wider than a regular tip. Its cone shape pushes out the plasma arc, which can remove more material than the constricted orifice of a regular tip.
Many people do not believe that plasma works well for gouging, but that perception may be based on older machines with weaker arcs. Some newer machines feature a stronger design that creates an arc 1 to 1-1/2 inches long. Although carbon arc gouging removes metal faster, plasma arc gouging produces less smoke and noise and offers more control over the arc.
To gouge, hold the torch at a 40- to 45-degree angle to the base metal. Press the trigger, and the pilot arc will start after two seconds of preflow air. Establish an arc length of 1 to 1-1/2 inches and move the torch across the metal, adjusting torch speed, arc length, and angle as needed. Direct sparks away from the torch, and do not gouge too deeply on one pass. Make multiple passes if needed.
To pierce metal - - creating a hole, such as for coping or inserting a valve - - place the torch at a 40-degree angle to the workpiece. Press the trigger. After the machine initiates the cutting arc, bring the torch tip to a 90-degree angle and the arc will pierce the base metal. Generally, a machine can pierce metal up to one-half of its maximum cutting thickness capacity.
If a machine produces an arc and then loses it, or if the arc fails to penetrate metal it once could, examine the consumables first. The electrode and tip wear a little bit with every start/stop cycle and need to be replaced when they are worn excessively. Figure 2shows how to inspect a torch.
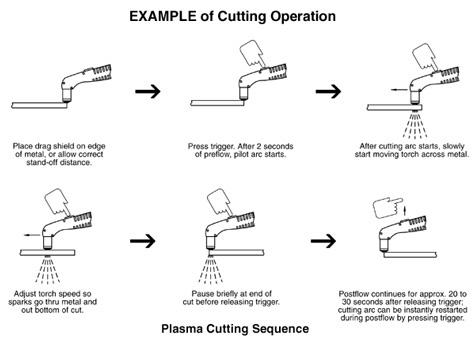
Figure 1Six steps in a plasma cutting sequence
Some of the biggest problems relate to air pressure. Low air pressure leads to poor performance, notably at high amperages.
To check for this condition, try increasing pressure at the machine. If the pressure gauge doesn't move much beyond the optimum setting, adjust pressure at the gas source, because minimum flow rate may not maintain enough pressure through several hundred feet of pipe or hose.
To ensure sufficient pressure at the machine, set the source gauge 30 to 40 PSI higher than the pressure gauge on the machine.
To ensure sufficient air pressure at a plasma machine, you must use a gas hose with at least a 3/8-inch internal diameter and hose fittings that match or exceed the rating recommended in the machine's owner's manual.
Many plasma cutters have built-in regulators with air filters, but good practices call for additional filters and separators on the gas supply to remove water or other contaminants. Remember that water is highly conductive, and if water enters the torch, it can cause internal arcing that can damage the torch. Like the oil filter on your car, routinely change the air filters on a plasma setup; saturated filters do not remove moisture.
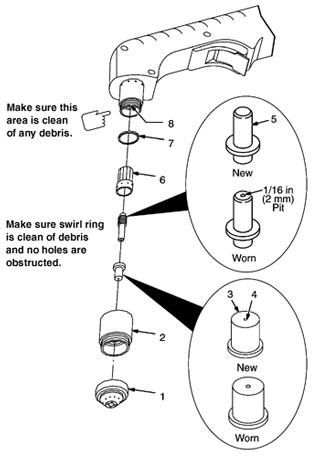
Figure 2


The Fabricator is North America's leading magazine for the metal forming and fabricating industry. The magazine delivers the news, technical articles, and case histories that enable fabricators to do their jobs more efficiently. The Fabricator has served the industry since 1970.
start your free subscription
Easily access valuable industry resources now with full access to the digital edition of The Fabricator.

Easily access valuable industry resources now with full access to the digital edition of The Welder.

Easily access valuable industry resources now with full access to the digital edition of The Tube and Pipe Journal.

Easily access valuable industry resources now with full access to the digital edition of The Fabricator en Español.
Cameron Adams of Laser Precision, a contract metal fabricator in the Chicago area, joins the podcast to talk...