Engineering Manager
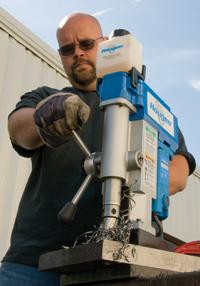
Figure 1: A manual-feed, portable magnetic drill is a suitable tool for many hole-making jobs, but for heavy-duty, highly repetitive jobs, a basic tool may be the best choice.
When you need to make holes and cannot take the work to a machine, a portable magnetic drill is usually the tool of choice. Today fabricators and contractors can choose from several types and sizes of magnetic drills and annular cutters, all with different features, for on-site hole-making.
Although basic portable magnetic drills are the most popular and quite versatile, they may not be big enough or powerful enough to handle a particular job. On the other hand, the drills may not be small enough if you were drilling, for example, in hard-to-reach or confined spaces. Additionally, if you're working on extremely hard, rusty, scaly, or painted material, you may not be able to do the job with basic power tools.
With so many magnetic drills and so many different applications, a person would have difficulty covering every scenario. However, this guide will give you some basic descriptions of the different types of tools available to fabricators and advice on how to increase productivity with those tools.
Presenting a complete list of the various sizes and types of portable magnetic drills available today would be impractical. For discussion purposes, most can be organized into general categories.
The most basic are standard manual-feed, portable magnetic drills that use annular cutters. They are quite popular and offered in a variety of sizes, speeds, horsepower ratings, and coolant system options. Most of these units have a three-handle feed with a slide and gib system for moving the motor, arbor, and cutter together (see Figure 1). Standard features as well as costs vary from one manufacturer to another.
One of the newer offerings in magnetic drills is a variable-speed, quill-feed model. It is lightweight, has a large drilling capacity, and does not require gib and slide adjustments. Its fixed profile allows it to fit in tight, confined spaces where standard drills may not operate. The quill feed provides fast, smooth feeds throughout the cut, even in deep-hole drilling. Optional pressurized coolant delivery systems are extremely valuable for those deep-hole applications. Variable speed can increase tool life and works well with carbide cutters, which require higher RPMs than standard annular cutters.
For the problem of drilling in confined spaces less than 8 inches in height, 90-degree, low-profile drills offer a good solution (see Figure 2). These mini drills have a single feed handle, not the standard three-handle feed like most magnetic drills. They also have an excellent cutter size range, and because they have a quill feed, just the cutter moves. They will operate in any place they can fit. Their light weight also makes them a suitable choice when the job requires moving the drill around a job site or carrying it up a ladder.
When the job requires repetitive holes, consider power-feed drills. They provide consistent hole-making with less operator fatigue. Productivity also can be improved because one operator can operate two or more drills simultaneously. While one unit is cutting, a second can be set up. Drills that electronically optimize the feed rate may help to extend tool life and produce higher-quality holes.
When drilling in vertical or horizontal positions, swivel-base drills (see Figure 3) should be given strong consideration. A swivel-base drill allows you to roughly position the drill and activate the magnet. Then, by releasing the swivel mechanism, you can precisely position the drill pilot over the hole's centerpoint and lock down. This feature will speed up alignment for precision holes.
Permanent-magnet drills are not as widely used, but they are suitable power tools for special applications where electric power is unavailable. However, they are extremely heavy and have limited holding power. Some permanent-magnet drills have pneumatic motors for use in explosive atmospheres where sparks can be catastrophic.
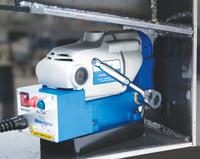
Figure 2: Sometimes the size of a magnetic drill is an issue. Low-profile drills go where manual-feed drills could never fit before.
Another type of drill uses a hydraulic motor, which provides higher horsepower in a smaller package and is offered with either an electro- or permanent magnet.
Some manufacturers modify existing magnetic drills to solve unusual hole-making problems for customers. An example is a unit that drills from the bottom up or special fixturing for deep-hole drilling.
Setting up the job is basically the same no matter which type of magnetic drill you use. Here are some helpful hints to improve your drill's performance and cutter life.
Obviously, the material base to be used must be ferrous metal for the electromagnet to work properly. The material type dictates the type and grade of the cutting tool to be used.
The first step is to make sure you have a clean, flat, and smooth work surface that is free of chips. Make sure the bottom of the magnet is also clean. Any foreign matter such as chips under the magnet could rock it and decrease its holding power, resulting in the drill rotating or shutting down because the safety mechanism was activated. If the surface is not perfectly flat, such as an I-beam that has a crown, you need to make sure the magnet is not affected. Placing the magnet to one side and not over the crown will give better results. The use of a swivel-base magnetic drill might help in this situation.
If the surface is heavily rusted or covered with paint, especially epoxy, the magnet may not obtain good holding power. Special care must be taken to ensure proper magnet adhesion. The proper, well-sharpened cutting tool may help in this situation because it may put less stress on the magnet while making the hole. Or this may be a good time to step up to cobalt or carbide cutting tools.
Using a safety chain or strap is critical in the event of a loss of power (see Figure 4) or if the drill safety circuitry shuts itself down because it will ensure the drill does not fall on or injure you.
Proper use of coolant is essential to good cutting tool life and drill performance. Many magnetic drills come equipped with gravity-feed coolant systems, while others have arbors with internal coolant reservoirs. Coolant for annular cutters should be high lubricity-low viscosity.
If a drill is not equipped with a through-the-tool coolant system, you should never just squirt coolant on the cutter because it will just spin off during drilling instead of getting to the cutting teeth where it is needed. In this instance, a good stick lube placed on the cutting teeth will do the job. Stick lube is a waxy substance that will adhere to the teeth of the cutting tool and will last for one hole. It should always be used when drilling in the horizontal and overhead positions.
For deep-hole drilling, a pressurized coolant system will perform the best and help to extend tool life. Running cutters dry builds up excessive heat, shortens tool life, and possibly results in an inferior hole.

Figure 3: Magnetic drills with a swivel base can be useful tools. Models that don't require adjustment tools to use the swivel are the most user-friendly.
Once you have selected the right tool for the job, set up properly, and figured out your coolant needs, you are ready to commence hole-making with the magnetic drill. These tips can help you avoid excessive downtime.
1. If you don't value fast tool change more than extended tool life, use two set screws to secure the cutter firmly and ensure rigidity of the cutting tool. This helps to prolong tool life and produce better holes.
2. Use a pilot because it helps to line up the cutter to the hole's centerpoint. More important, it directs the coolant flow to the cutting teeth. It also aids in ejecting the slug at the end of the cut.
3. Use the right cutter for the application. Annular cutters are material-specific, and using the right cutter will result in optimal tool life. Although many tool manufacturers supply data on what types to use with specific material, consult with the cutting tool manufacturer when in doubt. In some cases, the manufacturer may suggest a custom tool, such as an extended-reach cutter for deep-hole drilling.
4. Carbide cutters are useful for extending tool life or drilling in extremely hard material. However, remember that they must be run two to three times faster than ordinary M2 cutters. If you're using an older drill model, chances are it will not generate the proper RPMs to reap the benefits of using carbide.
5. When drilling two or more stacked plates or a bridge structure that has double-layered steel, always specify a cutter with stack cut tooth geometry. Using a standard annular cutter requires stopping the drill after each plate is cut to remove the slug. Stack cut cutters cut inside/out, rather than outside/in, so the slug doesn't get caught. Drilling the same hole in several plates using stack cut cutters increases productivity rates.
6. A major cause of broken or prematurely dull annular cutters is a slow feed rate. A firm, aggressive, and steady feed pressure throughout the cut, where you can hear the motor work but not overly labored, results in a good hole and long tool life provided coolant and the proper cutter are also employed. A good feed rate also will result in a healthy chip coming up out of the flute, keeping the cutting teeth free to do their job.
When the hole is finished, you should see a good birdnest on the cutter. A slow feed rate results in a thin chip that can start to break up and pack up in the flutes. This either slows down or stops the cutting action and possibly could destroy a cutter.
A dull cutter also has a tendency to lift the magnet, which can lead to a broken cutter. If the cutting action is diminished, sharpen or replace the cutter. Pecking the cutter also breaks up the chips instead of working them up the flutes, causing the same problems.
7. Some operators try to "horse" the cutter through the material by applying too much pressure. They think they are cutting faster, when really they are not because as they load up the machine, the RPMs decline, and metal removal rates and RPMs go hand in hand. The slower the cutter turns, the more the metal removal rate diminishes. Listen to the motor, and let the machine and cutting tool do the work.
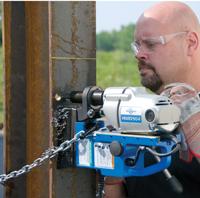
Figure 4: A safety chain ensures the magnetic drill is not damaged or the operator injured should the electricity cut off. Such precautions can prevent expensive losses. One contractor rehabbing a bridge in New York lost a majority of the 40 drills being used when a power failure occurred and the drills ended up in the East River.
8. If you are cutting stainless steel, three things need to happen:
9. Make sure the slug ejects at the end of the cut. Drills with a positive slug ejection feature accomplish this automatically. Spring ejection systems do work, but are not as reliable. For example, the cutting action generates heat, resulting in a slight expansion of the slug that could cause it to get caught in the tool. Removal of a slug can be time-consuming, and you run the risk of breaking the cutter while trying to remove the slug. Remember, the edge of the slug is very sharp, so handle with care.
10. After completing a hole, clear away chips and excessive coolant from the work surface, particularly when making additional holes. Also check the coolant level and cutter condition and make sure the slug is ejected.
When all else fails, read the instructions. They will provide good maintenance procedures for you to follow.
Additionally, some good, commonsense advice should be followed continuously .
If your drill has a slide and gib system, it needs to be adjusted and lubricated periodically . The rigid arbor system should be checked periodically for excessive runout to make sure parts are not worn or the arbor is sloppy, which can lead to premature tool failure or inconsistent holes. Quill-feed drills usually require no adjustments.
The coolant system is essential to tool life and should be checked for coolant flow and possible obstructions. It is also a good practice to periodically check if the safety system is working properly. If a drill's magnet breaks loose while cutting because the safety system is faulty, a serious operator injury could happen. Some operators have been known to attempt to override a drill's safety system; this is not only dangerous, but usually voids a warranty.
The magnet's surface can wear and lose its flatness from sliding around during everyday operation. The front and back can begin to curve or chips can get embedded. The magnet may need to be surface-ground periodically to restore flatness.
Obviously, power cord and electrical switch conditions need to be checked as well.
When faced with any hole-making job, it is always a good idea to conduct a prejob assessment, then take a good look at what equipment you have on hand. If some of your equipment is outdated, improve your productivity by talking to your tool distributor.
If you are up-to-date on your equipment, a properly operated, well-maintained portable magnetic drill can go a long way in helping to meet production schedules, improve productivity, and maintain a positive bottom line.


The Fabricator is North America's leading magazine for the metal forming and fabricating industry. The magazine delivers the news, technical articles, and case histories that enable fabricators to do their jobs more efficiently. The Fabricator has served the industry since 1970.
start your free subscription
Easily access valuable industry resources now with full access to the digital edition of The Fabricator.

Easily access valuable industry resources now with full access to the digital edition of The Welder.

Easily access valuable industry resources now with full access to the digital edition of The Tube and Pipe Journal.

Easily access valuable industry resources now with full access to the digital edition of The Fabricator en Español.
Seth Feldman of Iowa-based Wertzbaugher Services joins The Fabricator Podcast to offer his take as a Gen Zer...