


Contributing Writer
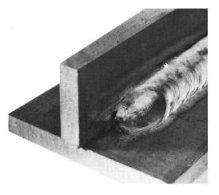
Figure 1
As is the case with most of my articles for thefabricator.com, I begin with something crazy that’s happened to me or something stupid I’ve seen or done. Hopefully, relating the stupid stuff I’ve done—bar fights, risks I’ve taken—will keep someone else from doing them, or at least give readers a good laugh.
My welding students give me laughs all the time. Once a student came in my office and said, “Mr. Rice, I don’t want to cause any trouble, but if I see Joe’s butt crack one more time, I’m gonna punch his face!" Joe was “sagging,” wearing his pants so low they looked as though they could fall off.
I told him not to punch Joe’s face; I would have a talk with him. So, I called Mr. Sagger in and told him he needed to pull up his pants, and that I wasn’t gonna give him another warning. He said, “Yes, sir” all nice and then went out into the shop. Less than five minutes later, I saw Joe’s pants hanging down again, and he was leaning over to pick up a piece of steel from one of our racks. About that same time, I saw my other student look over, and the disgusted look on his face told me a fight was about to start.
But then it was almost as if a light bulb went off above the student’s head—like on cartoons— and he got a big old smile on his face. He had a hand grinder and started it up, testing where the rooster tail (the sparks thrown out from the grinded steel and abrasives on the stone) was going. He then aimed that rooster tail with thousand-degree hot sparks right down the crack of Mr. Sagger’s butt! I ran over in time to stop the fight and gave the two of them a good hollering at in my office. It was hard to keep a mean face when I wanted to bust out laughing at what I had witnessed.
Regardless of how they dress, my students are here to learn how to weld. When it comes to MIG, I tell them that MIG actually is now called GMAW for gas metal arc welding, but that we old hands still call it MIG. Although I tell them about spray arc and globular MIG welding, we use short-circuit for practical application, because it is very effective in all positions. It’s also good for filling in Grand Canyon gaps that high school students sometimes leave in their projects. We use 75/25 shielding gas, which makes good-looking beads with decent penetration and little spatter. There are a lot of opinions—if not downright controversy—about shielding gases. If you want to check it out, no one says it better than Ed Craig.
Short-circuit is just what the name implies—the wire short-circuits when it touches the base metal. This heats the wire and causes a molten drop of steel, which then is followed by many others, creating the molten weld pool.
Short-circuit MIG uses 0.025-in. to 0.45-in. wire diameters. In the classroom, we use 0.035 in., a commonly used size that runs a good bead. Once you learn with this wire, you should be able to use thinner or thicker wires just fine. Thin wire, just like a thin welding rod, is easier to weld with because you have more control of the weld pool.
When learning to MIG weld, you should start with basic beads on flat steel, preferably at least ¼ in. thick. You should run backhand (pulling or dragging the MIG gun) and forehand (pushing the MIG gun) techniques with about a ½-in. wire stickout.
When welding thin steel, use the forehand technique. It allows faster travel and creates less fusion (penetration of the filler metal into the base metal). You obviously don’t want excessive fusion in thin steel because it will blow a hole right through the material. Backhand, which provides more penetration and more fusion, is used for welding thicker steel.
Just as an aside, I’ve argued with some (you know who you are) about the better fusion of dragging (backhand). I’ve turned it up pretty hot and run forehand on 3/8-in. plate and didn’t notice much better penetration than when I cut the temperature and used the backhand dragging motion. But before you start the e-mails flying, I am stating here, for the record, that backhand MIG welding achieves better penetration.

Figure 2
Whether pushing or pulling, you should concentrate on feeding the leading edge of the weld pool. You want to stay right in the edge of the pool, because if you go too far out while pushing, or not far enough back into it when dragging, you’ll have a small gap with no filler metal. Gaps are susceptible to forces such as tension, torsion, compression, and shear that can cause cracks and weakness in the weld itself. That is not good, grasshopper!
After you can run a bead pushing and dragging, you should practice restarts. Restarts are where you have stopped welding and need to continue the same bead. The more restarts you do, the better welder you will become.
A restart should be done at the front of the weld crater. The crater is where you stopped welding and looks like a crater (Figure 1). The arc force cut into the steel, but you didn’t leave filler metal. When you start at the end of the crater, you preheat the base metal as you burn back into the bead. You should hesitate slightly to burn into the existing bead and then continue back in the direction you were traveling.
After a while you should be able to do a restart so that it ties in inconspicuously and contains no gaps that can weaken the weld.
To show what a good tie-in is, I have my students make fists and push them into each other (Figure 2). I can grab their wrist and easily push them apart.
Then I have them interweave their fingers so that I can’t push their hands apart (Figure 3).
A great way to run continuous beads and learn control of the MIG gun is to make an ashtray. Now that everything is politically correct to the point of absurdity, I have renamed our project a “coin holder.” If my students want to take a grinder and cut cigarette holders in their coin holders, that is up to them. I don’t condone smoking, and tell my students to stop, but I’m also a realist who knows that some of them do.
At the beginning of each semester, I ask my class how many of them smoke. (I’m glad to say the number has decreased in my 20-plus years of teaching youth.) Usually a few raise their hands, but some won’t admit it.
I then have all the newbies smell acetylene so that they will know what a leak smells like. After they have inhaled that nice rotten-egg acetone smell, I announce that they should not smoke a cigarette for the next 10 hours, because their lungs will explode. That’s when I see the scared looks on the faces of those who told me they didn’t smoke. I then tell them to wise up; I’m not gonna let them smell something that’ll explode their lungs! I’ll bet that would be a good stop-smoking incentive though.
To make the coin holder/ashtray, cut out a 4-in. by 4-in. by ¼-in. section from a 4-in. flat strip. You can make it bigger, or use different steel. We use a Texas pattern in our shop (Figure 4). You’ll want to practice keeping about a half-inch (varies) wire stickout as you use both the forehand and backhand techniques going around the edge of the steel.
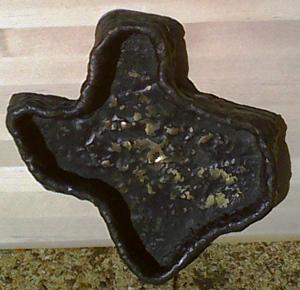
Figure 4
After you have completed a full pass all around the edges, stop and cool the piece. A plastic 5-gallon bucket makes a good cooling bin, if you don’t touch the sides with the hot metal.
After you’ve cooled the piece, run a bead right on top of the bead you just made. As you run this bead, practice making small circles and a “C” motion as you watch and control the weld pool. This gives you some great practice with positioning the gun, keeping the wire stickout correct, and watching the weld pool.
After enough beads, brush up the piece, paint it with clear coat, and you’ve got a unique coin holder. Or an ashtray … if that’s the case … like I tell my students ... QUIT!

Contributing Writer
High School Career Center in Texas

The Welder, formerly known as Practical Welding Today, is a showcase of the real people who make the products we use and work with every day. This magazine has served the welding community in North America well for more than 20 years.
start your free subscription
Easily access valuable industry resources now with full access to the digital edition of The Fabricator.

Easily access valuable industry resources now with full access to the digital edition of The Welder.

Easily access valuable industry resources now with full access to the digital edition of The Tube and Pipe Journal.

Easily access valuable industry resources now with full access to the digital edition of The Fabricator en Español.
In this episode of The Fabricator Podcast, Caleb Chamberlain, co-founder and CEO of OSH Cut, discusses his company’s...


