


Contributing Writer
Making a high-quality gas metal arc weld is no easy task. But making a high-quality weld when your gun and consumables aren't functioning properly is just about impossible. Porosity, excessive spatter, undercut, and burnback are just a few of the problems that can occur when something's not right with these components. Troubleshooting weld defects can be a difficult task, because any single problem can be caused by any number of factors.
Ideally, you should avoid weld defects by conducting a thorough check of your GMAW gun and consumables before welding. But problems will inevitably occur, and being able to quickly and accurately identify their source will save you both money and frustration.
A number of problems can cause the wire not to feed, including problems related to the feeder relay, control lead, adapter connection, liner, or the trigger switch. Begin troubleshooting by checking whether the drive rolls are turning when the gun trigger is pulled. If they are not turning, an electrical continuity failure is occurring. Check the terminals and connector contact pins to ensure the gun is properly connected to the wire feeder. The wire can also fail to feed if the trigger switch is broken or the control leads in the gun cable are damaged. If this is the case, they will need to be replaced.
If the drive rolls turn but the wire does not feed, there may be inadequate drive roll pressure or a blockage in the contact tip or liner. Check the drive rolls and contact tip before moving on to the liner, which takes more time and effort to check and replace.
If a faulty feeder relay is the cause, consult the feeder manufacturer for information on correcting the problem. A broken control lead or a poor adapter connection will require you to test and replace the leads and/or contact pins. Some guns feature a spare set of control leads that can be used to correct the problem. With others, it may be necessary to replace the entire cable.
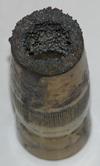
While burnback (see Figure 1) will occur from time to time even when nothing is wrong with your gun and consumables, improper equipment setup can be a culprit, especially if burnback rates increase.
Improper tip recess and improper wire stick-out can increase burnback frequency. In the case of incorrect tip recess (or stick-out), install a nozzle and tip combination with a different recess. Similarly, adjusting the distance between the gun and the workpiece (tip-to-work distance) will resolve burnback problems associated with wire stick-out.
A faulty work lead also can be a culprit. Check and possibly replace the electrical connections and cables to ensure a faulty work lead/ground will not cause any further burnback.
Erratic wire feeding—when wire does not feed from the gun at a consistent rate—can also cause burnback. Such a wire feed problem could have various causes, including a worn-out or kinked liner; buildup of debris, filings, dirt, and other foreign material inside the liner; the wrong liner size; and gaps at the junctions caused by an improperly trimmed liner. In each case, the liner likely will need to be replaced and properly trimmed so that it fits as tightly as possible to the other components.
Erratic wire feeding also can come from improper drive roll size, worn-out drive rolls, and improper drive roll tension. Replace worn-out drive rolls or those of the wrong size with correctly sized and tensioned drive rolls.

Figure 1 Burnback can be caused by problems with the gun and consumables as well as improper equipment setup.
Another common cause: The contact tip may be worn out or the wrong size for the wire being used. If you suspect the contact tip is causing the wire feed problems, replace the tip.
Although tip quality plays a critical role, tip life can vary dramatically from application to application. If you notice a change in your contact tips' life from their normal life spans, however, several factors may be contributing to the problem.
Using the wrong contact tip size, as well as exposure to excessive heat or erosion from the wire, can contribute to premature contact tip degradation. If your contact tip is melting from excessive heat, you may be exceeding the product's rated amperage or duty cycle, in which case you should replace either the tip or the tip and the GMAW gun with heavy-duty equipment.
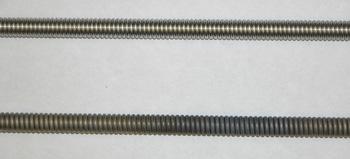
If the wire is prematurely wearing out the contact tip, the drive rolls may be creating small burrs on the wire that erode the inside of the contact tip (see Figure 2). Setting the drive roll tension too high also can create deformities in the wire that cause it to wear out the tip mechanically, a problem especially common with knurled drive rolls. If this is the case, be sure to properly tension or, if necessary, replace the drive rolls.
Rusty, dirty, or simply low-quality wire with excessive imperfections also can cause the contact tip to fail prematurely. If this is the case, replace the wire.
If not caused by erratic wire feeding, an erratic arc is usually caused by inconsistent electrical conductivity. The contact tip can fail to conduct electricity consistently to the wire if the contact tip is either too big to begin with or worn out from use. In either situation, replace the contact tip with a new one of the correct size.
If the gun neck is too straight, it could produce an erratic arc through a lack of conductivity. The bend in the neck increases electrical conductivity by creating a continuous contact point as the wire is guided along the outside of the bend in the liner and through the tip. To remedy this, install a neck with a 45- or 60-degree bend.
A worn or kinked liner or buildup inside the liner also can produce an erratic arc. To avoid a recurrence, replace the liner and check the wire condition for inconsistencies. Also, ensure the work lead/ground clamp and gun connections are solid and can establish a good electrical circuit.
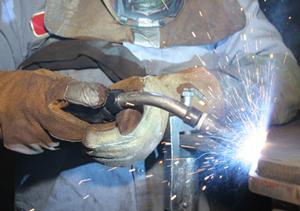
From a gun and consumables perspective, improper tip installation and improper weld pool protection can both create excessive spatter (see Figure 3). First, ensure the tip is installed properly and that it is at the correct recess for the application. Next, verify that you're using the correct shielding gas for the application and that the weld receives adequate gas coverage. Too little or too much shielding gas can cause both poor weld pool protection and excessive spatter. Clogged nozzle and diffuser orifices could cause too little shielding gas flow, so check and clean or replace the nozzle and diffuser as necessary.
Though not equipment-related, incorrect electrical parameters or a contaminated workpiece also can cause spatter. Keep the voltage and wire feed speed at the recommended levels for the application, and ensure that the workpiece is free of rust, mill scale, and other contaminants. Some welding factors—such as the short-circuit process, using pure CO2 gas, and galvanized metal—have inherently higher spatter rates, which can be mitigated by using an argon-rich gas blend or a different filler metal transfer process.

Figure 2 Drive rolls may be creating small burrs on the wire that can erode the inside of the contact tip.
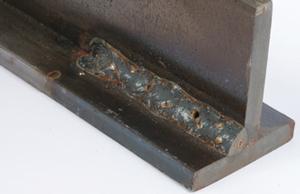
Porosity—holes in the weld bead caused by trapped contaminants and gases—has many possible causes (see Figure 4). One of the most common is exposing the weld pool to atmospheric air, whether as a result of plugged gas ports, a ruptured gas hose, too much or too little gas flow, or a faulty solenoid. Ensure proper gas flow before moving on to diagnose other possible causes of porosity.
Worn-out or damaged parts, including the diffuser, the insulator, O-rings, and fittings, all can lead to compromised gas coverage. Check each of these components and replace as necessary. Wind that blows away the shielding gas also can create porosity. In this case, either move to a less windy site or set up screens to block the wind.
A gun running hot usually means you are exceeding its rated amperage or duty cycle, or you have loose power connections or a degraded power cable that creates excessive resistance in the weld power circuit. If you exceed the gun's duty cycle, you can either decrease the parameters to within the gun's rating or use a higher-rated gun.
If loose connections are to blame, clean and tighten connections that are in good working condition or replace ones that are worn out. One common symptom of loose power connections or a degraded power cable is a discolored liner (seeFigure 5). Caused by heat, such discoloration indicates that weld current is being carried through the liner instead of the gun's power cable. Also check to make sure the work lead/grounding connection is tight and free of obstruction.
Although there are many ways GMAW guns and consumables can be responsible for poor weld quality, the good news is that most problems have simple and inexpensive solutions. By following these recommendations, you will be able to address and resolve the vast majority of the most frequently encountered welding problems.


The Fabricator is North America's leading magazine for the metal forming and fabricating industry. The magazine delivers the news, technical articles, and case histories that enable fabricators to do their jobs more efficiently. The Fabricator has served the industry since 1970.
start your free subscription
Easily access valuable industry resources now with full access to the digital edition of The Fabricator.

Easily access valuable industry resources now with full access to the digital edition of The Welder.

Easily access valuable industry resources now with full access to the digital edition of The Tube and Pipe Journal.

Easily access valuable industry resources now with full access to the digital edition of The Fabricator en Español.
In this episode of The Fabricator Podcast, Caleb Chamberlain, co-founder and CEO of OSH Cut, discusses his company’s...


