Catalyst with Profero Inc. and Founder of affiliate company 5S Supply
Some think that cellular assembly will not work in a job shop. I’ve heard many reasons: “We make something different every day, sometimes every hour”; “Our process wouldn’t work in that type of environment”; and so on.
But the fact is, creating assembly cells in a job shop is not a new idea. In his job shop, my dad connected machinery via skate conveyors to create his first cell. I was amazed how raw material went in one end and the finished product came out the other end, all in a matter of minutes. He even balanced the work load. One operation took twice as long, so he put two machines side by side to maintain flow.
The old method, of course, was to batch materials. One machine created a batch, the operator put it into a bin, and the forklift driver came by and moved it to the next machine, which sometimes was across the shop. This all continued until the parts were finished—not very efficient and, unfortunately, chockful of waste.
How does a job shop design an effective and efficient assembly cell that can handle design variations, with the assortment of tools required? How can you ensure as many of these assembly components are all within arm’s length? And how do you define which product families flow through those cells?
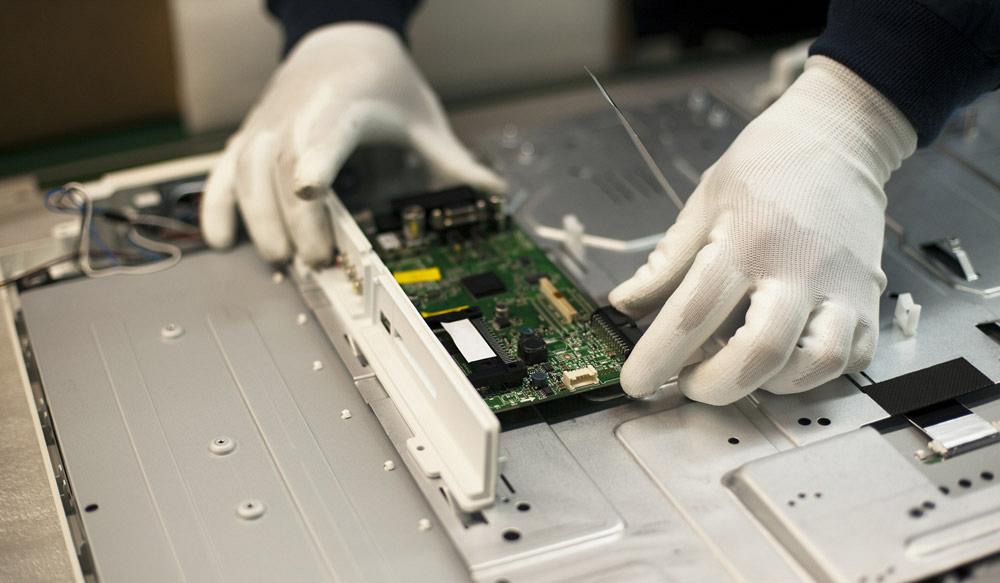
Most parts in a fab shop undergo similar processes, such as cutting, drilling, bending, welding, and powder coating. The real differentiation happens in assembly. All the same, a custom fabricator still can have a smart assembly cell, though implementing one isn’t always easy or straightforward. You have to be creative to overcome specific situations, but therein lies the challenge—and the fun!
A cell is a specialized grouping of people, machines, tooling, and materials. Its purpose is to produce small batches of parts efficiently. When designing an assembly cell, you are trying to achieve flow by looking for ways to reduce or eliminate waiting or batching; combine processing steps or run steps concurrently; prevent items from waiting in queue; use smaller batches; and eliminate non-value-added activities.
Many shops move equipment closer together and declare triumphantly, “Here is our cell!” Although moving equipment closer does change the shop layout, it doesn’t necessarily create a cell. Cellular manufacturing is much more detailed.
In fact, considering all the challenges, why create cells in the assembly department in the first place? What are the real benefits in a job shop?
First, you’ll have less work-in-process (WIP), because the WIP won’t pile up between the individual assembly steps. And you’ll have less unnecessary finished-goods inventory. The people in the cells can make what you need, when you need it. The cells, promoting small batches and better flow, also shorten lead times.
Moreover, cells free space, because you have less floor space dedicated to WIP and finished-goods inventory. This gives you the option to fill this space with productive, value-adding activities.
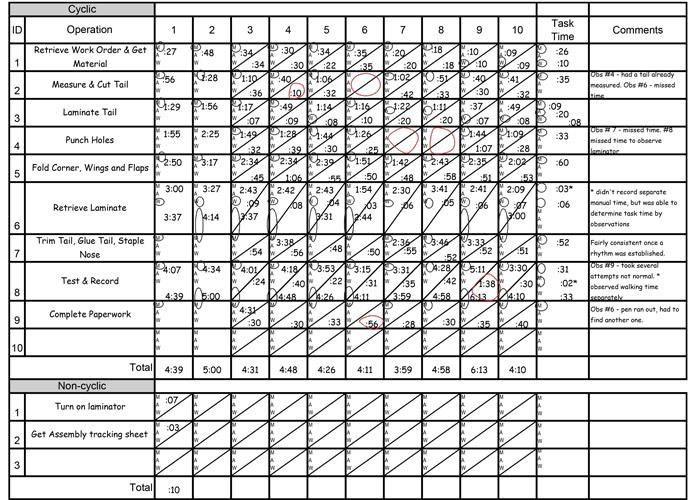
Figure 1
This time study shows the minimum and maximum time it took assemblers to accomplish certain tasks. Some aspects of this chart are being scrutinized, including one task with a significant difference between the minimum and maximum time.
Cells also give you higher first-pass yields, because you have quality at the source. Properly trained, assemblers can inspect as they go; they’re not passing bad parts on to subsequent operations.
You also streamline material handling. Assemblers handle only the parts they need at the point of use. Dedicated material handlers deliver and remove parts. This allows the assemblers in the cell to focus entirely on the value-added work.
By its very nature, a properly designed and implemented assembly cell will increase productivity and throughput. This ultimately will make the operation more flexible to customer needs. And since your goal is to add value for the customer, this is right on target.
Many challenges come with high-mix, low-volume assemblies. But you can overcome a lot of those challenges by carefully following these five steps:
If you gloss over or skip any step, you risk creating a cell that may not increase throughput or make life easier for the assemblers on the floor.
First, identify potential products that might work in an assembly cell. >Nowhere in the job shop is identifying product or process families more important than in the assembly area.
One tool you can use is a process family matrix, a table that will help you determine process families, or parts that go through the same or similar processing steps. (For more on this, see “12 tips to improve your value stream maps,” available at thefabricator.com.)
To create a matrix for an assembly cell, start with the list of parts or components in the first column and all the processing steps in the first row (drilling, testing, calibrating, fastening, gluing, attaching, inserting component A, inserting component B, etc.). Next, simply put an X in the box if it goes through that step. The parts that share the most X’s are candidates for a process-family assembly cell.
Look for items that have commonalities, such as similar components or assembly methods. Scrutinize your routing documents. Can you rearrange the sequence of certain steps? For instance, instead of inserting A and then inserting B, could you insert B and then insert A? If so, would this new sequence make the assembly a candidate for the cell?
Avoid trying to stuff everything into a single cell, which can cause more problems than it’s worth. Instead, consider smaller, right-sized assembly cells. You can do this by grouping jobs together not just by process steps, but also by part geometries; demand profiles (when and how much customers order over a certain period); setup and run times; and tooling commonalities that minimize changeovers. All this can help you further refine your potential process family groupings.
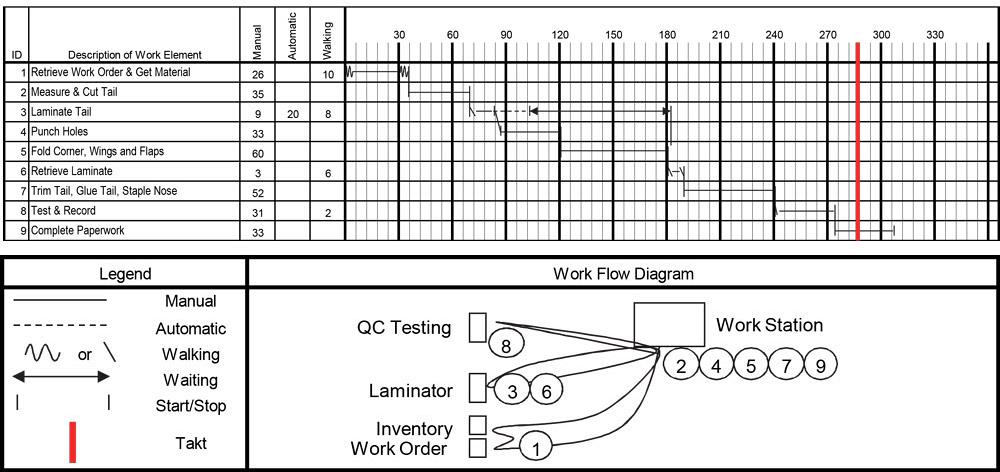
Figure 2
This shows two portions of a standardized work combination sheet, which has the total takt time (338 seconds), process steps, and a diagram showing how assemblers move to perform those steps. This current state will serve as the starting point in rearranging operations into an efficient assembly cell.
For a cell to be effective, about 80 percent of the processing steps should be the same or similar. If it’s less than that, you will introduce unwanted variation. Similarly, the cycle times of each operation should be within approximately 20 percent of each other. Large variances in cycle times, again, can introduce variation that can be difficult to manage in an assembly cell.
Analyze changeover times from one product to the next to see if that has a negative effect on cell throughput. If an assembly has a long changeover time—greater than 10 or 15 minutes—you may want to shorten that changeover time before assigning that assembly to the cell.
Start with a few assemblies and build from there. If this is your first cell design, don’t try to tackle 40 different parts. Start with a handful and add more when you are ready. Even a job shop has some items that may be considered high volume and low variety, those “steady runners” that are ordered somewhat consistently. Start there, then add more low-volume, high-mix work.
Takt time sets the pace or rhythm. To calculate it, divide the time available per shift by the demand per shift. For example, if your shift is eight hours with two 15-minute breaks, then you have 450 minutes available (or 27,000 seconds). If your average demand is 450 pieces, then your takt time is 60 seconds.
Based on these numbers, each cycle in the assembly process needs to take less than 60 seconds. You might also add a small safety factor that reduces the cycle time to 57 seconds (or about 5 percent less) to cover any miscues or mishandling.
Standardized work is the best way we know today to perform a task. This includes doing time studies, identifying and eliminating waste, and training people to the new standard. Standardized work is considered a cornerstone for operational excellence.
In many organizations, the engineers decide what the assembly sequence should be first and then take it to the operators to improve it. Since assemblers have the most hands-on experience, they have valuable insight. Allow assemblers to do a few practice runs and then consider performing your time studies. List the sequence of tasks in the order they should be performed, then observe the assemblers and time them (see Figure 1).
Analyze manual or hand operations, machine or automatic operations, as well as walking and other potentially excessive and wasteful movements. And be sure to pay attention to the sequence of operations.
Say you notice that one assembler removes part A to install part B and then reinstalls part A. This of course takes additional time. It turns out another assembler installed part A earlier. Rearranging the sequence, having assemblers install part B first and then part A, eliminates waste and makes life easier for workers on the floor. This example seems like a no-brainer. Still, many times these sequencing problems become obvious only when you observe the operation with the assemblers.
After doing several time studies on each process, you will have a good feel for how long the cycle time for each operation should be. Transfer these times into a standardized work combination sheet (see Figure 2). You then use cycle times to balance the line.
After you know the cycle times for each operation, use a line-balancing chart to ensure each assembler has about the same amount of work in content, time, and difficulty. Rearrange the operations as necessary to achieve this balance. In Figure 3, you notice that the fifth and seventh operations take longer than the takt time. In this case, the work has to be redistributed, perhaps by adding some tasks to another assembly step, such as to the sixth step, “retrieve laminate.”
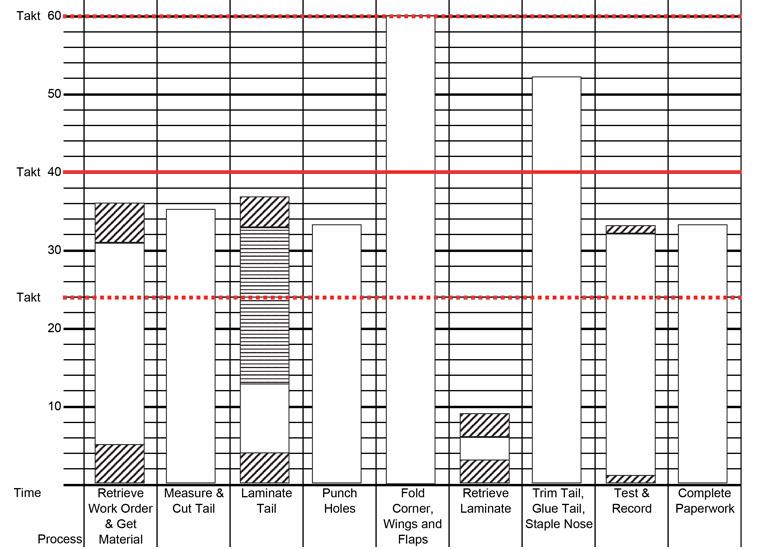
Figure 3
As this line-balance chart shows, the fifth and seventh operations take longer than the takt time. In this case, the work has to be redistributed.
Now that you have the process steps in sequence and know the cycle times, you can start to determine the cell layout, including its shape. Realize that there are many shapes a cell can take. You may choose the preferred U-shape, but in some instances this may not be feasible or optimal.
When creating the cell, consider how exactly the cell’s assemblers will work. Do you divide work among assemblers? Do you have one operator per workstation or more than one? Do you have an assembler complete all the tasks in a cell, moving from one station to the next? Or do assemblers start in reverse order? For instance, they could unload a machine and send parts on to the next assembly step, load the machine, then move back to the previous step to prep the work for the machine.
When laying out the cell, be sure to consider the basic factors: man (people), machine, maintenance, method, material, measurement, and the environment.
Man. Ensure that the operations are ergonomic and safe. Make tools easy to reach and use. Implement point-of-use storage principles and 5S (workplace organization) to help accomplish this. Have tool shadow boards within arms’ reach, and keep items at a comfortable height. Make sure bench heights are appropriate for different assemblers, and adjust those heights as necessary. Consider ergonomic supports, such as tool balancers suspended from above, so that assemblers do not have to lift tools for long periods.
Standing usually is more efficient. If assemblers sit, they may need to get up and sit down repeatedly—a lot of wasted motion. Having said that, provide ergonomic floor mats as well as sit-stand chairs. Make sure each assembler has proper training to perform the standardized work, and instill teamwork in the group.
Machine. Instead of having equipment or machines that do everything, consider having single-purpose and right-sized equipment. Using smaller, dedicated machinery helps you scale up or down with business demand. If you need to add a little capacity, you just add a little machine. Having multiple right-sized machines also gives you a backup should a machine break unexpectedly, allowing you to perform necessary maintenance without disrupting the whole system.
Focus on shortening machine changeover time from the last good piece of the current run to the next good piece of the next run. The goal should be to change over in less than 10 minutes. If you can switch from making one assembly to another in a short period, you then can make items efficiently in small batches, which is a good thing.
To minimize motion and transportation waste, put equipment as close together as possible. Remember, U-shape is often the best choice, and if you do choose this shape, limit the U’s width to about 5 feet if possible. At the same time, be sure you have enough clearance for utilities, walkways, materials, and, of course, people.
When laying out the cell, try using graph paper and cutouts on a magnetic board. Then place tape or draw lines on the floor to test distances, and use cardboard cutouts of equipment and workbenches to make sure things fit. Then simplify the flow as much as possible. There should be one way for products to flow from one station to the next—always horizontally, if practical, to avoid unnecessary lifting.
Maintenance. Make sure there is enough room to conduct preventive maintenance. Train assemblers to perform basic maintenance themselves (autonomous maintenance) rather than always relying on dedicated maintenance technicians, and have the correct spare parts available. The goal is to have the equipment up and running when needed.
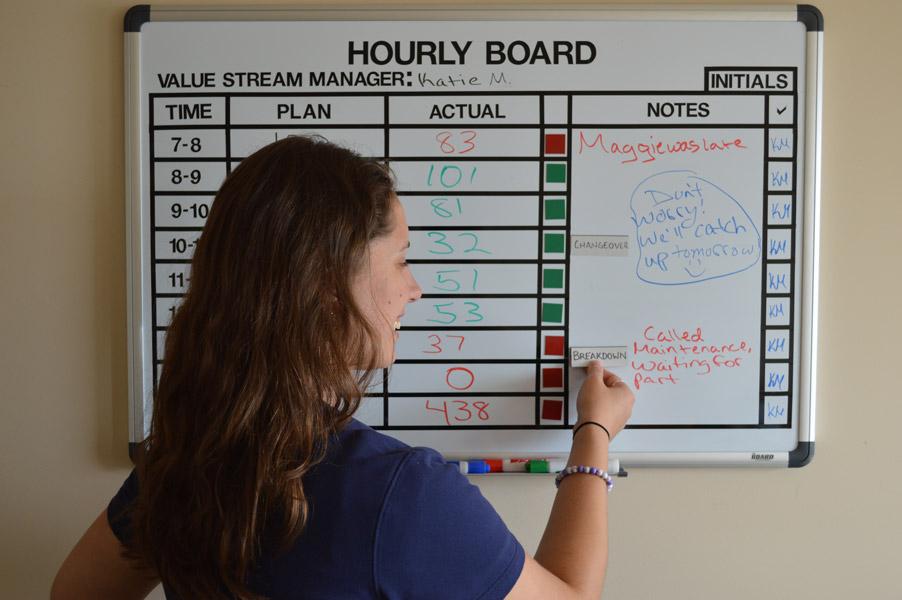
Figure 4
This hourly production board compares planned with actual throughput.
Materials. Have materials near the point of use, with the least amount possible at the cell. Be sure critical or most used items are easy to reach. And have a material handler, team lead, or supervisor deliver and remove parts; this allows assemblers to focus on their tasks. Finally, use a kanban pull system and visual signals to replenish parts in a timely fashion.
Method. Standardized work and cross-training fall into this category. Track training and cross-training of those working in the assembly cell. Include startup and shutdown procedures, changeovers, inspections, autonomous maintenance, and other important tasks.
Measurement. Build self-inspection and quality checks into the standardized work, or better yet, use autonomation (when something abnormal happens, the machine stops) and errorproofing to ensure quality at the source. Remember, do not pass anything defective on to the next operation. Ensure that assemblers are properly trained to use any measuring or monitoring device they need. Include visual systems that show quality, cost, delivery, and other pertinent metrics, including planned throughput (see Figure 4).
Environment. Build organization and housekeeping (5S) into the daily activities to ensure a safe, clean, and orderly work area. Lighting needs to be sufficient, and consider using task lighting for detailed work. Confirm that the HVAC system is adequate along with air quality. To improve communication, make sure the noise level is low enough so that assemblers can hear each other without undue stress.
Of course, as with any continuous improvement initiative, designing and implementing an assembly cell is just the beginning. You need to experiment, test, change, improve, and repeat. Improvement, after all, never stops.
How would you like to:
These are actual results for an assembly cell redesign that occurred during a five-day kaizen event. You too can achieve these types of results when you release the potential of your people.

The Fabricator is North America's leading magazine for the metal forming and fabricating industry. The magazine delivers the news, technical articles, and case histories that enable fabricators to do their jobs more efficiently. The Fabricator has served the industry since 1970.
start your free subscription
Easily access valuable industry resources now with full access to the digital edition of The Fabricator.

Easily access valuable industry resources now with full access to the digital edition of The Welder.

Easily access valuable industry resources now with full access to the digital edition of The Tube and Pipe Journal.

Easily access valuable industry resources now with full access to the digital edition of The Fabricator en Español.
In this episode of The Fabricator Podcast, Caleb Chamberlain, co-founder and CEO of OSH Cut, discusses his company’s...