


A safer way to bend bar stock in a press brake
Set shield to support and keep those arms out of harm's way
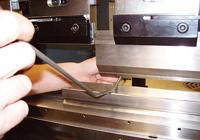
Figure 1
Putting multiple bends into round barstock is a test for the most skilled operators. For less experienced operators, the task can turn into a very frustrating event if no guidance is available.
General industrial education differs from one vocational program to the next, so no single technique for bending round barstock exists. In the work world, a particular technique used to make a quality part can be exclusive to each shop because parts dictate how to approach the fabrication job. In many instances, the trade secret used to fabricate the part is not passed down to the next generation of operators.
However, what if the trade secret is passed down, but the shop floor advice is not very good? Bending barstock is one fabricating activity that demonstrates how experience in a field can be a detriment. Seasoned operators are more likely to engage in risky practices and can be inflexible to changing practices that have worked in the past.
This type of scenario leads to two opportunities for every metal fabricating shop: encouraging personnel to recognize problematic parts and empowering them to find better ways to make those parts.
For demonstrative purposes, I would like to share an example of how a method for effectively and safely bending barstock evolved into a system that even today's rookies can manage with great success. This incident occurred early in my fabricating career and inspires me even to this day.
Raising the Red Flag
On this particular day I saw the next job on the to-do list involved a skid full of 0.5-inch barstock about 6 feet long that, according to the print, had to be bent in a U. I had bent a wide variety of material, but barstock was a rarity. This one was a brain tester.
Lucky for me, someone came over to tell me how to go about it. All I had to do was tape a level to the bar, and then while holding the bar against a square, keep it level as I executed eight bends. During that process, sometimes I had to hold onto the bar inside the machine.
In my mind, that raw product was about to become a heap of scrap, and if I were fortunate, that was all that would get messed up. I knew something was not right with this process, and the red flag went up. As I've learned over the years, red-flag moments are good.
Evidently, 80 percent was the average success rate for bending the barstock, and only after the welders flattened them. Engineers should have seen the red flag and re-evaluated the manufacturing process after discovering another operation was added for expected rework. This was a blanket P.O. part, and the engineering staff had plenty of time between releases to tackle this inefficiency. It could have begun simply by someone writing on the whiteboard, "How can we do this better?"
A technician setting up a new press brake nearby came by me as I attempted to try the suggested method. I hoped that he would be able to offer some advice as I sat there with a good start on the scrap pile. Instead he was kind enough to tell me that he had seen barstock like that bent, and it freaked him out to see people put their arms in the machines (see Figure 1). He suggested that I come up with a different approach. It's not the help I was hoping for, but it's about what you need in life, not about what you want.
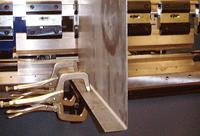
Figure 2The squaring shield needs to be securely fastened to the press brake. C clamps will work for this, but the shield will have to be checked randomly for movement until you make a model that incorporates holes to bolt it down.
I soon refused to continue with the prescribed fabrication process. I was the recipient of a lecture that can be summed up with "Get onboard or get under the wheels." Given those options, I decided to hop in the driver's seat and to start thinking inside the box!
Bending It a Better Way
Yes, inside the box. When you are free to let your imagination run wild you can come up with all sorts of ideas, such as taping a level to barstock. Of course, good ideas need to be created within boundaries. In this case, those would be:
- The remedy needed to be safe.
- It needed to create quality parts.
- It had to be quick and repeatable.
- It couldn't mean breaking out the checkbook.
I knew the squaring arms were my best shot. I tried them again, but this time I intently watched the part form. If only the squaring arms were in the proper location and were a few feet taller, life would have been good. That sent me looking at the scrap bin. There I saw a small piece of 12 gauge that was 20 by 30 in.
I took it to another press, did a quick 90-degree bend with a flange of 2 in. the long way, and proceeded to square it to the die (see Figure 2).
One bend already was completed, and when I went to make the second bend, I found that I had enough area to gauge against. There was a little wobble, but once I measured the rollout from the bend, subtracted that from the diameter, and divided by two, I knew how thick my shim had to be.
So armed with a shim, I had a completely solid surface to square against to keep the bends in line. When I had two bends that were on the squaring shield (see Figure 3), I didn't have to use a shim. I was feeling good, and all of the bends were coming out great until I came to the final bend.
It was a rehit bend, and that was a point where I had to resist putting my arm in the machine. My experience told me it would be OK this one time, but I found ample room existed for me to hold the barstock in place while I rehit it (see Figure 4).
By the time the supervisor made his way back to my machine, I had completed a few more parts. He saw a new apparatus and wanted to check on my progress. I finished the part I was working on, laid it on the table, and gave it the tap test. No matter where I touched it on the part, it didn't bounce, move, or show any sign of being anything other than perfectly flat. I didn't make a friend that day, but I did make good parts.
I called the technician over to show him what I had devised. He just smiled and went back to work. So maybe I did make a friend as well.
Additional Thoughts
A few side notes need to be mentioned before closing this chapter on bending barstock. When making these bends, you need to have the squaring shield securely fastened to the press brake. Unless the shield is bolted down, you will have to check it randomly for any movement that may have occurred. That random movement gave me no end of grief.
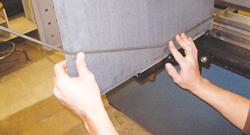
Figure 3The squaring shield provides enough support to make multiple bends in barstock.
Also, the shield has to be made with a perfect 90-degree bend. If it's not bent at an exact right angle, you may experience deviation if the part needs to be fed from both ends.
So now you know that to put multiple bends in barstock, all you really need is a small bent drop to gauge against. The how-to really is a simple solution. The most difficult part is creating an environment where operators can tell superiors "No!" to a reckless practice that routinely gets a blind eye.
Daniel Vogt is president, VMF Consulting, P.O. Box 1126 Oshkosh WI 54903, 920-203-4725, vmfconsulting.com.
The FABRICATOR would like to thank Larry Clark and the metal fabrication department of Moraine Park Technical College in Fond du Lac, Wis., for assisting the author with the photography for this feature.
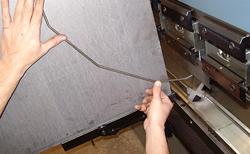
Figure 4Even for bends that call for a rehit, the shield provides enough support so that you don't have to place your body parts in movable machine areas to ensure stability during the bend.
About the Author
About the Publication
subscribe now

The Fabricator is North America's leading magazine for the metal forming and fabricating industry. The magazine delivers the news, technical articles, and case histories that enable fabricators to do their jobs more efficiently. The Fabricator has served the industry since 1970.
start your free subscription- Stay connected from anywhere

Easily access valuable industry resources now with full access to the digital edition of The Fabricator.

Easily access valuable industry resources now with full access to the digital edition of The Welder.

Easily access valuable industry resources now with full access to the digital edition of The Tube and Pipe Journal.

Easily access valuable industry resources now with full access to the digital edition of The Fabricator en Español.
- Podcasting

In this episode of The Fabricator Podcast, Caleb Chamberlain, co-founder and CEO of OSH Cut, discusses his company’s...
- Trending Articles
1
Capturing, recording equipment inspection data for FMEA

2
Tips for creating sheet metal tubes with perforations

3
Are two heads better than one in fiber laser cutting?

4
Supporting the metal fabricating industry through FMA

5
Omco Solar opens second Alabama manufacturing facility
