


President

Usually engineers completely design a part, then the die, and then finally submit those designs to a computer simulation that measures formability, with many iterations and analyses to assess robustness. This, however, may not be the most efficient method—a bit like designing a road to exact specifications without considering the terrain until the very end.
Today a method exists that allows engineers to resolve part and die forming problems before designers have invested in a lot of drafting. The direct engineering approach allows designers to create parts and dies more efficiently and, ultimately, develop optimal solutions often missed when simulations check completed designs. In essence, it allows engineers to resolve formability issues along the way—and not at the end of the process.
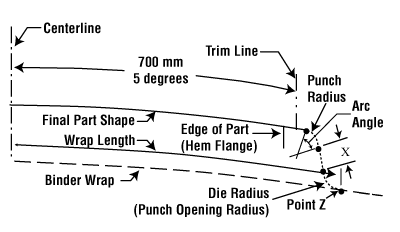
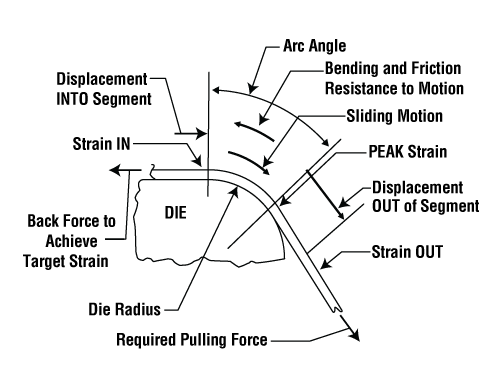
To understand this method, consider the following revealing study of one die radius on a simple, hypothetical engine hood (see Figure 1). For simplicity’s sake, this hood has no critical forming features, and problems on only one side of the hood are discussed. Figure 2 shows the draw die binder dimensions that must be established. Again for simplicity, this example includes only the features sensitive to formability: punch perimeter radius, punch perimeter radius arc angle, and the X dimension. For a real die, of course, the wrap length, draw-in, bead restraining force, and other elements would weigh into the calculations.
Several forming objectives call for some specific requirements (see Forming Objectives sidebar). The formed part must be 300 MPa, 0.75 mm thick, and made from AKDQ with a minimum yield strength of 174 MPa. This means that it will be necessary to work-strengthen the material by straining it in the die. Because the straining will thin the wall, the purchased material must be thicker than the 0.75 mm specified. The part should have no loose metal or other springback shape distortion, which makes reasonably uniform forming stresses necessary, and also requires that every point throughout the part increase in strain some incremental amount at the very last instant of die closing.
The part also must have maximum robustness to normal and reasonable process and material variation. A stretch-form die—one having lock beads all around instead of draw beads—can accomplish this by driving relatively large punch perimeter radii and open wall angles; that is, small arc angles for the punch perimeter radii.
Another forming objective, however, conflicts with this: Designers need to maintain a minimum blank size, which usually requires small punch perimeter radii and large arc angles for the punch perimeter radii. The die designer must balance the desire for minimum blank size with the requirement for maximum robustness.
To that end, this study used Part Analysis and Binder Synthesis (PABS), an Excel-based program written by the author. The program evaluates the formability feasibility of an existing, proposed, or planned stamping die. It has no graphics capability and so does not work from a CAD file. Instead, it does the plasticity, friction, and displacement calculations for sectional forming problems (though it is not a plane-strain solution).
While PABS does help design the actual die face, it does not eliminate the need for a full computer simulation of the entire design. However, it does help the user consider robustness throughout the die design process.
The method starts by specifying a target strain pair somewhere in the part’s interior. The strain pair specified must be what is needed for the product to achieve its performance goals, such as shape fixation, and work strengthening. The method also specifies two lines—called neutral lines—roughly normal to each other across the part, where there is to be no displacement (that is, sliding motion) of the sheet metal during forming. A designer selects these neutral lines to avoid such undesirable conditions as impact lines, draw lines, or skid marks. The neutral lines cross at the location of the specified target strain pair and, in doing so, establish the boundary condition for subsequent calculations and analyses.
Die designers have plenty of material plasticity and friction models to choose from. The simple power law, the pulley friction model, and Levy’s virtual work model (for bending effects) are used in this example, but designers can use any model best-suited for the application.
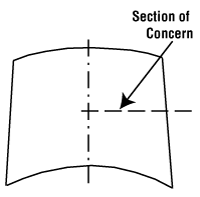
Figure 1: This is a plan view of a hypothetical engine hood used for the study.
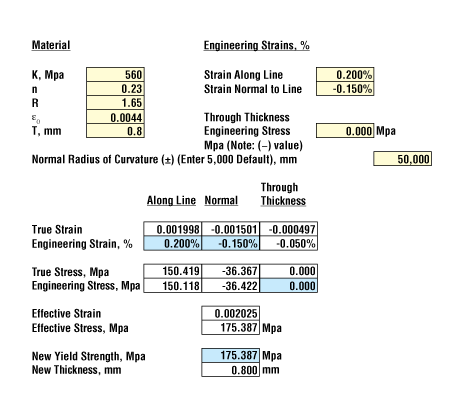
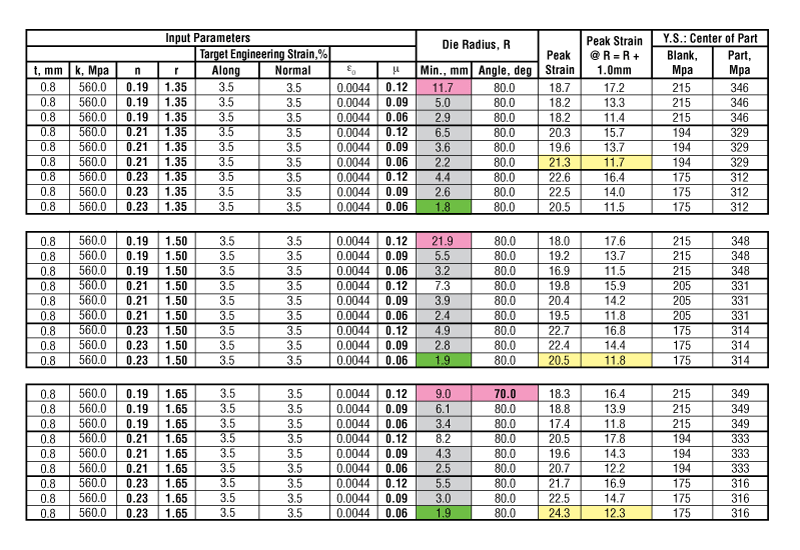
AKDQ’s published specifications do not show ranges for all properties, so for this example the following ranges of the variables in the power law constitutive equation for the material were arbitrarily selected. Its strength coefficient (K value) is 560 MPa. The n values (work-hardening exponent) are 0.19, 0.21, and 0.23, producing a variation of ±9.5 percent. The R values (plastic strain ratio) are 1.35, 1.50, and 1.65 (±10 percent).
Finally, the strain (e0) value was set at 0.0044 by establishing allowed variation along and normal to the neutral lines—the boundary condition, as described previously. The strain along the line was set to +0.2 percent, while strain normal to the line was at -0.15 percent. Then using the PABS program, a designer adjusts the e0 value so that all combinations of n, K, and R produce a material yield strength of 175 MPa or greater (see Figure 3).
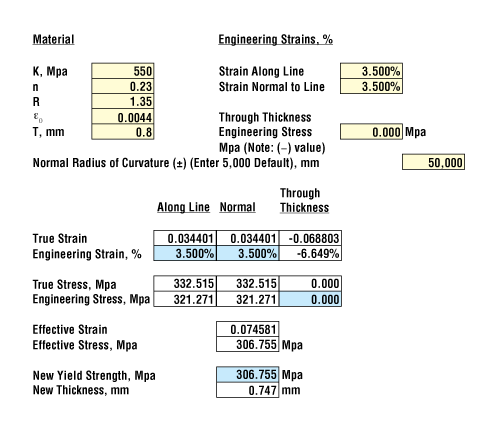
Next, the designer determines the variables required to produce a formed part of at least 300 MPa. Here again, the user plugs in the n, K, and R values necessary to produce the desired minimum MPa. In this case, a K value of 550 MPa, R of 1.35, and n of 0.23 produce a 306.755 MPa. Under these conditions, the strains are found to be 3.5 percent, both along and normal to the line. These stresses would cause material thickness that starts at 0.80 mm to thin to 0.747 mm during forming, as shown in Figure 4. That is slightly less than the specified 0.75 mm thickness. To meet that requirement, the purchased material must be between 0.80 and 0.88 mm.
Blank size variation could be a source of variability, but not for this specific application, which uses a stretch-form die with lock beads. One variable remains, however: material surface condition. This example assumes that the coating—be it bare, hot-dipped, galvanneal, or anything else—would not change in production, so only one variation within one coating type was considered. Beyond this, sources of surface condition variability abound, including lubrication and its application; surface finish degradation from die wear over time; and press speed. A relatively wide range for coefficient of friction, ±33.3 percent, attempts to cover all of these variables (specifically, m = 0.06, 0.09, and 0.12).
With the application’s variable ranges determined, the designer considers the maximum arc angle and minimum punch radius for every condition, increases the punch radius in 0.1-mm increments until the design reaches a workable condition, and then finally increases it another 1.0 mm for a robust condition. The extra millimeter provides some tolerance for diemaking and die wear.
Figure 2 shows the forming problem as a series of true arcs, and formability problems can be solved independently for each arc. Figure 5 shows the forming issues for each arc, including strains and pulling forces. For the line in Figure 2, PABS calculates a forming condition that meets the strain-strengthening requirement with zero displacement, 3.5 percent strain along the line, and 3.5 percent normal to the line. It uses these strain data to calculate the force (or back force) needed along the line for a unit width (1.0 mm), as well as the restraining force, or the force needed over one unit width to overcome friction and bending. The program also calculates the strain out strain pair, calculated for material that never touches the die at the end of the sliding motion, out of the arc.
As a unit width of sheet metal is stretched, it strain-strengthens and thins. The strain strengthening increases the total pulling force, while the thinning decreases the pulling force. At low strains the combined effect is an increasing pulling force with increasing strain; but at some point, the thinning effect starts to dominate, and the pulling force starts to decrease with additional straining.
In this example, PABS required the keying in of material properties (K, n, r, e0, and m), the percent strain along and normal to the line (both 3.5 percent), the arc length (700 mm), and the angle degree of the first arc (5.0). It also required the angle of the second radius (80 degrees). Different radii were keyed in until a minimum workable radius was found, determined to be 0.1 mm larger than the one that failed. Finally, the radius was increased another 1.0 mm to achieve robustness. Then n, R, and m values were changed systematically, and the calculations repeated. Figure 6 shows the results.
The design fails not just when the material wrinkles or splits, but when any objective is not met—including a minimum blank size. Making a die robust to normal and reasonable material processing conditions would indeed require a larger blank size.
According to the results, restricting material and processing variation can affect that minimum blank size requirement. Specifically, if the plastic strain ratio variability were halved (R = 1.35-1.50) as well as the coefficient of friction variability (0.06-0.09), the punch perimeter radius could be 6.00 mm—which is 4 mm smaller than the worst-case scenario of the study—and the 80-degree arc angle could be used. This would reduce the blank another 5 mm, for a total of 11 mm all around the part. If the blank is 1,480 mm square, it could be reduced to 1,458 mm square. At $0.35 per pound, that is a savings of $0.35 per stamping. The range of variation for each variable might be reduced by better process control at the stamping line or through negotiations with the sheet metal supplier at little or no cost. The amount of reduction in variation needs to be established with actual data on the capability of the supplier or the control of the press line.
Designing robustness into the die does not take long using this method. In fact, the example discussed here took only about four hours. And after doing more such studies, the die designer would learn which limit of each variable to study for particular situations. Considering the days and weeks spent simulating a die or modifying a die setup in service, those few hours represent time well spent.
The objectives for forming the engine hood were set to be:


The Fabricator is North America's leading magazine for the metal forming and fabricating industry. The magazine delivers the news, technical articles, and case histories that enable fabricators to do their jobs more efficiently. The Fabricator has served the industry since 1970.
start your free subscription
Easily access valuable industry resources now with full access to the digital edition of The Fabricator.

Easily access valuable industry resources now with full access to the digital edition of The Welder.

Easily access valuable industry resources now with full access to the digital edition of The Tube and Pipe Journal.

Easily access valuable industry resources now with full access to the digital edition of The Fabricator en Español.
In this episode of The Fabricator Podcast, Caleb Chamberlain, co-founder and CEO of OSH Cut, discusses his company’s...


