


Contributing Writer

I heard once that, statistically speaking, a progressive die incurs more damage in the first 10 cycles than in the remaining production run. Based on my personal experience, that statement still stands true.
Most problems and accidents occur during the die setup process. If the strip is started in the correct position but the die is not designed properly, half-cuts and -forms can be made, resulting in misalignment and shearing of die sections. In addition, startup scrap often is left in the die, causing double metal to be introduced into the tool. Pressure, stripper, and draw pads often are half-loaded and unbalanced. The list goes on and on.
Although the tool design is critical, many of the setup problems that occur are not the result of a poor design, a poorly located tool, or a faulty coil alignment process. Instead, problems often start with the condition of the coil, such as severe camber, crown, and twist.
In today’s competitive global market, stampers are looking to reduce tooling and stamping costs any way that they can, so they often choose to reduce the amount of metal required to make each part. But that action could prove disastrous in the long term, such as when a pitch notch is required.
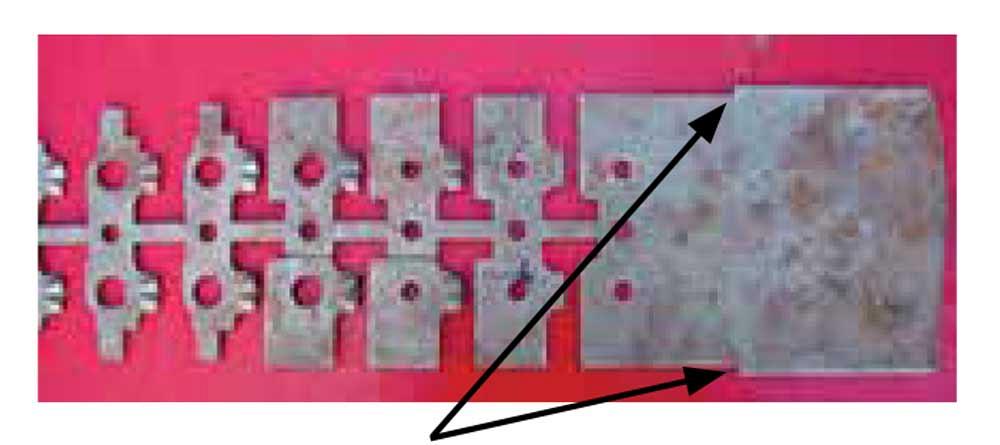
A pitch notch, sometimes called a French notch, is a small section of material that is cut away from one or both edges of the strip stock at the beginning stations of a progressive die (see Figure 1).
The pitch notch provides a first-hit solid stop for the leading edge of the material to hit against so that the operator or die setup personnel cannot overfeed the tool. Overfeeding a progressive die can result in severe die damage and can be dangerous to the operator. If properly placed, pitch notches often can reduce or eliminate loose scrap or half-hits in a progressive die.
For large progressive dies that use wide and thick coil, locating parts with the pilot pins can be difficult. A pitch notch lets the operator feed the strip forward the precise amount for the pilots to locate the strip. Without this solid stop, the operator must eyeball the location of the strip before cycling the press, which greatly increases the odds of strip mislocation and die damage. When used in addition to pilots, pitch notches also can help to locate and register each part in its proper station. Typically, two notches, one on each side of the strip, are used for this purpose (see Figure 2).
For a progressive die to operate efficiently, it must feed smoothly. Edge camber incurred during coil slitting can make feeding a progressive die very difficult. By forming a straight line cut on the edge of the incoming material, pitch notches remove severe edge camber from the coil and allow it to be fed smoothly through the die, regardless of the edge condition or coil width.
Misconception 1: You don’t need a pitch notch if your coil feeder feeds within 0.0005 inch.
Reality: Feeders don’t perform final strip location. The pilots in the die locate the strip. The feeder only needs to bring the strip to a position, whereas the pilots can pick up and locate the strip.
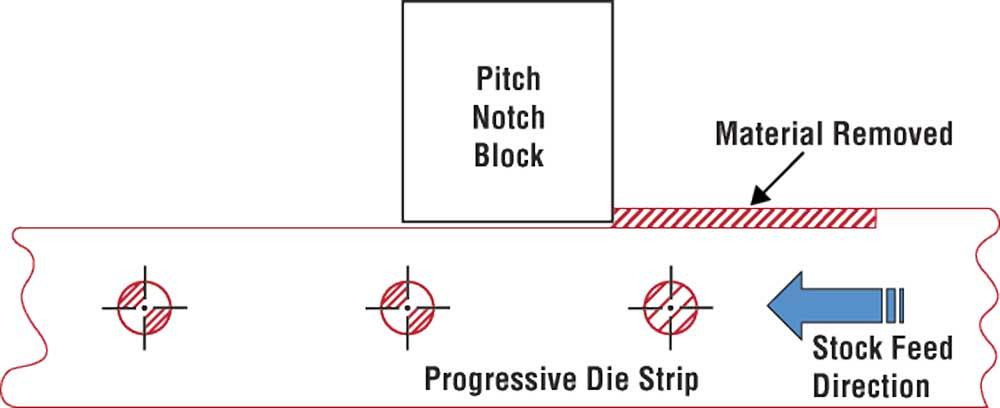
Figure 1
A pitch notch, sometimes called a French notch, is a small section of material that is cut away from one or both edges of the strip stock at the beginning stations of a progressive die.
Misconception 2: Pitch notches are a waste of money.
Reality: Pitch notches can cost you or save you money. Even though adding a pitch notch will most likely add material cost, it can prevent severe die damage and substantially decrease die setup and production times. How much will it cost if the die is damaged—not only in the cost of repairing the die, but also the downtime? One severe die crash can cost 100 times more than the cost of the additional material required for a pitch notch. And how much is it worth to cut 15 minutes from setup time each day?
Misconception 3: Die protection to prevent over- and underfeeding negates the need for a pitch notch.
Reality: All of the die protection in the world won’t improve your feeding capability or reduce the time needed to get the strip fed through the die. Die protection does not remove edge camber. Because it must be deactivated during the die setup process, it does nothing to reduce possible feeding errors. I’ve seen numerous progressive dies with full electronic protection smashed to bits because the die protection was not set up properly or was overridden during die setup.
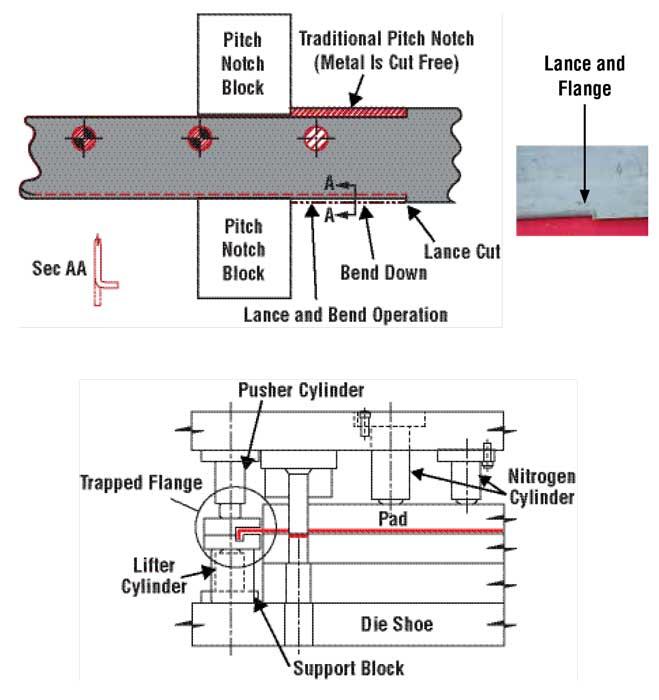
To use a conventional pitch notch, you have to get rid of the slug. Shedding a small strip of material that often is only two times the metal’s thickness can be difficult. Using a lance and flange pitch notch can eliminate this problem. It is created by first lancing a small area in the strip and then bending it down to create a straight flange, which provides a solid stop and stiffens the carrier to aid in feeding (see Figure 3).
This type of pitch notch works well with one-sided carriers because the flange can be trapped in a bar lifter and prevent any side bending when feeding material through the die.
The pitch notch is all about simplifying die setup, reducing die setup time, and minimizing the potential for tool damage. Sometimes it pays to add a pitch notch and sacrifice the extra material needed.
Unless otherwise directed, die builders should design a pitch notch into the tool and leave the decision to remove it up to the stamper.


The Fabricator is North America's leading magazine for the metal forming and fabricating industry. The magazine delivers the news, technical articles, and case histories that enable fabricators to do their jobs more efficiently. The Fabricator has served the industry since 1970.
start your free subscription
Easily access valuable industry resources now with full access to the digital edition of The Fabricator.

Easily access valuable industry resources now with full access to the digital edition of The Welder.

Easily access valuable industry resources now with full access to the digital edition of The Tube and Pipe Journal.

Easily access valuable industry resources now with full access to the digital edition of The Fabricator en Español.
Seth Feldman of Iowa-based Wertzbaugher Services joins The Fabricator Podcast to offer his take as a Gen Zer...


