


Contributing Writer
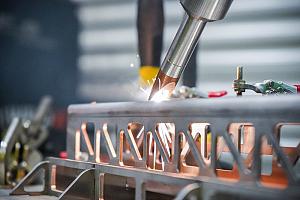
Die tryout time can stretch from minutes to months, but there are several ways to get good parts quickly. Getty Images
One of the challenges of die building is the time spent on die tryout to get a satisfactory part. The tryout process can take a few minutes or several months, depending on the complexity and tolerancing of the part’s geometry.
Advanced tools such as forming simulation software can certainly help reduce the time spent in the press. But while forming simulation can help you establish a process electronically, it typically does not account for many of the variables that occur in the real world of stamping. Factors such as heat, press and die deflection, forming speed, and friction changes during forming typically are not accounted for in simulation, yet they have a profound effect on your ability to reach a satisfactory stamped part.
So how can you reduce die tryout time?
When I was a young toolmaker, we didn’t have forming simulation software. Engineers and die designers made educated guesses to determine the best die design and process for making a part, so they spent a lot of time in the press, changing and altering the tooling as needed. We used to joke that we were designing the dies while in the press. Today we don’t have the time or resources for that.
To expedite the die tryout process, the die designer or process engineer must leave no stone unturned. Every detail of the die design must be defined. Using forming simulation, analyze the strain levels of the part to equalize and distribute the strain as evenly as possible to prevent splitting and wrinkling during drawing or stretching.
Once you have accomplished that, focus on springback prevention rather than correction. And remember: No strain, no gain. Significant changes in strain severity typically cause parts to twist and tip. And knowing the material’s true properties is key. I recommend having the actual tryout material tensile tested to determine mechanical values.
A formability report typically includes the material’s parameters used for simulation, so the toolmaker can verify that the correct tryout stock is being used. A report also shows the coefficient of friction used, the holding and forming pressures needed, and it might show a forming limit diagram of the process and blank dimensions. The tryout technician or toolmaker should use the exact same blank size and shape that was used during the forming simulation process.
For parts that are formed using the drawing process, the report also should contain specific draw-in measurements around the perimeter of the blank and the drawn part. Most simulation reports show the part overlaid on the blank. These draw-in measurements will define how metal is flowing inward toward the drawing punch to achieve a satisfactory part.
During the die tryout process, the diemaker or tryout technician can compare the draw-in measurements on the report to actual measurements on the tool. If the simulation report shows 35 mm of inward flow in a given area of the part and the die shows only 30 mm of flow inward, the diemaker or technician must adjust the tool to achieve 5 mm of additional inward flow.
If the inward flow amounts on the die are identical to the ones depicted on the formability report, then most likely there is a difference in the friction used, or the metal’s mechanical properties don’t match what was used in simulation.

The main function of a binder or draw pad is to keep the material from wrinkling during the drawing process. Although you can use the blank holder to squeeze the metal and create a restrictive force, doing so may result in inconsistent strain levels.
Instead, use draw beads and radii to control metal flow. They provide consistent results and help reduce die tryout time and process instability. This is especially important with strain-sensitive materials such as high-strength steel and aluminum. Minor strain differences with these metals can have a big effect on springback, as well as splitting and wrinkling.
When designing and debugging a die, make sure you understand all the variables, and approach die tryout like a scientist. Make logical, data-supported moves, document your changes, and try to match the results of the formability report.
Check out more articles from the Die Science series.


The Fabricator is North America's leading magazine for the metal forming and fabricating industry. The magazine delivers the news, technical articles, and case histories that enable fabricators to do their jobs more efficiently. The Fabricator has served the industry since 1970.
start your free subscription
Easily access valuable industry resources now with full access to the digital edition of The Fabricator.

Easily access valuable industry resources now with full access to the digital edition of The Welder.

Easily access valuable industry resources now with full access to the digital edition of The Tube and Pipe Journal.

Easily access valuable industry resources now with full access to the digital edition of The Fabricator en Español.
Seth Feldman of Iowa-based Wertzbaugher Services joins The Fabricator Podcast to offer his take as a Gen Zer...