


Fabricating stainless kitchen countertops for a 200-year-old house
Out-of-square walls make kitchen remodel a challenge for metal fabricator
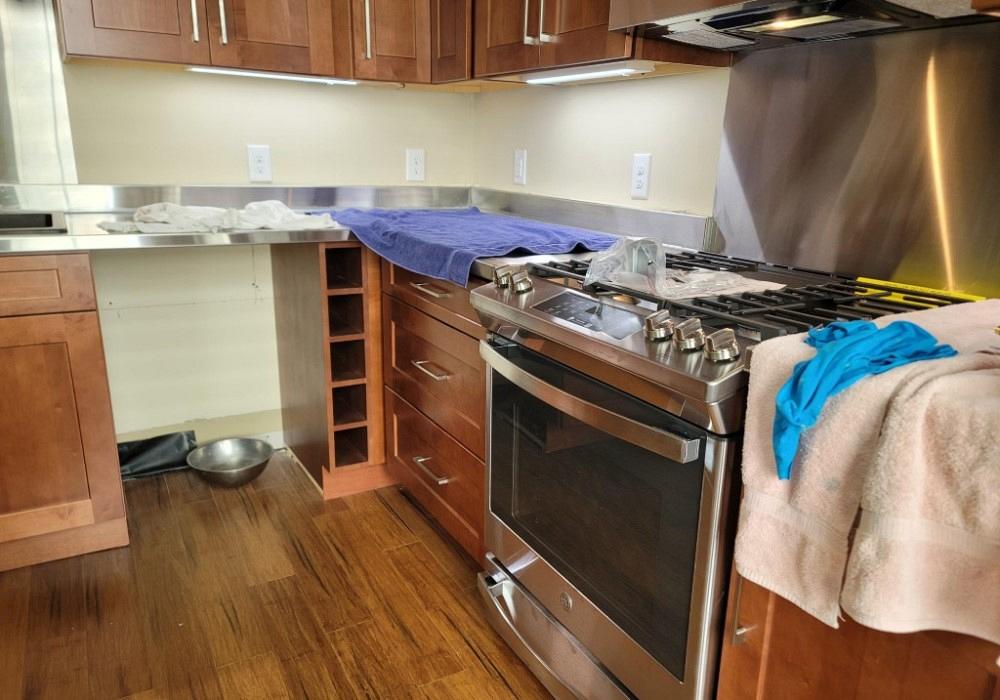
Barnes MetalCrafters had some unique fit-up challenges when fabricating stainless kitchen countertops for a 200-year-old house. Images: Nick Martin
Not every shop is set up to do field work. Some can handle it here and there, maybe, but not every day, because field work is a whole different ball game. At Barnes MetalCrafters, we like to do most of our work at the shop under our conditions. It’s what we’re set up to do, with all our tools and equipment right there, and it’s what we’re good at.
But we do like to spread our wings sometimes. So when a customer asked us to quote a countertop job in our hometown of New Bern, N.C., we said, “Sure! How hard could it be?”
This Old House
Our friend Mindy Faraci at Creekside Cabinets told us she had a customer that wanted stainless steel countertops in a kitchen that was being remodeled. We’ve done quite a few countertops in the last few years for several different customers. Most of them bring the wood to us, labeled to indicate which sides are touching the walls and what edges need to have a smooth, flanged edge.
My co-worker Zach has gotten pretty good at “wrapping” these in Autodesk Inventor. He basically recreates the wood as a solid model and then wraps the wood with sheet metal. Most of these countertops require very little welding or finishing, and only in the corners. Occasionally we’ll have to pull a seam, but we try to avoid it. Most seams usually are butted together and glued down in the field by the customer.
This job for Mindy was quoted with drawings, as most jobs are. Her crew was to install the cabinets and we would supply the stainless steel countertops—a seemingly straightforward request. When installation time came, she asked us to come and look at the site. Apparently, the house was older, and some things about it were a bit “off.”
Well, it was more than just “older.” Construction began in downtown New Bern in 1790—yeah, I said 1790. This 4,000-sq.-ft. house, which sits near the Neuse River, was finished in 1805.
That proximity to the water was a big detriment in 2018, when Hurricane Florence struck New Bern and the house took on about 4 ft. of water. The owners have done a great job repairing the storm damage, but there are still some things the original builders did that just can’t be fixed.
My Dad and I went to look at the house after the cabinets were installed and found we needed to make some adjustments to our square countertops. That’s because nothing in this house was square. I jokingly told my co-workers that the walls were made of waves and they would not be the same the next time we went to the job.
The installers from Creekside Cabinets made the best of the situation (hopefully some of you had stock invested in shims!). They squared up their counters and cupboards as best they could. Now we had to figure out a way to make our countertop somewhat square with what they installed.
Mindy, my dad, the owners, and I were in the kitchen discussing how to make this project the best it could be. There was a lot of oohing and ahhing going on—the kind of moments when you grin as if you are trying to wrap the corners of your mouth around your ears without even touching your face.
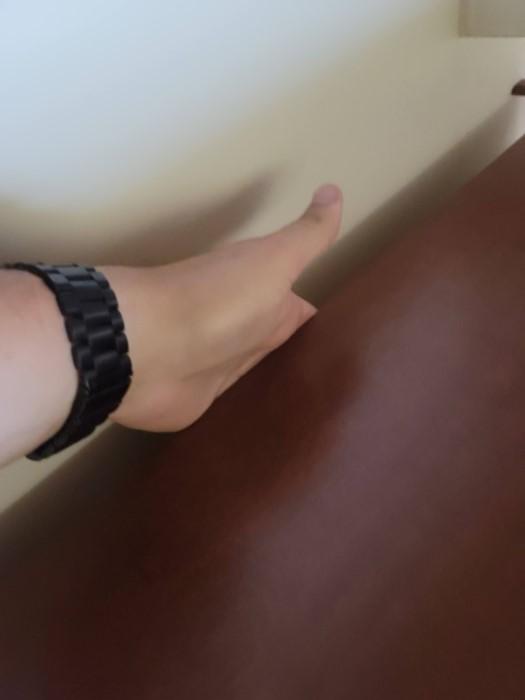
My hand fit behind the cupboards. It needed a lot of shims and eventually was trimmed out.
Scratching Our Heads
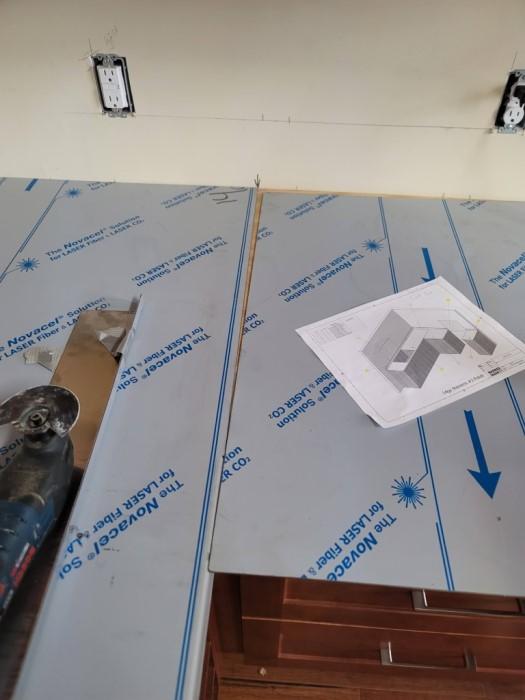
When the discussions were over, my dad and I started taking measurements. I was calling out measurements and Dad was drawing the layout. As I called measurements, he said what? a lot—not because he couldn’t hear me, but because the numbers weren’t making sense. We were scratching our heads, trying to figure out how to go about this. We finally completed the layout on paper with as many notes as possible.
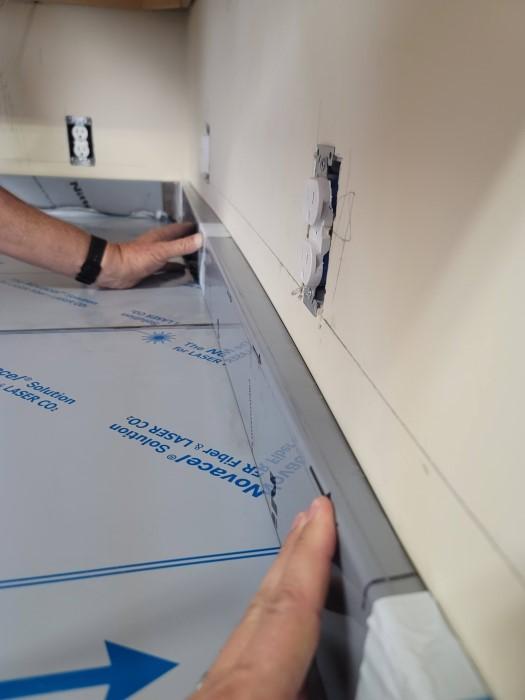
The plan was to slit the drywall down the full length of the wall and push the stainless countertop inside of it. This would give us some wiggle room as we made the 90-degree turn toward the stove, where we were going to have to butt up another piece of stainless top make everything square. Another way we planned to hide some of the imperfections was to make a 4-in. backsplash and stand it off from the wall about 1 in. This was going to look nice, but down the line we still were going to run into issues with our laser-cut lines on wavy drywall.
Zach got to work modeling the parts and pieces, and he had a lot of questions. To be fair, anyone who looked at our dimensions would have a lot of questions.
First Attempt
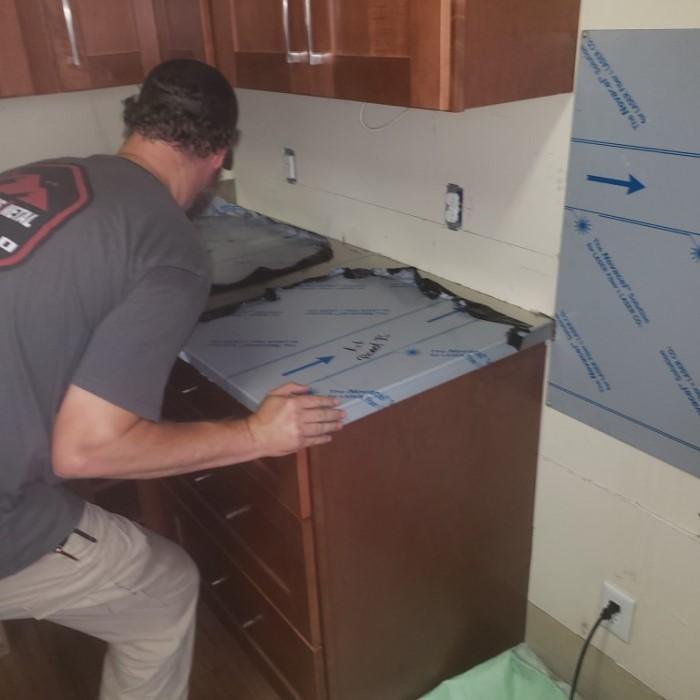
After the countertop and all the pieces were completed in the shop, we went to dry-fit the counter. To be honest, we never should have made the first version of this counter from stainless. Something cheap would have been better suited for the dry fitment, because sometimes the dice don’t roll your way—as we quickly found out.
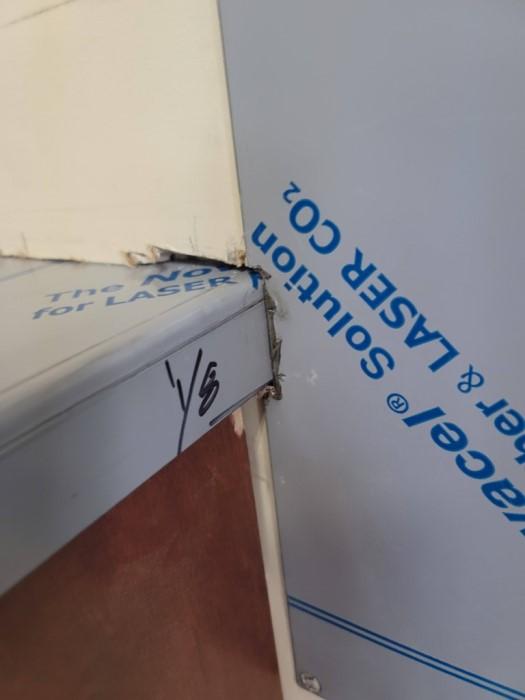
The counter did not sit properly in the 90-degree corner. When we butted the mating piece to it, it did not fit properly. The wall was noticeably out of square. The backsplashes were straight, so they found every wavy imperfection of the drywall. The sink hole was a bit too large. When we dropped the sink in for a test fit, the wood was showing in the corners.
Within just a few minutes, we knew this was going to have to be remade. We checked some more dimensions and tried to take all the guesswork out of the next attempt. At least we got the right side of the stove correct on the first try!
We decided to bring the countertop over 6 in. in the corner. We would weld the inside corner, and this would establish the 90 degrees. One issue with doing this is that the welded corner would not have the same radius as the mating piece that would be formed on the press brake. That doesn’t sound like much, but it’s something we notice in this line of work.
If At First You Don’t Succeed …
We were ready to try our updated countertop at the house. When we set down the large section, it went right into place. We did have to push some inside the drywall, but it worked as we intended it to. We sat the 4-in. backsplash risers in place, and they looked OK but had some expected gaps. One gap that we hadn’t noticed before was where the drywall bowed at least 5/8 in. This stainless piece wasn't too big, so we made some marks and decided to put a large arc on the top flange instead of the normal 1-in. turn. Another piece to remake … who would have guessed?
When we laid the small countertop up there, the one that butted to the large portion, it was not even close. Again, the squareness of this house came into play. We regrouped again and had to make this section a third time. (You can’t win ‘em all, as we’ve figured out many times at this house!) We went ahead and glued the large portion down so we could get that out of the way. I’m glad we did; it felt like we at least accomplished something.
So we left the house again, unlucky and ready to get this job over with. When we got back to the shop the next day, Zach asked how it went. We told him as we hung our heads low. Tim, Zach, and I looked at the dimensions and got a final game plan. As Zach started drawing it, he and I began second guessing the measurements. When he started laying them out in Inventor, and using common sense, he saw the front of the countertop was going to have a weird kick in it where the two butted together. My dad was adamant on the numbers being correct, so we ran with it. It would only be off a couple degrees if it didn’t work out. To us, that’s quite a bit, but it would be hardly noticeable to the average person.
A straight edge showed how far off our first attempt at installing the countertop was.
I also talked to Zach about the weird backsplash that we needed to remake with the extra 5/8-in. arc to be added. He laughed and asked if I was serious. By now, the numbers were making us all crazy, but yes, I was serious.
Third Time’s the Charm?
So we made the small butting countertop piece for the third time and prayed that it would work. With the weird arced backsplash and small countertop in hand, we headed inside the old house one more time. I slapped the countertop up there and the front was off by about 3/8 in. Come on, man! We then realized it was hitting part of the large backsplash that was behind where the oven would go. So we get out the Sharpie and a cutoff wheel. I marked around the edge and went to town with the cutoff wheel. Well, not really—I was pretty dang nervous that I was going to mess up in this nice house. It ended up being OK, and I was happy with my efforts.
We laid the small countertop back up there, and it started to slide in place. I gave it some good love taps and it slid right in the wall as it was supposed to. Now it was time to check out the 4-in. backsplash with the 5/8-in. arced flange. That was a home run—the best fitting piece of the whole job!
Now we had to glue our last pieces and get out of there. The glue was a little hard to work with, and it set up pretty quickly. We ended up having to pull up the countertop a couple times to get some more glue down in places where it seemed to pop a bit. That was a bit of a nail biter, but it ended up looking good.
Walk the Walk and Caulk the Caulk
We were finally starting to see this job come to an end. One last thing was to caulk all the joints. I am not the best at caulking, and I made this known before we went to finish the job. “I got this,” Dad said confidently. I helped as needed, spending most of my time trying to fill the gaps with a spongelike material to give the caulk something to bond to.
As Dad started caulking, I got a funny feeling about the type of caulk we chose for this job. I reminded him that I had to get a haircut that afternoon, so I was going to have to cut out a little early (no pun intended). The kitchen was small, so there was only so much I could do anyway. So my caulking party came to an end and I ventured off to get a majestic mullet. (Sometimes you have to switch gears when things aren’t going your way.)
I called Dad after my haircut, and he said he was finishing up, but he didn’t sound confident in his caulking job. I hadn’t been too impressed with how it was looking when I left earlier. It wasn’t his fault. The caulk was taking too long to set up, and it was not filling the awful gaps. The foam wasn’t helping either.
The next day, the owner called my dad, and he wasn’t happy. The caulk had to be removed. So Dad went back to the job without me and removed it on a Sunday morning. I ended up seeing him later that day and he said we were going to have to go back and finish the job and use the right kind of caulk. He did some research and found the right product. I also think Dad bought every caulk tool known to man to get us out of this bind. He kept pulling them out of bags while we were getting out of the truck, and it made me chuckle. I got a kick out of that.
When we went back to the house, we got a nice surprise. The owners decided to do a quarter round at the top of our backsplashes to hide the curves in the drywall. No more big gaps to fill with caulk. We ended up doing the caulking with all the new tools and it looked pretty good. There was some thin residue that needed to be cleaned up, so we told the owners we would come back the next day. Some mineral spirits and scrubbing made the caulking and the rest of the job look finished.
We were ready to get out of there, and we all felt hugely relieved when we got back in the truck. Some jobs drag on and you never catch a break. The owners were very patient, as they knew the pains of owning an older home. There is always something to do in a house like that. Before they purchased this home, they had lived on a farm. They said when they sold the farm, they also sold all the tools—except for a caulking gun. I thought that was funny given the circumstances.
subscribe now

The Fabricator is North America's leading magazine for the metal forming and fabricating industry. The magazine delivers the news, technical articles, and case histories that enable fabricators to do their jobs more efficiently. The Fabricator has served the industry since 1970.
start your free subscriptionAbout the Author

About the Publication

- Stay connected from anywhere

Easily access valuable industry resources now with full access to the digital edition of The Fabricator.

Easily access valuable industry resources now with full access to the digital edition of The Welder.

Easily access valuable industry resources now with full access to the digital edition of The Tube and Pipe Journal.

Easily access valuable industry resources now with full access to the digital edition of The Fabricator en Español.
- Podcasting

In this episode of The Fabricator Podcast, Caleb Chamberlain, co-founder and CEO of OSH Cut, discusses his company’s...
- Trending Articles
1
Tips for creating sheet metal tubes with perforations

2
JM Steel triples capacity for solar energy projects at Pennsylvania facility

3
Are two heads better than one in fiber laser cutting?

4
Supporting the metal fabricating industry through FMA

5
Omco Solar opens second Alabama manufacturing facility
