


Taking a trailer from blank slate to fully customized
Next step for small aftermarket parts business: Fabricate a trailer for tradeshows
Nick Martin explains how he and the Mountains2Metal crew fully customized and fabricated a trailer for the Overland Expo and other aftermarket tradeshows.
Earlier in October, our shop had its nose to the grindstone getting new sixth generation Ford Bronco products ready for the Overland Expo East in Arrington, Va. Overall, the event was a success and we were able to interact with customers at a grassroots level. There weren’t as many Bronco owners there as we would have liked, but we knew this was a broad event for anyone who was into the outdoors and exploring with their vehicle.
Going to the Overland Expo was an experience for our side business, Mountains2Metal, to say the least. As we arrived, seeing the booth setups was a jaw-dropping experience. The event was held in and around a large horse racing track tucked in a valley. I am not sure if the track is still used for any racing, but the area that this event covered was huge. Admittingly, I was not in the best of health due to a foot injury. So, getting around the event wasn’t something I was really looking forward to on a KneeRover scooter.
We got out of town late due to some trailer trouble that was fixed with the forklift and a cutoff wheel. Not sure what the trailer manufacturer was thinking when they used self-tapping screws on fender marker lights. The tips of the screws were only ¼ in. away from the tires. We quickly found that out while we attempted to leave the shop fully loaded. Luckily, we didn't slash a tire.
Knowing what to expect upon arrival made me anxious and I was on the verge of losing my mess. I didn't put two and two together when I first saw the event overview. We were one of the last booths to get there for setup. So, when we did get to our spot, backing this trailer into a tight space between two brand new Sprinter vans was a nail-biter. After about 17 Austin Powers-esque forward-and-backward maneuvers, the trailer was in place. We were ready to set up shop.
This trailer was a must-have for our event booth and we plan to use it a lot for Mountains2Metal in the future. I wrote about this trailer before, and it got a lot of attention from friends and followers. So, I’d like to tell you about it.
One thing fun about the Overland Expo is the camping. You are welcome to camp in your booth as long as you don’t exceed your booth space. That wasn’t an issue because Justin Zimmerman, one of our booth workers, camped in his Bronco. That left plenty of room for Cody, my sister Denee, and myself to set up tents.
With the trailer parked on the far-right side of our booth, we set up our two 10- by 10-ft. canopy tents next to it and parked the two Broncos to the left. For one of the tents, we had a large 10- by 10-ft. tent that clipped to the bottom of the canopy frame and basically turned into a room. Cody set up his tent under the other canopy but had to take it down each day because this was where displayed our merchandise.
We spent four days and three nights camping in our booth. We were lucky enough to have an ARB Fridge to keep things cold. Justin brought a Dometic fridge as well. Our vehicles were not set up to power the fridges for extended periods of time without running them. We needed extension cords and another power source. Running to the store and grabbing some ice was not an ideal option as we could not leave the event with our booth vehicles. We did have another vehicle parked in vendor parking, but this was not a just-up-the-road kind of thing.
The reason we had another vehicle there was because we had to use my truck to pull the trailer. We had to get a trailer that weighed less than 3,500 lbs so my Bronco could safely pull it to events. The 6- by 12-ft. trailer was loaded to the gills and we didn’t think it was a good idea to take the Bronco through the foothills. For future events, we probably won’t be taking as much stuff. Live and learn.
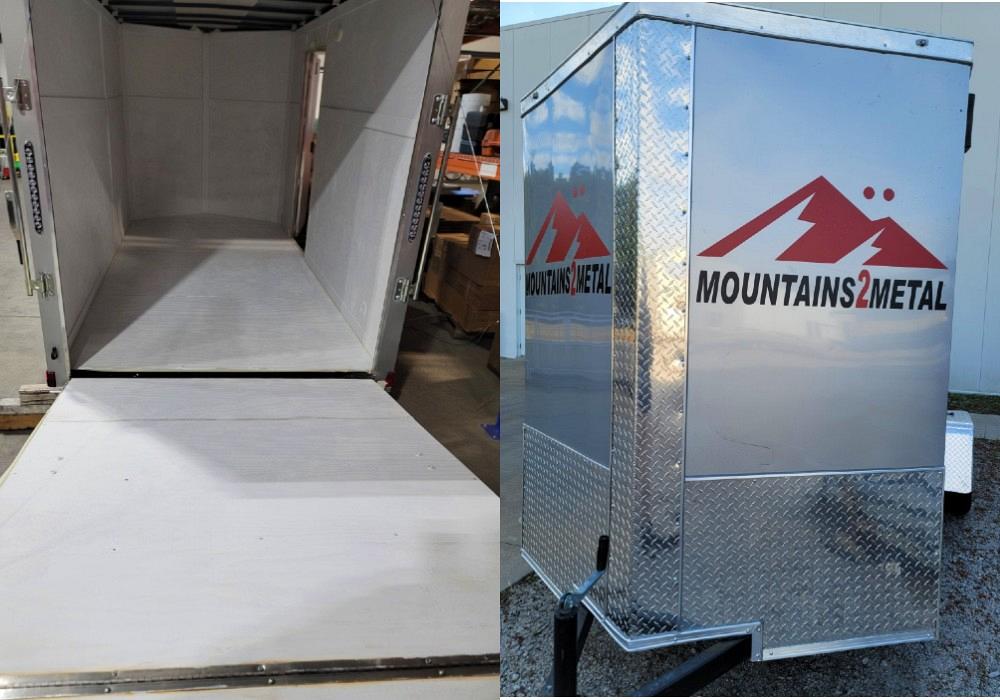
Our 6- by 12-ft. trailer started out as a blank canvas. The first thing we did was get some fresh white paint to cover up the wood floor and walls. We did a primer coat and finished it off with a semigloss white paint. This really brightened up the inside of the trailer. I highly recommend doing this for a work or event trailer.
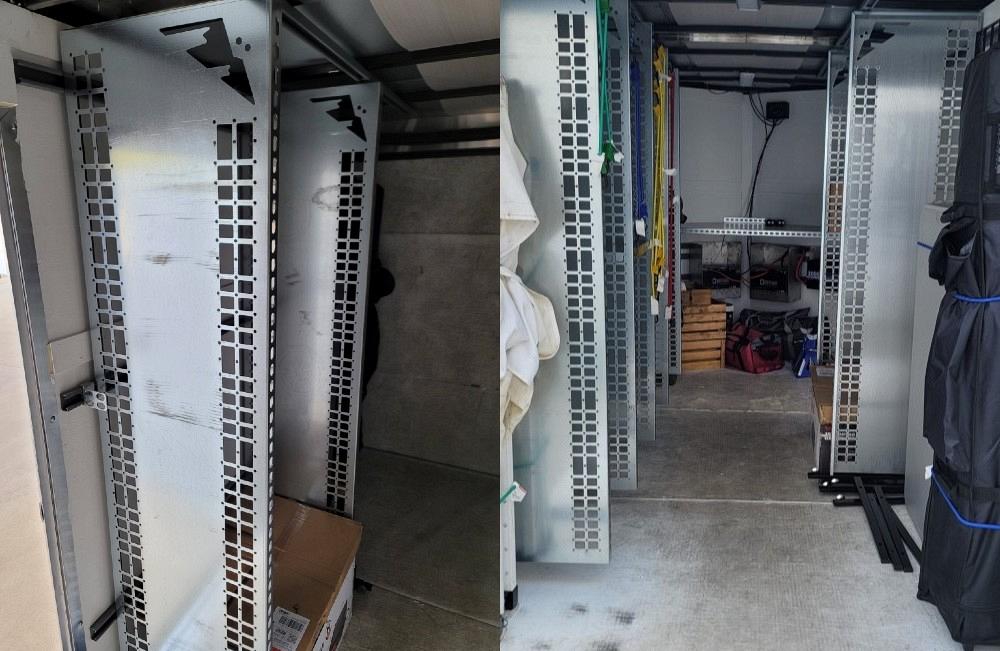
Vertical panels with a modular lightweight load-carrying equipment (MOLLE) on each side of the trailer
For storage, we added divider panels made from 14- and 16-ga. galvanized material. We didn’t need to worry about painting them since this overall trailer build was a bit of a time crunch. To make the securing loads with bungee cords easier, we did a modular lightweight load-carrying equipment (MOLLE) pattern on the front and rear of the panel. Another reason for the MOLLE pattern was a telescoping shelf design that Zach Hall came up with. This accommodated different widths between panels and made dividing inventory much easier. Another nice feature was that the shelves helped lock the panels in place.
The large panels are anchored in place by Unistrut channels that run the length of the trailer on the walls and on the ceiling. The channels allow the panels to be moved to accommodate for different sizes of inventory. We also made some custom hooks to help secure tents and tables to the walls with bungee cords.
The front of the trailer houses the power storage, controls, and a small work bench. We ended up with two 12-V deep-cycle batteries. To charge these up in the field, we installed three 100-W solar panels on the roof. To control the charging, we went with a Renogy solar charge controller. This was mounted on the front wall for easy visibility. To switch power on and off, for our lights and future additions, we went with a simple 12-V electrical panel from West Marine. To power external sources, such as our fridges and phone chargers, we added a 3,000-W inverter by VOLFVERT. The inverter was installed near the side door so we could easily plug in extension cords.
The batteries and inverter are covered by a workbench that filled the front triangular area. This process was easier said than done. For anyone that has ever measured the inside of a trailer, you know how square and precise everything is. We ended up making a template to get the numbers a little more exact. The sides were not symmetrical, so we had to lop off the corners of the workbench to compensate for any errors. We had to kind of wedge into place and mark up the walls a bit. Two or three people held up the workbench while it was secured to the wall. If needed in the future, we could put a couple bar stools under there and it would make for a nice place to eat or get some work done on a laptop.
The overhead lights were a nice add-on and make finding things easy, especially since we should always have some power onboard that isn’t hooked up to a vehicle. At night, we strung lights up around the tent. We didn’t need a generator like some of the other campsites because we had solar power. Our area was well lit and made it easy to cook on and hang out before we walked the area looking for other people that were enjoying the expo. Finding people to talk to was pretty easy. Everyone was there with the same shared excitement for the outdoors and were ready to kick up their feet after all the prep work it took to get to an event like this.
As the expo went on for a few days, our trailer was low on power, which understandable since we had powered two refrigerators nonstop for nearly three days. We cut the inverter off and gave it a break for a little while. There wasn’t a lot of sunlight left that Saturday afternoon, but we weren’t too worried about keeping any food or drinks cold. We were more worried about keeping ourselves warm. The temperature was supposed to get down to 30 degrees F that night. That may not sound cold to some of you, but we were still in summer mode here in eastern North Carolina. Anything below 60 degrees F is cold to most people around here.
We made it through the Overland Expo East without any major issues. The only one that comes to mind was that the tire on my KneeRover exploded. At first we thought it was something electrical or that a gunshot went off. We didn’t find the bike tire until a couple hours later when I went to scoot around the show. I’ll take it if that was the worst thing that happened on our trip.
I know we weren’t really roughing it while we were there. We had cold beverages, hot food, and shelter. Some of the rigs at this show were fit for kings and queens. Their setups were ridiculous, and they could have lived out of their vehicles for weeks or months on end. Ours? Not so much. But we are very happy with it. A little more tidying up on some wires and the trailer will be good for everything we plan to use it for.
Feel free to give me a shout if you have any questions or suggestions on our trailer build. You can spend all the money in the world on overlanding, so do what makes you happy. I always jokingly tell people that overlanding is spending a bunch of money to live like a bum. It is true to some extent. I’ll definitely be investing some more in the future as we get back out on the trails.
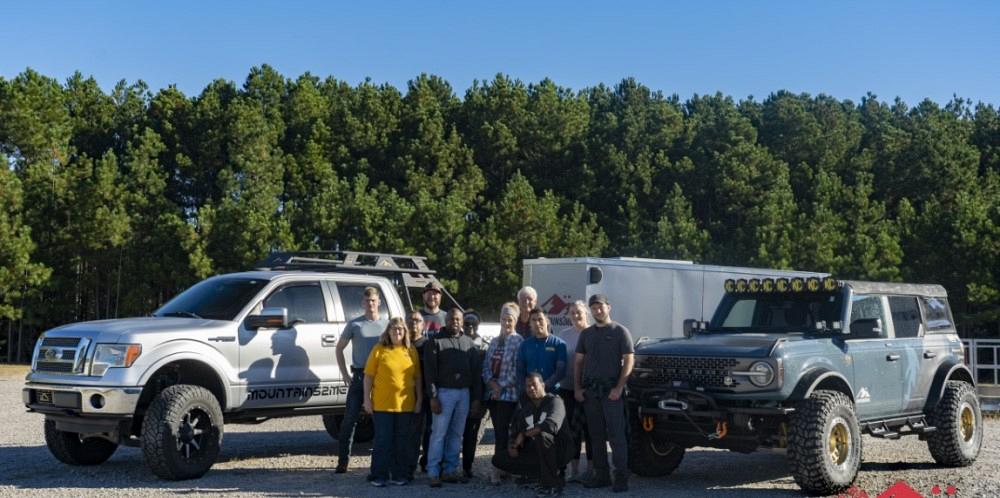
The Mountains2Metal team.
subscribe now

The Fabricator is North America's leading magazine for the metal forming and fabricating industry. The magazine delivers the news, technical articles, and case histories that enable fabricators to do their jobs more efficiently. The Fabricator has served the industry since 1970.
start your free subscriptionAbout the Author

About the Publication

- Stay connected from anywhere

Easily access valuable industry resources now with full access to the digital edition of The Fabricator.

Easily access valuable industry resources now with full access to the digital edition of The Welder.

Easily access valuable industry resources now with full access to the digital edition of The Tube and Pipe Journal.

Easily access valuable industry resources now with full access to the digital edition of The Fabricator en Español.
- Podcasting

In this episode of The Fabricator Podcast, Caleb Chamberlain, co-founder and CEO of OSH Cut, discusses his company’s...
- Trending Articles
1
Tips for creating sheet metal tubes with perforations

2
JM Steel triples capacity for solar energy projects at Pennsylvania facility

3
Are two heads better than one in fiber laser cutting?

4
Supporting the metal fabricating industry through FMA

5
Omco Solar opens second Alabama manufacturing facility
