


Stamping Product Manager
A die takes a beating when it is forming advanced high-strength steels (AHSS), and a punch is the first item to wear, typically. Altering the punch tool’s geometry can reduce the tonnage forces and stress and strain on the tool
Today’s materials for lightweighting have changed the metal stamping industry dramatically. The need to strengthen parts while making them lighter has led to the use of very strong and thin materials that are increasingly difficult to stamp. As the automotive and aerospace industries continue to drive more components to being manufactured from advanced high-strength steels (AHSS), the process for forming and blanking them must also advance.
When designers and engineers develop a die, they focus primarily on the final product and output; productivity losses that result from tool and die wear often are overlooked.
A tool takes a beating when it is forming AHSS, and a punch typically is the first item to wear. Consider how the AHSS material is flowing. The stresses of blanking and forming can harden an already tough material to a near impenetrable state. As the punch pierces or forms the material, plastic deformation increases stress on the tooling until it exceeds the material’s tensile strength and begins to shear and then break through.
Shifting the design focus to extending tool life is an optimal way to increase productivity. A few modest changes in your approach to tooling can help bring your productivity up and your production costs down.
The progression of work materials from mild steel to AHSS has not been the only evolution in the stamping industry. Tool steels also have evolved.
For years the standard tool steels were general-purpose tool steels, such as S7, A2, and D2. They provided adequate uptime and tool life for most applications. However, with the advent of AHSS, punches made of these materials failed quickly when punching this very hard material, which wears cold-worked steels quickly.
About 20 years ago tool steels began to change to keep up with the demand for higher productivity and lower per-piece costs. Now punches most often are produced with high-speed steels such as M2 or powdered metals such as PM-M4. Today’s stampers could not blank and form AHSS if tool steels did not change with them.
As is the case in most scenarios, every stamping application has its ideal tool steel. Work materials such as dual phase (DP) and transformation-induced plasticity (TRIP) require that the tool steels that punch through them can bear the brunt of the impact, yet maintain the cutting edge without chipping.
To select the right punch tool material, examine the current failure. Do you see wear, microchipping on the tip, head breakage, or other catastrophic failures?
In most cases, a high-speed or powdered metal (PM) is the best option for tool and punch steel for stamping AHSS. If the punch is wearing, a wear-resistant steel such as PM-M4 is best. If the punch is showing head breakage or microfracturing, the punch should be made of a PM-3V or a hybrid material that can absorb the increased impact forces (see Figure 1).
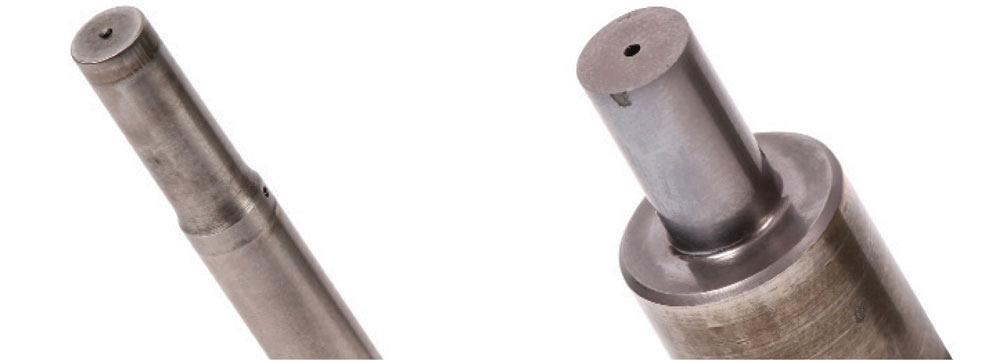
Figure 1
If a punch shows wear, as it is at left, using one manufactured from a wear-resistant steel such as PM-M4 is best. However, if it displays microfracturing, as shown at right, the punch should be made of a PM-3V steel.
Simply changing tool steel alone, however, does not go far enough to meet AHSS head-on.
Once you have chosen the right punch tool material, all the work is done, right? Not a chance. Some of the most important steps are still to come. Heat treatment and machining practices can make or break tool life.
Hardening the punch to the required hardness correctly is critical, and there are several ways to do that. Work with your steel provider to ensure that your punch undergoes the proper heat treatment method. Technologies have improved greatly. For example, a vacuum furnace with multiple atmospheric pressures (bars) can more accurately control the environment and provide more uniform heat treatment than many previous methods (see Figure 2).
But even using a 6-bar furnace may not ensure that the punch is hard enough. The process of getting the tool to a Rockwell hardness level that meets the application requirements is threefold: hardening, quenching, and tempering.
Quenching and tempering times and temperatures are all critical aspects of the punch’s strength and ductility.
An additional helpful step in the process is to anneal the punch head to provide strength where it takes all the impact. Usually this can be accomplished by induction tempering the head end before finish machining. The softer head’s increased ductility fortifies the tool.
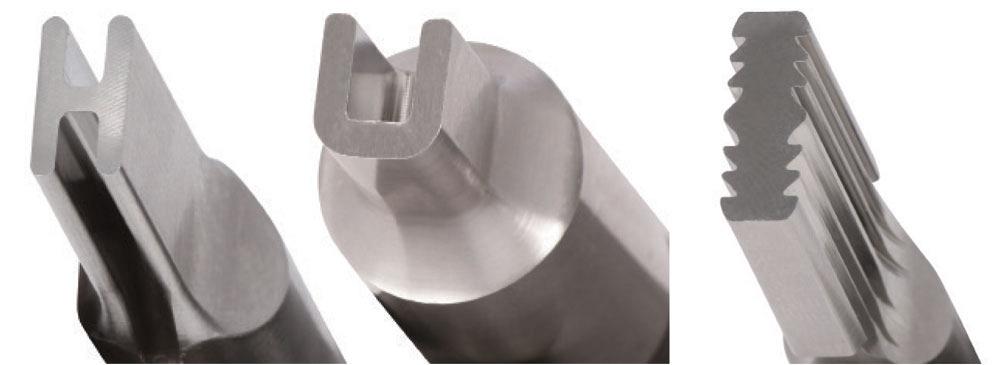
Now that you have chosen the right steel and have hardened it properly, look back at the tool design itself. Pierce tools and forming tools are under a lot of pressure when they are pushing through AHSS, so the design can make a significant difference in determining tool life (see lead image). The increased strength in materials such as TRIP create extra strain on punch tips during piercing. Often this extra strain causes tips and heads to wear prematurely or even break off.
To combat wear and breakage, you have a few options, including the tool’s geometry.
Start by reducing the straight length before the radius begins on the tip. If you are unable to reduce the length because of a form or other details, you have other options.
See if you can minimize the final tip size and create a stepped point length that will clear any details (see Figure 3).
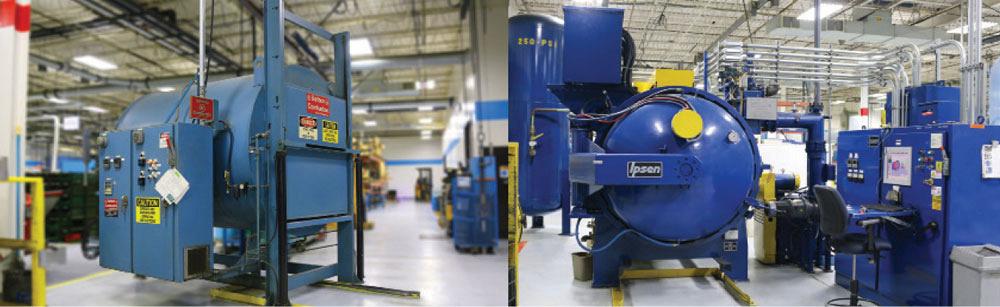
Figure 2
A vacuum furnace with multiple atmospheric pressures (bars) can more accurately control the environment and provide more uniform heat treatment than many previous methods. At left is a 2-bar oven; at right, a 6-bar oven.
Another quick fix may be upsizing to a bigger tool body to spread the shock and stresses of impact over a larger area that can absorb more.
If these approaches don’t work, it may be time to explore more drastic changes that can have lasting results. Wholesale changes may not always be necessary, but outside-of-the-box thinking is in order. If the head is breaking, you should just remove the head, right? Wrong. Use a bigger head? Maybe. Bigger radius? Viable option. Chamfer the head? Helpful. All of those options can help, but it’s still just a head.
So why not remove it? Simply put, removing the head removes the biggest area that absorbs the shock. So, by removing the head, you make the punch more susceptible to a cracked body.
A more effective approach is to examine your die to see if you can make some changes to the design, possibly redesigning the head end to strengthen it with some new thinking.
The tonnage and pressure that are put on the tools are forces to be reckoned with. You can address these forces by making several adjustments, such as adding shear in the tool or staggering punches to reduce tonnage. Adding shear not only helps reduce tonnage, but also reduces the stress on the punch because it isolates the cutting forces to the points of contact along the shear angle.
Today’s machinery allows tool manufacturers to create unique geometries and nontraditional punches. They may be more expensive initially, but if they can last longer and improve productivity, ultimately cost savings may result. Incorporating a little engineered geometry and combining multiple geometries and steps will make the tip stronger (see Figure 4).
What additional options exist for designing longer-lasting tools? It depends on how your tools are failing and what your part looks like.
Maybe increasing or reducing the number of hits in the progression will help. Increasing the number of progressions and adding additional tooling gives you the opportunity to strengthen the tip.
Not up for a large upheaval? Then look at the little things that make up the tooling. When combined, many small adjustments may also get you to the productivity levels desired
Look at the failure. If the tip is being pulled off, maybe a taper, back or fore, will help reduce the stripping pressure or strengthen the tip. Smoothing the surface finish to reduce friction will reduce the stripping forces. Changing the grinding pattern from circular to linear to change the grain direction of the cutting surface will reduce the stripping forces also.
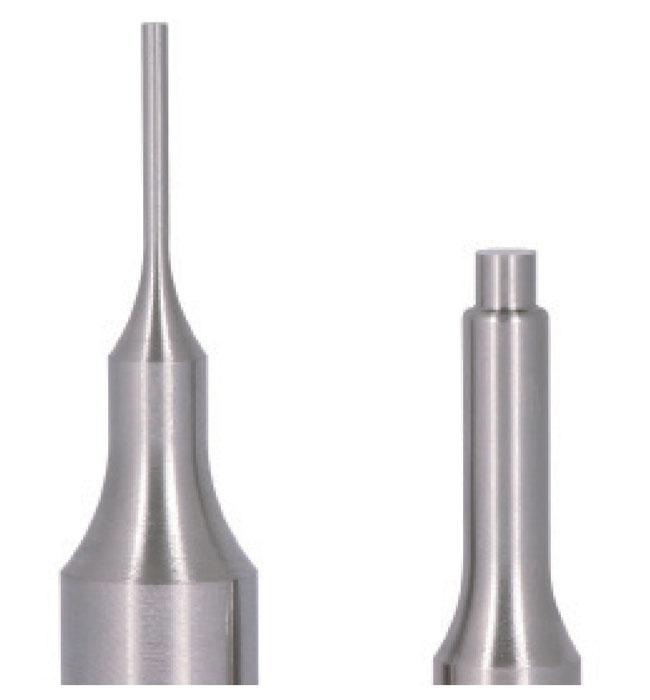
Figure 3
One successful design change approach is a stepped punch with a reduced final tip size and a length that clears all details.
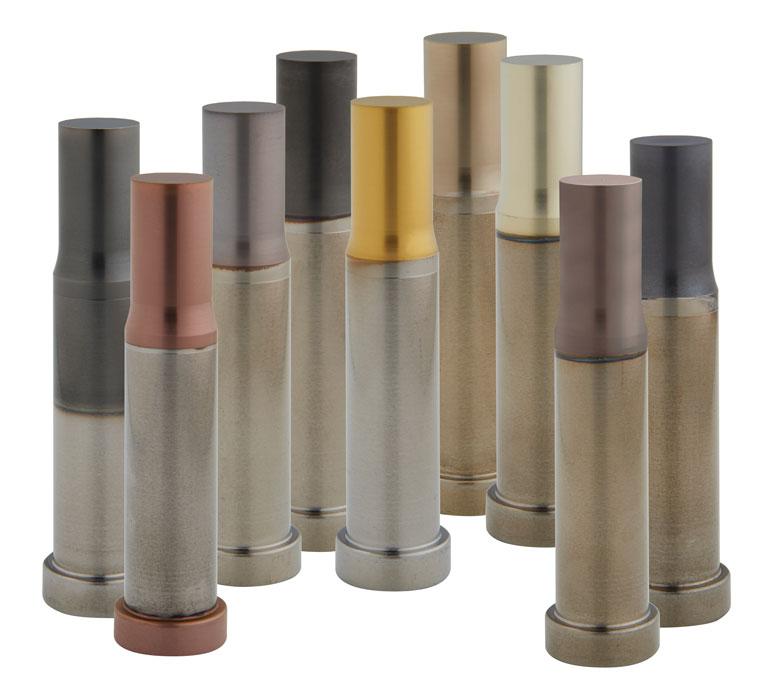
One other way to improve tooling is by applying coatings (see Figure 5). The beauty of coatings is that there are plenty of options. Understanding which coating to use, however, can be confusing. How the punch is wearing, which lubrication you’re using, which tool steel the punch is made from, and which work material is being used can help determine the best coating for the application.
Coatings have all sorts of methods for adhesion. Some of the easiest coatings to work with are applied via physical vapor deposition (PVD). The critical criteria are application method, material, Vickers hardness (HV), and friction coefficient. Consider your application and current failure method, and work with your tooling provider or coaters to decide which coatings to apply.
You are looking to keep that die running and out of the toolroom. Once you have already explored options such as stepping the tip, reducing the straight, making head changes, and adjusting materials, what other options remain?
How the punch tooling is failing can tell you a lot about what is happening with your die and can provide the information you need to improve productivity. Examine your punch and look for changes in finish and break lines, as well as any wear over time. When the punch shows consistent wear, a simple tooling replacement is sufficient. Breakage and inconsistent wear may warrant a closer look at the feeder or the die itself.
Articles have been written on how AHSS material reacts in action that can provide some additional insights. Other online resources include videos and articles discussing options to improve productivity. Review the forums, online tools, and discussions for different applications, because at one time or another, someone had the same problems you have.
Jeremy Edson is product manager, stamping and tableting division, Wilson Tool International, 651-286-6042, www.wilsontool.com.


The Fabricator is North America's leading magazine for the metal forming and fabricating industry. The magazine delivers the news, technical articles, and case histories that enable fabricators to do their jobs more efficiently. The Fabricator has served the industry since 1970.
start your free subscription
Easily access valuable industry resources now with full access to the digital edition of The Fabricator.

Easily access valuable industry resources now with full access to the digital edition of The Welder.

Easily access valuable industry resources now with full access to the digital edition of The Tube and Pipe Journal.

Easily access valuable industry resources now with full access to the digital edition of The Fabricator en Español.
In this episode of The Fabricator Podcast, Caleb Chamberlain, co-founder and CEO of OSH Cut, discusses his company’s...


