Associate Product Manager
Getty Images
A part surface can require a specific metal finish for many reasons, be it cosmetic, product functionality, or customer preference. Certain metal finishes also can help the material resist damage or rusting.
Some applications require a precisely measured finish on metal parts, while others need only look visually appealing. On many jobs, the consistency of surface appearance is the most important factor in judging a metal finish. Each finish also can have a variety of coatings and treatments like clear coating, patina, and steel blackening. Which abrasive product you use for the job, the grit type and size of the abrasive grain, and operator technique all affect surface finish and can produce different results.
Metal is ground and polished to either a visual finish, which is subjective, or a measured finish, which is objective. Metal surfaces might appear smooth to the naked eye, but they actually contain peaks and valleys that can be precisely measured, usually with the Ra (roughness average) or RMS (root mean square) metric. Measuring these is critical if an operation needs to produce a measured finish.
Quality personnel measure the surface roughness with a profilometer, which determines Ra values by moving a diamond stylus across the surface for a specified distance and using a specified contact force. They then assign the Ra value as an average of the surface deviations. A low number represents a smoother, or less deviant, surface.
While less common than visual finishes, measured finishes might be needed in applications where two parts come into contact with one another and require a precise, smooth finish to avoid friction. Measured finishes are almost always specified in food-grade and aerospace applications that require stringent quality testing.
In applications where the material will be powder-coated or treated, the finish might not be as critical, and a visual finish or a nonmeasured finish is often acceptable. Still, if a part will be painted, it should be relatively free of deep abrasions.
Fabricated metal components have a wide range of finishes. Four common ones are mill, directional, nondirectional, and mirror-polish finishes.
A mill finish (also called a 2B finish) is the unabraded material from a producing mill. It’s how the material—be it carbon, cold-rolled, or hot-rolled steel—appears straight off the production machine. Mill finishes can be difficult to match with a hand-held tool or abrasive product, so it’s important to make sure the surface isn’t scratched significantly during welding or finishing. Applying any type of abrasive to a mill finish will produce scratches or swirling.
Directional finishes are common on stainless steel products, such as a refrigerator door. These finishes come in several varieties, including hairline and #4 finishes. Hairline finishes have light, “hairline” directional markings, while #4 finishes are coarser with more pronounced striations.
Nondirectional finishes, on the other hand, don’t have a clear directional pattern. Fabricators create a consistent, nondirectional pattern by stepping up to a high-grit hook-and-loop or pressure-sensitive adhesive (PSA) sanding disc on an orbital sander. Fab shops apply most nondirectional finishes as the final stage before some kind of surface treatment, such as tinted clear coat, patina, steel blackening, bluing, painting, or waxing.

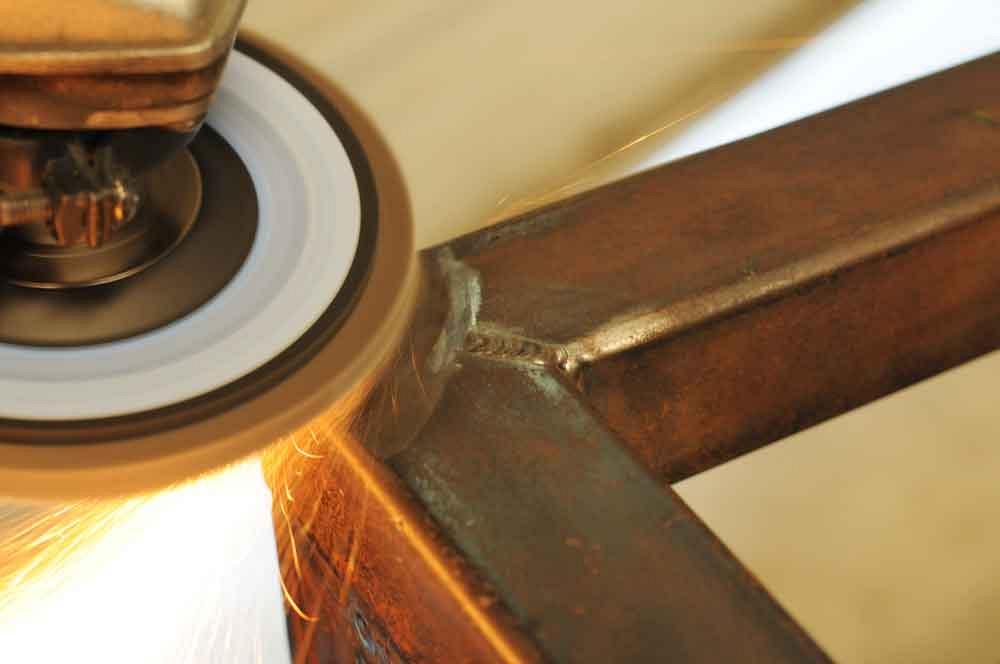
Different grinding tools, including wheels, discs, and brushes, serve unique purposes and create specific finishes.
Some jobs have a mirror-polish finish requirement. Mimicking a machine-made mirror polish by hand isn’t easy. If done manually, a mirror polish is one of the most labor-intensive visual finishes, and one of the most difficult to keep consistent. To achieve a flawless mirror-polish finish, operators must follow specific grinding and polishing steps. Because the finish is so difficult to achieve, many companies buy pre-mirror-polished metal, cut it to size, weld it as needed, and then blend it by manually grinding and polishing only the areas around the weld.
Ideal for pure stock removal, flap discs—as well as their mini-flap-disc cousins that can reach into tight areas—remove material quickly and create a consistent profile. To achieve smoother finishes, operators can step down to finer grain sizes, such as from a 36 to an 80 or 120 grit. That said, a flap disc alone usually can’t provide a visual finish. An application that ends with a flap disc typically involves products with no specified finish or workpieces that will have surface treatment applied.
Flap discs come in various grain types, including ceramic and zirconia alumina. Ceramic flap discs often come with a topcoat, which can be ideal for heat-sensitive applications. Heat can discolor the base material (especially stainless steel) and cause a rough finish. Both the ceramic grain and the topcoat reduce that heat.
Resin fiber discs, which can blend the base material around a weld, might also be used in place of flap discs. A skilled operator can use these discs to blend and create surface patterns. To achieve an extremely smooth finish, operators can use an orbital sander with a high-grit resin fiber abrasive in the proper sequence. To increase the sander’s effectiveness, an operator can add a compound or perform wet polishing.
The finishes resin fiber discs achieve reflect the grain size chosen and, as with the flap disc, the same general rules of grain and grit size apply: The finer the grit, the smoother the finish. A finish that ends with a resin fiber disc typically has no specified finish or will have a surface treatment applied.
An excellent choice for finishing a variety of metals, nonwoven abrasives create a consistent, cohesive smoothness on metal surfaces. They work well for achieving cross patterns, and they can remove discoloration on stainless steel. They’re available in hand pads, unitized wheels, and surface conditioning discs.
Surface conditioning discs or nonwoven abrasives come in varying grades, from very fine to medium and coarse. Starting the process, a coarse disc takes out the surface imperfections and prepares the surface for refinement. The medium disc enhances the surface left from the coarse grade and leaves a bright, satin finish. The very fine grade continues the finish enhancement, leaving a glossy, silken finish.
Wire brushes work well when metal removal is not allowed or desired. Brushes with small wire diameters apply slight scratch patterns to blend and improve visual finishing, though wire brushes typically are not recommended for painted surfaces. The finer the wire, the smaller the resulting scratches, and the better the finish.
Keep in mind that wire brushes can’t remove scratches left by a flap disc; they can only refine the existing finish. Because they don’t remove base material, wire brushes often work well for removing heat discoloration on stainless steel. A nylon abrasive product or nylon product can also remove heat discoloration, remove burrs, radius edges, and provide a scratch finish, which may improve surface finishes to some degree.
Applications that specify a very fine, measured finish, such as for some commercial and retail appliance workpieces, may require mechanized buffing and polishing. Manufacturers sometimes integrate mechanized grinding systems for time-consuming work on repeating products. However, most industrial applications have basic finishes achievable with the right abrasive products installed on bench wheels, right-angle grinders, and other hand tools.
Whichever tool a finishing operation uses, it will produce very different results with different grinding and polishing wheels, each with a specific type and size of grain.
If the base material has a lot of mill scale that must be removed, a 120-grit flap disc will take much longer to remove it but will provide a nice surface finish. A 36-grit or 40-grit flap disc, by comparison, will remove mill scale much faster but leave deeper scratches that require more time to achieve a smooth finish.
Achieving a specific finish generally requires using a progression of products. An operator can start with a coarser-grit flap disc that will remove material quickly and bring the weld down to almost surface level, then move to higher, finer grits such as 60, 80, or 120 (or even higher) to provide a smoother finish.
Depending on the desired finish, the next step might be a nonwoven abrasive to blend in the directional scratches. High-grit flap discs and nonwoven abrasives allow operators to produce measured finishes that allow for painting.
In grinding, pressure matters. If operators (or machines, for that matter) apply different pressures using the same abrasive product, they can achieve significantly different results.
Lab tests have proven this, especially when more pressure is applied to low- grit (36 and 40) discs. More pressure applied to smaller-grained abrasives—like 60, 80, and 120 grit—produces less varied results. In other words, applying more pressure on a 36-grit disc makes a bigger difference in the finish than putting more pressure on a 120-grit disc. This is important since pressure is one of the few variables operators can adjust.
Operators grind differently, and their technique affects results no matter what abrasive product they use. For example, crossing the initial grinding pattern, whether it’s north to south or east to west, improves the finish and can reduce the number of finishing steps a job requires.
Paying attention to scratch patterns makes a difference too. Unless they need to achieve a directional finish, operators can rotate each step 90 degrees from the previous step. This removes and blends the previous step more efficiently.
Training employees in the proper techniques helps prevent rework and makes a shop’s finishing department more consistent. That said, the best-looking finishes in the world can’t overcome the waste brought about by poor communication. This rings true when producing visual finishes. Customers who want visual finishes aim for a certain look, and it’s important to understand exactly what that look is.
To this end, finishing operations can keep samples and finish codes to illustrate the exact steps taken to achieve certain finishes. They’re often displayed in a code book or on a board that provides customers and employees alike with a visual template incorporating high-quality photos or actual samples. Customers then can choose the finish they want from the very start of a project, eliminating rework and confusion.
Think of a well-supported finishing operation as a three-legged stool. Proper training sturdies one leg; having the right tools and abrasive products sturdies the second leg; good communication, with customers and between employees, sturdies the third. With all three legs of the stool secure and stable, inefficiency in finishing can be a thing of the past.
Elliot Shepherd is associate product manager and Ron McCarthy is abrasive specialist at Weiler Abrasives.


The Fabricator is North America's leading magazine for the metal forming and fabricating industry. The magazine delivers the news, technical articles, and case histories that enable fabricators to do their jobs more efficiently. The Fabricator has served the industry since 1970.
start your free subscription
Easily access valuable industry resources now with full access to the digital edition of The Fabricator.

Easily access valuable industry resources now with full access to the digital edition of The Welder.

Easily access valuable industry resources now with full access to the digital edition of The Tube and Pipe Journal.

Easily access valuable industry resources now with full access to the digital edition of The Fabricator en Español.
In this episode of The Fabricator Podcast, Caleb Chamberlain, co-founder and CEO of OSH Cut, discusses his company’s...