Marketing Manager
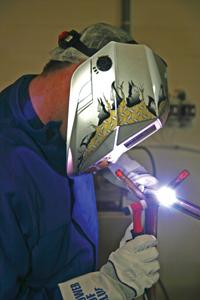
The cup walking technique can help welders gain greater arc stability and change positions more easily as they weld. It is also faster than most traditional GTAW techniques.
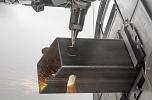
Tube and pipe both pose unique challenges during the welding process, particularly gas tungsten arc welding (GTAW), which can be tedious and slow. Gaps or poor fit-up, in particular, are common occurrences and can easily interfere with quality and productivity. Austenitic stainless steels, also known as the 300 series, have properties that compound these challenges. Austenitic stainless steel is a relatively poor conductor of heat, making it susceptible to distortion and shrinking. It is also prone to oxidation.
Still, when welded properly, austenitic stainless steel provides reliable corrosion resistance and long-term cost-effectiveness, making it a staple across the food, beverage, and process refinery industries. And while traditional methods of GTAW can be used to join austenitic stainless steel tube or pipe, the constant motion required to maintain a consistent arc length and to dab filler metal into the weld puddle can become both tiring and frustrating for the welder. An alternative to improve operator control and comfort is a technique called cup walking, or walking the cup.
Cup walking is a technique in which the welder rests the nozzle of the GTAW torch against the tube or pipe (as opposed to holding the torch freehand) and places the filler rod in the joint. The welder then rocks the nozzle gently along the groove to weld it. The technique offers the advantage of greater arc stability, and it allows the welder to change positions more easily while welding. Some welders, as they become more experienced with cup walking, might find the technique faster than traditional methods of GTAW on tube or pipe.
Before cup walking:
1. Clean the tube or pipe. Use a stainless steel wire brush to remove any paint, dirt, or debris; use a clean cloth to wipe away any oils. Use a stainless steel brush designated for cleaning stainless steel to prevent contamination of the tube or pipe. Keep the brush at hand for cleaning in between passes, too, as it can help remove potential interpass oxides.
2. Prepare the weld joint. V grooves and similar joints lend themselves well to cup walking. The V groove helps minimize the number of weld passes necessary to fuse the tube or pipe, which minimizes the amount of heat input to the base material. During welding of austenitic stainless steel, less heat means less distortion. It also allows for a better-welded microstructure, which reduces the opportunity for oxidation or other forms of corrosion.
3. Set the electrode stickout. The stickout must not drag in the puddle as you walk the cup. A good rule of thumb is to place the tungsten electrode within 1⁄16 to 1⁄8 inch from the base material before welding, making sure that it does not make contact with the base material when rocking the nozzle gently side to side.
4. Select and grind the electrode. Electrodes such as 2 percent ceriated, 1.5 or 2 percent lanthanated, and thoriated tungsten work well for GTAW on austenitic stainless steel.
Grind the tungsten electrode to a point; this shape allows the welding current to transfer more easily to the base material and creates a more stable arc. Use a diamond or cubic boron nitride grinding wheel that has been designated for this purpose to prevent contamination that can lead to arc wandering. Grind the taper on the tungsten electrode to no more than 2.5 times the electrode diameter. For example, a 1⁄8-in. tungsten electrode should have a taper 1⁄4 to 5⁄16 in. long.
Note: When grinding thoriated tungsten electrodes, use a ventilation system adequate to control and collect the dust. Follow the manufacturer’s warnings, instructions, and material safety data sheet (MSDS).
5. Select the filler material. For best results, use a filler rod with overmatching strength. To prevent the filler rod from entering the root opening when cup walking, select a diameter that is slightly larger than the gap between the two pieces of material. For example, a 1⁄8-in. filler metal diameter would be appropriate to use on a 3⁄32-in. root opening.
6. Set the power supply. Because austenitic stainless steel conducts
heat at about half the rate of mild steel, but has a higher rate of thermal expansion, it is critical to control the heat input. Doing so helps prevent warping, shrinking, and oxidation.Use a DC power source set to straight polarity (direct current electrode negative [DCEN]). Use between 80 and 140 amps, depending on the material thickness. A good rule of thumb is to use 1 amp of welding current for every thousandth of an inch of material thickness to prevent too much heat input.
Before welding, align the pieces of tube or pipe and tack them together with four to six 1-in.-long tacks (depending on the size of the tube or pipe) to prevent the pieces from shifting during welding. Grind the tacks to a feathered edge to ensure solid tie-in when welding the root pass. For the root pass, select a No. 6 nozzle, which is suitable for most material thicknesses.
Rest the nozzle on the tube or pipe, laying the filler rod in the groove, and begin welding. Angle the torch so that the back of the nozzle touches the tube or pipe, keeping the tungsten slightly above the surface of the groove. Rest the nozzle in the groove, making contact on both sides of it, and move the torch back and forth slowly in a zigzag motion. Generate this motion by swaying the arm, not the wrist, to reduce fatigue and steady the weld. Hold the torch securely, but don’t squeeze it too tightly, because doing so can cause fatigue. The motion should be smooth and fluid.
While welding, pull the weld puddle to the high side of the joint to accommodate any out-of-roundness and to avoid excessive root reinforcement. Move from the bottom (6 o’clock) to the top (12 o’clock) of the tube or pipe, keeping the filler rod at the leading edge of the weld puddle.
For subsequent weld passes, switch to a No. 7 cup to fill the joint and a No. 8 for the cap pass. Larger nozzles allow for a wider range of motion so it is easier to catch the edges of the weld joint during fill and cap passes. Maintain slight pressure on the filler rod during each pass, and keep it tangent to the pipe to avoid penetrating the root opening or pushing it into the tungsten, which can contaminate the weld.
Note that the technique for cup walking is slightly different on fill and cap passes compared with the root pass. For the fill pass, make a three-point contact with the groove instead of a two-point contact, pivoting the torch so that the edges of the groove guide it. For the cap pass, make a single point of contact, pivoting the torch carefully on the weld face while moving it upward.
To prevent weld contamination, maintain adequate postflow after each pass. One second of postflow for every 10 amps of welding current generally is adequate.
For full-penetration welds, backpurging, or covering the back of the weld with shielding gas, is recommended to prevent oxidation. It helps provide smooth, clean internal reinforcement and prevents sugaring.
Cup walking provides several benefits. In many cases it is faster than conventional welding techniques. It can also be a more comfortable process for welders and offer better torch control. However, the main reason to use cup walking is quality. Using this technique, while keeping in mind austenitic stainless steels’ tendency to distort and shrink when subjected to too much heat, can help you to make quality welds.

The Tube and Pipe Journal became the first magazine dedicated to serving the metal tube and pipe industry in 1990. Today, it remains the only North American publication devoted to this industry, and it has become the most trusted source of information for tube and pipe professionals.
start your free subscription
Easily access valuable industry resources now with full access to the digital edition of The Fabricator.

Easily access valuable industry resources now with full access to the digital edition of The Welder.

Easily access valuable industry resources now with full access to the digital edition of The Tube and Pipe Journal.

Easily access valuable industry resources now with full access to the digital edition of The Fabricator en Español.
In this episode of The Fabricator Podcast, Caleb Chamberlain, co-founder and CEO of OSH Cut, discusses his company’s...