Editor’s note: This is one installment in a four-part series. Part I discusses equipment selection and skill evaluation. Part II focuses on the potential customer base and the welding repair needs of specific segments. It also offers pricing tips for various jobs. Part III lists dos and don’ts for any business with many tips specifically for welders. Part IV discusses specifics for welding stainless steel and aluminum.
We acquire knowledge about business practices, welding procedures, and safety through experience, and it is the same for welding stainless steel and aluminum. Here are some tips to help you get started.
Tips for Welding Stainless Steel
- Clean the weld joint and surrounding area to remove all foreign material: glue, paint, water stains, oil, grease, rust, and caulk.
- Weld with an arc that is as short as possible (tungsten tip to base metal) to minimize distortion and heat input. Arc length should be about 1/16 inch. Remember: As arc length increases, arc voltage (pressure) increases.
- Avoid weaving. This reduces heat input and weld metal dilution. Maintain constant forward speed. Never reverse the arc travel direction. If you can't get adequate filler in the joint the first time, let it cool, clean the joint, and do it again.
- Use only enough current to obtain a smooth, soft arc and minimal base metal melting. Use approximately 40 to 45 amps on 0.030- to 0.045-in.-thick metal.
- Filler metal should be as clean as the base metal. Make sure your gloves are clean.
- If the base metal is burned black after welding, it got too hot. You have a lot of weld metal cleaning to do. This isn't acceptable for hospitals or food service environments. Decrease the heat input, and maintain proper travel speed to prevent burned-black welds.
- Keep the tungsten clean and pointed at all times. A poor point can't direct the arc to such a fine line joint. Even the steadiest hands in an awkward position or joint will touch tungsten to base metal. If this happens, stop the arc and change the tungsten.
- It's acceptable to keep 3xx series stainless steel cool with a damp rag. Cool it down — it can be easy to push a weld through 0.040- or 0.050-in.-thick stainless steel if it's too hot. The weld will be gone before you realize what happened.
- Keep your shielding gas flow around 20 to 25 cubic feet per hour (CFH). If you need more volume than that, find out why and fix that problem. Don't waste gas.
- Remember: Kitchen environments always are wet. Have your heat gun ready to dry things off.
- On sheet-gauge stainless steel (0.25 to 0.55 in. thick), using 0.045-in. filler metal will force you to limit your heat application. Use 1/16-in. filler metal on 1/16- to 3/32-in.-thick base metal.
- Don't be afraid to use a 4-oz. ball-peen hammer and a couple of needlenose vise clamps to tighten up on weld joint dimensions.
- After light cleaning, a properly executed GTAW joint will have no discoloration.
Tips for Welding Aluminum
- Base metal joint and filler metal cleanliness should be your foremost consideration when welding gauge-thick aluminum, 0.050 to 0.125 in. New aluminum looks shiny and bright; a stainless steel brush will slide over it easily. That's bad. A superthin aluminum oxide layer covering the surface forms naturally over time. This oxide layer will hinder a good-quality TIG weld on thin aluminum. Aluminum oxide melts at temperatures higher than 5,000 degrees F. Long before the oxide layer melts, the base metal under the oxide layer is liquid and starts to fall away and sag, opening up into an uncontrollable mess. On this thin material, the high-frequency, constantly reversing AC arc doesn't break up the oxide layer fast enough before the joint collapses. You must brush the oxide layer hard with a power brush and remove it just before welding. Note: Aluminum oxide is the same material used in grinding wheels. It's an oxide of a metal — a nonmetal — so welding it is out of the question.
You'll know when you've broken the oxide layer and removed it by looking at it — it won't be shiny anymore, but a little dull — and the wire brush will drag (or grip) on the metal surface and leave visible, smooth scratches. Don't forget about your filler metal; it also has an oxide layer. Use 0- or 00-grade stainless steel wool to clean it. Grip the filler metal tightly and draw it through the steel wool five or six times.
- Aluminum boat weld repair requires clean base and filler metal. Boat hulls typically are 0.050 in. thick, and transoms typically are 0.075 in. thick. If you're asked to weld a leaky seam (riveted lap joint), forget it. In boat manufacturing, such as of jon boats or V-hulls, the manufacturer coats the two adjoining surfaces with various sealants or caulk material. Welding heat will burn the sealant out of the lap joint and into the weld puddle, rendering the weld grossly contaminated. Plus, the joint at the end of the weld will continue to leak because the sealant burned away. Any weld repair that will subject a seam or lap joint to temperatures greater than 180 degrees F also will burn sealant away at the joint. Use a damp towel to protect the metal joint from excess heat when making repairs near riveted lap joints. Also, the surface of the two laps (the faying surface) will be heavily oxidized with no way to clean it before welding. One remedy is to power-brush the seam 20 to 30 in. on both ends of the leak (inside the boat) and apply a layer of the best silicon caulk money can buy.
- For a good puddle start, use side cutters and snip off the tip of your filler metal.
- Remember: Aluminum doesn't change color when it gets hot or molten. Your cue to add filler metal is when the surface starts to appear "sweaty" or look shiny. Have the filler metal right at the joint, ready to use. It doesn't take long for 0.050-in. aluminum to melt away, especially on lap joints when you're repairing with a patch.
- In 95 percent of your repair work, ER 4043 will be suitable with little, if any, complications (even though most aluminum boat manufacturers use 6061 aluminum).
- Don't hurry. Keep the metal cool to the touch. Properly placed tack welds will assist alignment.
- Two percent thoriated tungsten (red) will work on aluminum after you round the tip like that of pure (green) tungsten. Size for size, it has a higher amperage capacity than pure tungsten.
- To increase the welding potential of an air-cooled GTAW torch on heavier aluminum, up to 3/8 in., use an argon-helium gas mix. Helium can conduct or transfer heat more efficiently than straight argon. A 75 percent argon/25 percent helium mix can make a difference. On 3/8- to 1/2-in. aluminum, a 50-50 mix will make a gas tungsten arc weld possible, with a 250- to 350-degree preheat. But don't weld aluminum thicker than 3/8 in. with an air-cooled torch too often: You may burn up the torch. The 75/25 mix used on thinner aluminum, 1/16 to 1/8 in., will allow you to increase your travel speed, and penetration will almost double. This mix is not recommended for boat hulls due to the increase in arc heat intensity.
- Don't weld aluminum with a pointed tungsten end. Arc force and puddle agitation will wash out sheet-gauge aluminum.
- Shielding gas flow rates should be kept between 25 and 35 CFH. A flow rate greater than 35 will have to be offset with wind shield curtains.
As this series has shown, starting a portable GTAW business can be lucrative. Remember: Time is money, so don't waste it. Take on reputable, skilled labor or a partner only if you absolutely have to. Poor help or an unskilled partner can easily cost you your business. Be very cautious.
Finally, you must make a personal decision about purchasing liability insurance for your business. Seek professional advice before you decide; you may see that the small price is worth it. You can't buy coverage for an accident or mistake that has already happened.
Now hit the print key on your computer, store this information, refer to it, and review it from time to time. Have fun!
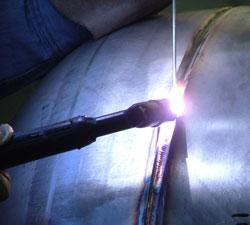
Photo by Jason Gies, project engineer, Amer Industrial Technologies, Inc., 302-765-3900, www.amerindustrial.com.