


Contributing Writer
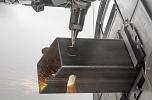
Designing, fabricating, assembling, finishing, and cleaning equipment for food-grade applications, regardless of the alloy used, has myriad requirements that must be met every step of the way. The term food grade and its many variants refers to surfaces that have, in the federal government’s terminology, a sanitary finish—a finish that is safe for processing food products and can easily and reliably be cleaned and sanitized.
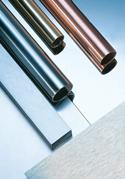
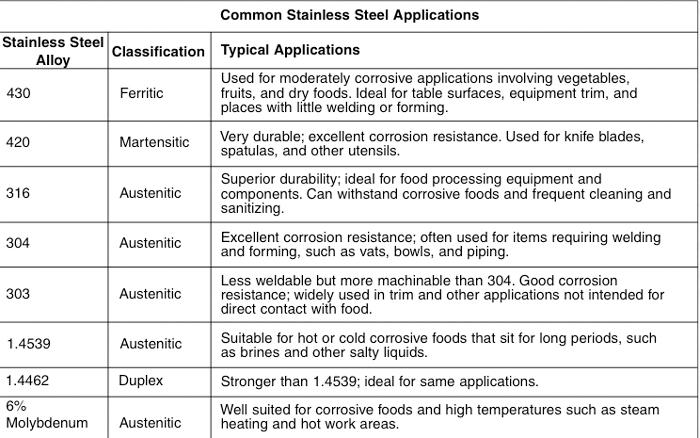
The grinding, sanding, and finishing of food-grade stainless steel must result in surfaces devoid of areas that encourage bacteria growth. The surfaces must be free of lines, grooves, pits, or divots. Additionally, the surfaces must withstand corrosion from the food being handled and the chemicals used to sanitize the equipment. Also note that stainless steel isn’t a single material; many stainless alloys are used in food-oriented applications (see Figure 1).
In the majority of applications, a finish at the high end of No. 4 is considered food grade (see Stainless Steel Finishes sidebar). This finish is achieved using a high-grit abrasive in the range of 150-220 and is identified by short, parallel lines that run the length of the material. The success of the finish can ultimately be determined by a surface roughness average (Ra), measured by height in millionths of an inch (µin.), or microinches. A profilometer determines Ra values by moving a diamond stylus across the workpiece’s surface for a specified distance and using a specified contact force. It measures small surface variations and calculates their average to determine the roughness. In most food-grade applications, 60-36 Ra is achieved with 150-220 grit. Because milk products spoil more quickly and carry more bacteria than other food and beverage items, dairy applications should have a finer finish, No. 4A, which is 40-24 Ra and achieved with a 220-grit abrasive or finer.
Keep in mind that the abrasive’s grit value isn’t the only determinant of the surface finish; other factors are the condition of the abrasive, the particular tool, its speed, and the operator’s technique.
Areas that do not come in direct contact with food don’t need to adhere to the sanitary finish specifications. However, they do need to be cleaned and sanitized frequently, so the surface should be able to accommodate such harsh treatment. In these instances, it is most often easier — and more aesthetically pleasing — to use a consistent finish for all the surfaces. Bear in mind that cleaning and sanitizing are more effective if the system is designed to discourage the bacteria buildup (see Tips for Designing, Assembling a Sanitary Piping System sidebar).
Finishing the inside of a pipe or tube can be a challenge. After welding slag is flushed out, the best finishing tools usually are long arms and elbow grease. For small diameters, mounting a flap wheel to a flexible shaft is a possibility. Long stretches of pipe require a little more creativity. The tool might be as simple as an abrasive mounted to a long dowel or a broomstick.
The abrasive and the tool shouldn’t be chosen in isolation; they should be evaluated together to arrive at the best combination for the job.
The Right Abrasive for the Job. Each project requires several products with various grits to achieve the final finish. Conventional abrasives are composed mainly of aluminum oxide or zirconium. These materials perform well, but ceramic materials are making inroads. Nonwoven abrasives such as fleece provide an even, consistent finish without shadows. Their softness reduces chattering on the surface and resists glazing from soft materials. Another new class, unitized abrasives, also are finding their way into the mainstream. As with other products, the decision to switch to ceramics or unitized abrasives requires careful evaluation of their costs and benefits.
The Right Tool for the Job. Because most fabricated pieces are unique in design, few if any tools enable mass production of a finish. Therefore, most finishing is done by hand or with a hand tool. Some tools, to use the terminology of Food Network personality Alton Brown, are “unitaskers,” whereas others are “multitaskers.” If you find good old hand abrasives and elbow grease aren’t right for the job, these guidelines can help you select a tool.
Choosing the right tool and abrasive are not enough to get the job done; the geometry of every component requires careful consideration. Round pipe is best-suited for circumferential, not lengthwise, finishing. Square pieces are best finished lengthwise, in the same direction, on all four sides. Trying to go around all four sides in one pass will result in an uneven finish with poor grain quality. Flat expanses of material are best taken a section at a time, always working in the same direction. Pay close attention to the areas where the sections join (see Figure 3); blend them until the transitions are nonexistent.
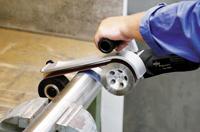
Figure 2: A wraparound pipe sander is ideal on round tube and allows the operator to polish about 60 degrees of the circumference at a time. If using a bench vise to steady the workpiece, be sure to cover the vise’s jaws with cloth to prevent damaging the tube’s finish.
Note that when finishing and sealing pieces that will be in direct contact with food, use only chemicals and cleansers certified by the NSF. The NSF Web site provides a listing of all certified chemicals for use in food production facilities. Federal, state, and local agencies can provide documented procedures for cleaning and handling food-grade fixtures. Periodic inspections are performed by local towns and municipalities and certifications are awarded upon satisfactory completion of the inspections. Failure to comply can result in fines and, in some cases, reconstruction and refinishing.
Now armed with all of this technical information about food-grade finishing, the next question is, What can go wrong?
Note that designing, assembling, and finishing a food-grade project require substantial technical knowledge, but ultimately the project’s success hinges on compliance with the standards established by the governing authority (see Sanitary Standards sidebar).
Finishing a stainless steel surface shouldn’t begin after the project is assembled; it should be a consideration in the project’s design phase. The initial engineering drawings should be clear about the design and sanitary specifications for the project.
The finishing industry uses numbers and letters to define 13 stainless steel surface finishes. The first five, numbered 0 to 2, are mill finishes; 2B is among the most common for fabricators to start with. The other eight finishes, numbered 3 to 10, are applied by steel producers, toll processors, or fabricators.
No. 0: Hot-rolled and annealed
No. 1: Hot-rolled, annealed, and passivated
No. 2D: Cold-rolled, annealed, pickled, and passivated
No. 2B: Cold-rolled, annealed, pickled, and passivated, with an additional pass through highly polished rollers
No. 2BA: Bright annealed, which is similar to 2B but has an additional step in which the steel is annealed in an oxygen-free atmosphere

Figure 3: A flexible shaft with a 5⁄8-in. by 11 thread attached to a stationary motor or angle grinder offers versatility. It facilitates finishing tight crevices or inside pipe—places that are otherwise inaccessible.
No. 3: Coarse
No. 4: Brushed
No. 5: Satin
No. 6: Matte
No. 7: Reflective
No. 8: Mirror
No. 9: Bead blast
No. 10: Any of several electropolished or heat-colored surfaces
More information on sanitary standards for food applications can be found at:
The Tube and Pipe Journal became the first magazine dedicated to serving the metal tube and pipe industry in 1990. Today, it remains the only North American publication devoted to this industry, and it has become the most trusted source of information for tube and pipe professionals.
start your free subscription
Easily access valuable industry resources now with full access to the digital edition of The Fabricator.

Easily access valuable industry resources now with full access to the digital edition of The Welder.

Easily access valuable industry resources now with full access to the digital edition of The Tube and Pipe Journal.

Easily access valuable industry resources now with full access to the digital edition of The Fabricator en Español.
In this episode of The Fabricator Podcast, Caleb Chamberlain, co-founder and CEO of OSH Cut, discusses his company’s...


