


New to the press brake? Establish best practices in the fab shop from the start
A review in forming tonnage, sharp bends, and machine maintenance
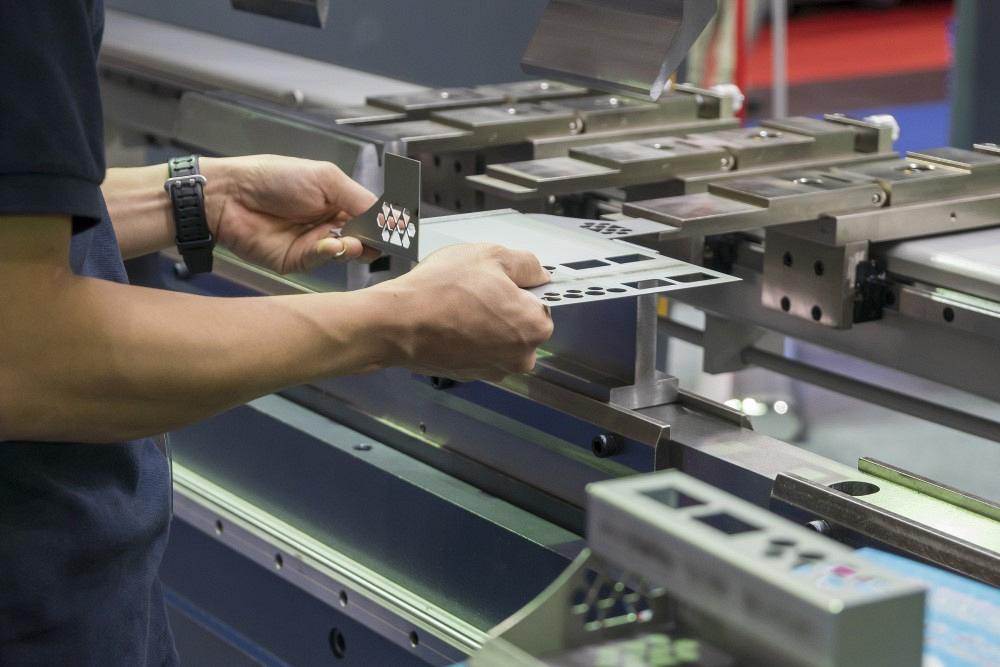
If you're new to operating a press brake, ask yourself these questions from the start to establish best practices: Do you know the safe working limits of your machine and its tooling? Do you have the right tools to make repeatable bends? Getty Images
When buying their first press brake, shop managers ideally should establish best practices right from the start. What are the safe working limits of the machine and its tooling? What should the maintenance procedures be, and whom can you call should a crisis arise? What tooling do you need to make quality, repeatable bends?
Not every question that follows comes from a shop new to the press brake. Regardless, they all address problems many in this industry face, newbies and veterans alike.
Determining Safe Working Parameters
Question: I just purchased my first press brake. It’s a used machine, and I am trying to establish its safe working parameters. I’ve read your past articles, but I’m still a little confused when it comes to ram upset and maximum material thickness.
We have an up-acting press brake with a rated forming capacity of 66 U.S. tons. The bed is 98 in. long, and the distance between the uprights is 80.75 in. According to your past articles, the rule of thumb is to not exceed a full tonnage load applied over 60% of the distance between uprights (see Figure 1). For my press brake, I get the following:
80.75 × 60% = 48.45 in.; 66 tons/48.45 = 1.36 tons/in.
I used an online tonnage calculator to determine 0.25-in. mild steel requires roughly 1.28 tons/in. to form using a 2-in. die width, which is the recommended 8X the material thickness.
Does that mean that the maximum material thickness my brake can form without damage, assuming I stick with a die that’s 8x the material thickness, is 0.25 in.? Can you help clear this up for me? I want to get as much versatility out of my brake as possible without damaging it.
Answer: What you have calculated is correct for that specific example; however, there is more to it than that.
You first need to contact the manufacturer; cite your machine’s make, model, and vintage; and then ask them for its centerline load limit. The centerline load limit is the tonnage value that you do not want to exceed as doing so will lead to ram upset.
Also, don’t forget the load limits for your tooling. Considering the tonnage rating of your brake, tool load limits might not be an issue. Regardless, if this is your first press brake and you’re looking to add more in the future, identifying your tooling load limits is a good practice to establish.
Precision-ground tools come with a tonnage rating from the factory. You will find the rated tonnage for that specific tool printed in the catalog or (ideally) on the tool itself. This can change depending on the tooling type and geometry. For instance, a deep gooseneck punch will likely have a lower tonnage limit than a typical straight punch—though, again, the exact limit will depend on the tool’s geometry and overall design.
If you can’t find a specified load limit, contact your tooling supplier. If you’re using older planed tools without specified tonnage ratings, you might need to run some calculations. You can find one that I’ve used in “The 4 pillars of press brake tonnage limits.”
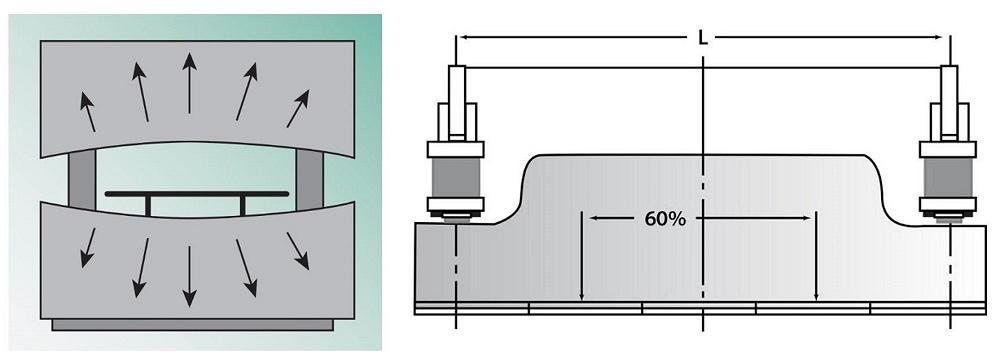
FIGURE 1. The press brake deflects during forming (left). Forming beyond a machine’s centerline load limit can cause ram upset, when the ram and bed deflects permanently. A rule of thumb is not to exceed a full tonnage load applied to 60% of the distance between the uprights. However, be sure to contact your machine supplier to determine its centerline load limit.
From here, you’ll want to calculate a job’s required tonnage based on the material tensile strength and the die opening. The formula I use is as follows and will give you the tonnage per inch that you’ll then multiply by the length of the bend in inches:
Required forming tonnage per inch = [{(575) × (Material thickness2)/Die opening}/12] × Material multiplier × Forming method multiplier
For the forming method multiplier, insert 1 for air forming (the baseline method), 5 for bottom bending, and 10 for coining. For the material multiplier, insert 0.50 if you’re forming 5052 H32 aluminum, 1.4 if you’re forming 304 stainless steel, and 1.0 if you’re forming 60,000-PSI tensile-strength mild steel (the baseline material).
For other materials, simply divide the tensile strength for the material you’re forming by the baseline material’s tensile strength (60,000 PSI). So, if your material has a tensile strength of 120,000 PSI, you’d have a material multiplier of 2.0 (120,000/60,000 = 2.0).
In certain circumstances, you might need to incorporate another factor into the equation. This factor accounts for tools that make multiple bends simultaneously, such as offset and hat tools. I cover this topic in “The 4 pillars of press brake tonnage limits,” but your tooling supplier should be able to offer guidance here as well. Again, if you’re just starting out, you’re probably not using special tools like offset tools. But if you’re establishing best practices for future growth, then noting the tonnage requirements for these tools isn’t a bad idea.
When it comes to tonnage limits and preventing ram upset, the material thickness matters, but it’s just one part of the overall equation. Remember, you can change the tonnage value by changing the die opening, die radius, material properties, and other variables.
Losing Bending Pressure
Question: I am from Namibia, and our shop uses a press brake to bend 0.078-in.-thick sheet. Recently, however, the brake hasn’t been applying sufficient pressure to bend the material. How do I rectify this problem?
Answer: If there is no apparent problem with the press brake, I would first start with the most obvious and straightforward issue and work my way to the most difficult.
First, is the material the same? That is, are you bending not only the same thickness but also the same material type? You may have ordered the wrong type of material, or your supplier may have substituted a different material. If the tensile strength has increased, bending the workpiece may require more force than your machine can produce.
If the material is correct, look at the hydraulic system next. Have the oil filters been changed recently? Are the oil filters partially plugged, reducing the flow to the cylinders, thus reducing the power? Is the oil old or dirty? Hydraulic oil needs to be replaced at intervals set by the press brake manufacturer.

FIGURE 2. In air bending, the die width determines the inside bend radius. To avoid bending sharp, choose a die width that produces a floated inside bend radius equal or close to the material thickness.
Is the press brake running hot? If the press brake oil is too hot, it can become thin and reduce the power at the cylinders. If that’s the case, try adding an oil-cooling radiator to the system to make it run cooler.
Assuming that the oil is new, the filters are clean, and the brake isn’t running hot, check the pressure at the oil pump. Is it producing enough pressure to allow the press brake to function? If it is producing enough pressure at the pump, move on to the proportional valving system. Are you getting equal pressure out both sides of the valving unit? If so, move on to the cylinders. Are they leaking badly and losing pressure? Has it leaked to the point that the machine does not have enough hydraulic oil to function and is perhaps overheating as a result?
If you answer all these questions and still don’t know what’s causing your problem, call the manufacturer’s technician to check the controller and sensors. They will also be able to help you with any repairs and suggest parts to fix any of the aforementioned problems. Alternatively, you could call the service tech and let them track down the issue; that’s likely the fastest way to get the problem solved. I wish you the best of luck in whichever method you choose to pursue.
Where Does a Bend Turn Sharp?
Question: I know that sharp bending is inherently inaccurate, but I was hoping there was a way to calculate, at least to some degree, when a bend turns sharp. The reason I ask is because we have a limited tool selection, and we run into instances where we have no choice but to use tooling that produces a sharp bend.
Answer: There is, but that will take an entire column to explain the math. Nonetheless, there is a sharp-bend calculator on my website, www.theartofpressbrake.com, under the Tools tab on the menu bar. All you need to do is place your information into the yellow cells and it will tell you whether your bend is sharp based on the bend, die opening, material thickness, tensile strength, and yield strength. The program does assume that you are air forming. And, if I do say so myself, it does work rather well. (Author’s Note: A Chrome browser may yield a security warning due to an expired certificate. It’s a problem I am working on at this time. Nonetheless, the site is safe to visit.)
Also, just to review, a bend turns sharp when the punch tip pierces the material surface and creases the bend. This can make a bending operation very inconsistent. In air bending, the radius forms as a percentage of the die width. For instance, 60,000-PSI tensile-strength mild steel typically forms an inside bend radius that’s about 16% of the die width (though that percentage will vary depending on the material).
To avoid air-bending sharp, use a die opening that’s appropriate for the job, such as one that air-forms an inside radius equal or close to the material thickness. Also, choose a punch-tip radius that’s close to, but does not exceed, the floated inside radius produced by your chosen die opening (see Figure 2).
Learn Through Trying
Until next time, I hope that the answers to these questions helped you solve a problem or inspired you to try something new at the press brake. Even if it doesn’t work out, you will still learn from the experience of trying.
About the Author

About the Publication
subscribe now

The Fabricator is North America's leading magazine for the metal forming and fabricating industry. The magazine delivers the news, technical articles, and case histories that enable fabricators to do their jobs more efficiently. The Fabricator has served the industry since 1970.
start your free subscription- Stay connected from anywhere

Easily access valuable industry resources now with full access to the digital edition of The Fabricator.

Easily access valuable industry resources now with full access to the digital edition of The Welder.

Easily access valuable industry resources now with full access to the digital edition of The Tube and Pipe Journal.

Easily access valuable industry resources now with full access to the digital edition of The Fabricator en Español.
- Podcasting

In this episode of The Fabricator Podcast, Caleb Chamberlain, co-founder and CEO of OSH Cut, discusses his company’s...
- Trending Articles
1
Tips for creating sheet metal tubes with perforations

2
JM Steel triples capacity for solar energy projects at Pennsylvania facility

3
Are two heads better than one in fiber laser cutting?

4
Supporting the metal fabricating industry through FMA

5
Omco Solar opens second Alabama manufacturing facility
