


Press brake basics: 10 tips for bottom bending aluminum
Bottom bending isn’t as common as it once was, but a knowledgeable operator should still be able to perform it efficiently and safely
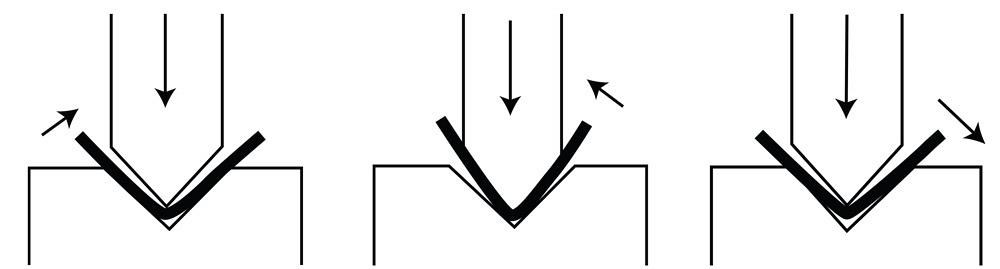
In bottoming, there is angular clearance between the punch and die. The punch descends and the material wraps around the punch nose. As the punch continues to apply pressure, the material is forced down to conform with the die angle.
Question: Our team still has some problems with overbending, at least in some materials and parts. We recently started bottom bending certain parts to make sure the bend angle is exactly 90 degrees. As a result, we’re thinking about bottoming all aluminum. There is good discussion going back and forth on both sides. Is this a good idea or bad idea? What are the advantages and disadvantages in regards to tooling, machinery, safety, and productivity?
Answer: Bottom bending can be done with softer grades of aluminum, such as the H series. Assuming the press brake operators have a full grasp of bottoming and are capable of performing the process safely, here is a list of best practices that should help.
1. Pay attention to the grade when bending aluminum
For aluminum, the harder the grade, the greater the amount of springback that you will need to deal with; very soft aluminum may exhibit no springback at all.2. Watch out for creasing along the bend line.
Aluminum generally loses its integrity if the material is creased. If you make aircraft parts with that crease along the bend line, that alone will make the parts unacceptable.Make sure the piercing tonnage—that is, the force it takes for the punch to pierce the material surface—exceeds the forming tonnage. It sounds as if your operators work with high tonnages, which increases the likelihood of damage from bottom bending.
For more on this, I’d recommend three articles available on thefabricator.com archive, which you can find by typing the title into the search bar: “Forming aluminum on the press brake: Bending sharp, not soft,” “How an air bend turns sharp,” and “The 4 pillars of press brake tonnage limits.”
I highly recommend that you review the material’s specifications for the minimum acceptable inside bend radius. For the most part, a 1-to-1 material-thickness-to-inside-bend-radius relationship is recommended, and in some cases a sharp radius may invalidate the material’s warranty.
3. Avoid a punch tip that’s too narrow.
Use a punch tip radius that’s as close as possible to the material thickness. Be careful to avoid coining, which occurs when the punch nose penetrates the neutral axis of the material thickness—a depth of penetration at less than material thickness.4. Spreading or cracking in aluminum bending.
Bottoming, especially if the bend is sharp, makes the grain in aluminum more susceptible to spreading or cracking. The closer you are to that 1-to-1 relationship—with the inside bend radius, material thickness, and punch tip radius as close as possible to equal—the less likely this cracking will occur on the outside of the bend. Regardless, you still may need to pay attention to the grain direction. Also, if the part has a “grained finish,” be sure to grain it opposite of the material grain direction.5. You can’t use the crease to compensate for springback.
Because you should not crease the bend at its center, as you would with a coined or sharp-bend radius, you will not be able to use that crease as a means of compensating for springback as you could if you were working with mild steel. The only way to bottom-bend aluminum is to use the 88-degree punch. An 85-degree punch will take the bend too far. This means that you cannot achieve enough negative springback (springforward) to force the bend back to the 90-degree angle.This means two things: First, unless the operator is very skilled and knowledgeable, he won’t be able to bottom-bend a piece of material in which the springback exceeds 2 degrees. There are ways to exceed that 2-degree limit with an 88-degree punch, but not by much. Second, bottoming is best used for light-gauge materials and bends of 90 degrees.
6. When aluminum bending, take angular clearance into account.
Assuming you use a 90-degree die and an 88-degree punch, you will have 2 degrees of angular clearance. In bottoming, we try to match the punch angle to the material’s springback.To deal with bends having different amounts of springback than the angular clearance allows for—say, only 1 degree of springback instead of 2 degrees— you will need to cheat a little. Purchase a roll of 1⁄8-in.-wide vinyl pinstriping tape, the cheaper the better. Place a piece high on the punch face. This has the effect of changing the punch angle.
Most will use masking tape, which works for a while but needs to be replaced regularly. Pinstriping tape, which is made from vinyl, won’t need to be replaced often, if at all.
Note that rarely will you be able to use tape on both sides of the punch. This usually does not work. Also, never cover the entire face of the punch with tape; that changes the center of the tool, not the punch angle.
7. Select your die width as a “perfect” bend.
This refers to a bend in which the die width is determined from a 1-to-1 relationship between the inside bend radius and the material thickness. The formula for a perfect die width is: (2 × Material thickness) × 3.429435. Even if the punch radius is less than 1-to-1, use this formula.Inside radii greater than 120 percent of the material thickness generally are not suited for bottoming. The exception would be when forming larger-radius bends into urethane, which can have similar effects to those of true bottom bending.
8. Take your time setting up the aluminum press brake.
Make sure everything is clean before installing the tooling. Most important, be sure to center the punch into the die, even if you need to walk back and forth from end to end to check. Look down the bend line while closing the tooling gap to zero. Start with no tonnage load, with the punch faces just touching, then stroke the press slowly. Watch for the tooling to move slightly. If it does, you need to recenter that end. If you move one end of the tool, you will change the other, so you will need to return to the opposite side of the machine and check the alignment there. You need to do this until you see no movement in the tooling on either end.Also make sure that all of the bolster (bed) set screws have been backed out or removed so you are not trying to center your tooling using a distorted or curved bolster. Also note that the New Standard style of press brake tools have no centering issues; these are fixed in location.
9. When bottoming, work your bend calculations based on the nose of the punch, taking the bent/bend angle factor into account.
This includes the bend allowance and bend deduction. Remember that the radius expands slightly when released from load during bottoming.What angle did you need to achieve before releasing the part from pressure? Divide that angle value by the angle value of the final bend—for example, 92/90. That division problem yields a value of 1.0222. Multiply that value by the radius on the nose of the punch, and you have your radius for your bend deduction calculations.
10. Modern press brake tooling will work fine for bottoming, assuming you pick the right combination.
Nonetheless, if you are bottoming correctly, you will develop up to five times the tonnage load of air forming. So please be aware that modern press brake tooling on average is about 70 Rockwell—it will explode if overloaded.Also be aware of the press brake’s centerline load limit. If you exceed that limit, you will upset the ram; the bed will remain permanently bent and no longer deflect the way it was intended to. Also, beware of the sink tonnage and the increased risk of exceeding the limit. Again, I would refer back to “The 4 pillars of press brake tonnage limits,” available at www.thefabricator.com.
Remember that bottoming occurs about 20 percent above the material thickness, as measured from the bottom of the V die. Say you have 0.062-in.-thick material; 20 percent of that thickness is 0.012 in. Add that to your material thickness of 0.062, and you get 0.074 in., which is approximately where bottoming occurs in the V die in bend lengths of about 18 in. or less.
This means that, on the outside radius, you should not see any shininess or other area that looks like it was hit too hard. The inside radius should have no signs of the punch nose penetrating the material thickness.
If you use American, traditional-style tooling, all of the same rules apply with a couple of additions and exceptions. First, these tools generally are surface-hardened only on the punch nose. If you overload one it will tend to make a loud noise, and a large chunk of steel will hit the floor. With this style of tooling, there’s only a chance of it exploding.
Also, these tools must be kept in sets, and all the tools need to face the same direction. If you cut a punch length in sections, you can use those sections individually or mated together; but if not mated back together at the original cut and with the tool facing the same direction, they may not successfully mate with sections cut from the full length of tooling. The same applies to dies. How precise the tooling is made will have a big effect on the final mating results.
Bottoming: A Viable Option for Bending Aluminum
If everything is done correctly, you should see an increase in production. Bottoming stabilizes the bend angle, and you’ll have fewer angle and dimensional variations as well as fewer errors and corrections.
Bottoming is a viable option for your forming department, but the decision really comes down to a few internal calculations on your part. Bottom bending will improve production rates and overall quality, but your calculations also need to take into account the skill levels of the employees who will be performing the task. It takes only one mistake to damage your press brake permanently!
While ram upset is always a possibility regardless of the method you are using, it is at least five times more likely if you are bottoming because of the increased tonnage. Accidents may happen. A part may be formed on the wrong tool at the wrong time. An operator may pick up two pieces by mistake and form them at the same time. Or he may just hit the part a little too hard while making adjustments. Whatever the error, the damage generally will be worse while bottoming.
Note that bottom bending is no longer the primary recommended method of forming when you are discussing the topic with equipment manufacturers. They too are moving the industry away from bottoming for all the reasons listed previously. The simple fact is that very few people still understand how to perform bottom bending safely without coining the part, an older forming method that you do not want to perform. Nonetheless, bottom bending still can be done, done correctly, and done safely.
About the Author

About the Publication

subscribe now

The Fabricator is North America's leading magazine for the metal forming and fabricating industry. The magazine delivers the news, technical articles, and case histories that enable fabricators to do their jobs more efficiently. The Fabricator has served the industry since 1970.
start your free subscription- Stay connected from anywhere

Easily access valuable industry resources now with full access to the digital edition of The Fabricator.

Easily access valuable industry resources now with full access to the digital edition of The Welder.

Easily access valuable industry resources now with full access to the digital edition of The Tube and Pipe Journal.

Easily access valuable industry resources now with full access to the digital edition of The Fabricator en Español.
- Podcasting

In this episode of The Fabricator Podcast, Caleb Chamberlain, co-founder and CEO of OSH Cut, discusses his company’s...
- Trending Articles
1
Tips for creating sheet metal tubes with perforations

2
Supporting the metal fabricating industry through FMA

3
JM Steel triples capacity for solar energy projects at Pennsylvania facility

4
Are two heads better than one in fiber laser cutting?

5
Fabricating favorite childhood memories
