


Press brake tooling: Planer or precision-ground?
What tooling works best depends on the metal parts being formed

Nordroden/iStock/Getty Images Plus
Question: We are in the process of purchasing a hydraulic press brake. With that purchase comes the need to specify and select tooling. We have been using American planed tooling for over 30 years.
Regarding American and New Standard styles of tang used in bending structural steel, what style of tang would you recommend? Also, is there benefit to selecting a V-die angle of 75 degrees versus the more available 85 degrees? We need to specify a die angle to accommodate for springback in A572 Grade 50 material.
We will be purchasing a hydraulic upper clamp. The push-button American-style tooling that we are considering has a groove in the tang that would self-seat like the New Standard tools.
Answer: You are in the heavy equipment manufacturing industry; therefore, I assume that most of your products are produced using plate steel with a few pieces of heavier gauge sheet for items such as dashboards.
Your first consideration would be the kinds of products you plan to produce with the new press brake. Are they light-gauge materials with tight tolerances, heaver plate, or both? Second, is your new machine specifically designed for the New Standard (Wila-TRUMPF) tooling?
Just to clarify some terms, modern press brake tools are identified by their manufacturing method—precision-ground or planed—as well as by the tool profile, including the shape of the tangs and mechanisms used to seat and retain them in the holder—American, European, and New Standard. Tools with American-style tangs have traditionally been planed, so you’ll often hear them referred to as American planed tools. Today, however, precision-ground tools are available with American-style tangs.
Now that you have a new press brake, you need to choose your tooling. Again, the type of brake you have will guide your choice, especially if your brake was designed for a specific tool style.
If you’re now deciding whether to stick with planer tools or switch to precision-ground tools, which path should you choose? For certain applications, planer tools work well. After all, you state that your operation has used planed tools for more than 30 years. On the other hand, if you’re having trouble meeting part-quality requirements, switching to precision-ground tools might be the way to go.
When choosing between traditional planer and precision-ground New Standard tools, know that each has its place in the industry, and both have their pluses and minuses.
The New Standard Style
The New Standard style of press brake tooling works well with high-precision, tight-tolerance parts, especially when used in a press brake designed specifically for that style of tooling. The correct press brake combined with New Standard tooling makes setups a breeze as they hold parallelism between the bed and ram or the punch and die perfectly. They also automatically hold the tooling perfectly centered in Tx and Ty (the axes shown in Figure 1).
The New Standard style can be purchased in sectionalized toolsets. These allow for the assembly of the tools to any length required without the need to cut the tooling itself. New Standard tools also are self-seating when used in conjunction with the proper auto-clamping system.
In my mind, New Standard tools have two drawbacks. First, the self-seating, self-centering tooling makes it very difficult to “cheat” a bend, such as offsetting the die slightly to catch a small flange. While it’s not always the best of ideas to offset a toolset, the reality of forming on a press brake is that occasionally it becomes necessary to catch the flange and complete the bend. Second, New Standard tools cost more than traditional planer-style tools.
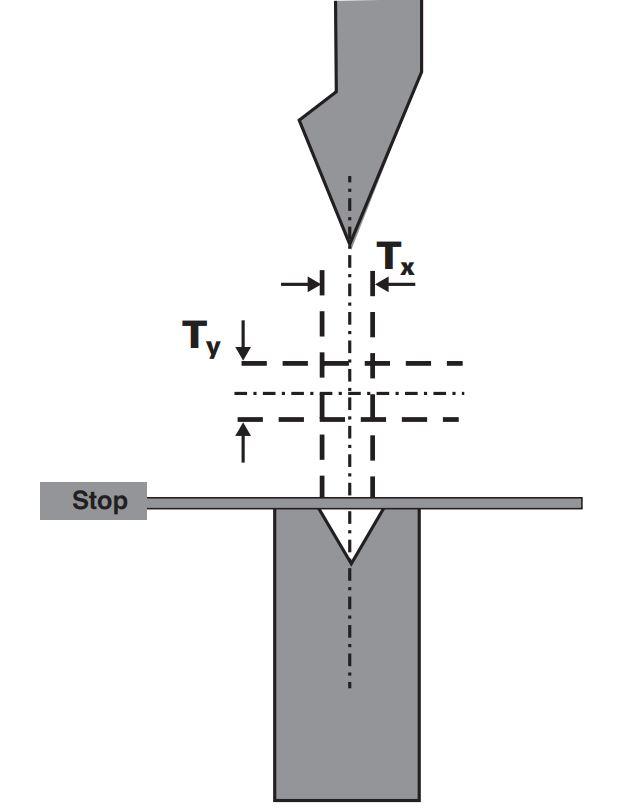
New Standard tools mounted on the right press brake automatically centers the tooling in both the Tx and Ty axes.
Traditional Planer Tools
Traditional planer tools have pluses and minuses as well. On the plus side, they’re less expensive than the New Standard, and they’re well-suited to heavy bending and bottoming. Planer tools generally come in long lengths of multiple feet that you then cut to length for specific applications.
Cutting the tools yourself has both advantages and disadvantages. If your product mix is somewhat limited and you aren’t continually cutting tools to new lengths, then cut-to-length tooling is a good option. If you frequently combine tools to achieve a given length, traditional planer tooling is more challenging.
Rather than being ground toward a center point like precision-ground tooling, planer tools are cut from an X-Y reference coordinate. When combining the tooling into different lengths, the tooling must be kept facing the same direction. Whichever surface you choose to define as the “front” must remain consistent. If you have one section placed opposite the other, the tools will not align properly since you will have moved the reference to the opposite side (see Figure 2).
When cutting planer tools to length, keep them in the same order. When you need to create a longer tool length, mate the same two pieces at the same cut with the tools facing the same direction. For the best results, mark each cut you make on one face of the tool: 1 mates with 1, 2 mates with 2, and so on. When you see the numbers aligned, as shown in Figure 3, you’ll know you’ve mated the tools in the correct order and orientation.
Planer tools are generally manufactured in lengths up to 40 ft. with 0.005 in. of error over 10 ft., or 0.020 in. of error total over 40 ft. That’s really good, but it only takes just a few thousandths difference to affect the bend angle. Taking a cut piece from one end and trying to mate it with a piece from the other doesn’t work out well. Also know that, when you cut planer tools to length, you could release residual stress from within the tool, which can cause alignment issues.
Traditional planer tools are not case- or through-hardened. Instead, they are generally flame-hardened only on the working surfaces. If you mistakenly overload planer style tools, you might just hear a bang and see broken pieces fall to the floor. Traditional planer tools may be the best option in an environment where you’re bending large pieces of heavy plate or where high tonnages are required.
Tang Type and Mounting Method
Your best option for the mounting tang is to get the one appropriate for the clamping system you are purchasing. Push buttons are great if you have a lot of small tools to deal with, but not so great if you mostly close the ram and slide in a 4- or 5-ft. tool length. All modern tooling will incorporate some kind of safety catch into their tooling, such as hooks or rare-earth magnets.
Tool Strategy for Structural Forming
If you’re forming in a structural application, you’re probably not bottoming. The forces required for that would be immense. As to which style of tooling is best suited for structural part forming, the New Standard or traditional planer, it is not so much the tooling design or type as it is the punch nose radius that matters.
You do not want the relationship between the punch nose radius and the material to become sharp.
If your bend becomes sharp and creates a crease along the bend line, you will add a lot of unnecessary angle variation. Bend angle variation affects the flange dimension as well. A good rule of thumb when forming steel is to keep the punch radius to a value greater than 63% of the material thickness. (To access a free sharp-bend calculator, visit theartofpressbrake.com and click on the “Tools” menu.)

If you reverse a planer die on the brake bed, its center shifts. If another section is placed in the opposite direction, the tooling will not align properly.
Die Angles: 75 vs. 85 Degrees
Which to choose depends on the bend angles you need to achieve and the severity of the springback. The purpose of a smaller die angle is to help compensate for excessive springback by helping push the material around the punch nose to achieve the bend angle.
Also remember that if you change the die angle, you also will need to change the punch angle so that you keep angular clearance between the punch and die. A punch angle greater than the die angle will load the die shoulders and ultimately split the die in half.
Planer or New Standard?
What type of tool you choose starts with your application needs, including the tolerances you need to achieve, the kind of press brake you have, and whether your machine is designed specifically for certain tooling types.
Not knowing the specifics of the press brake you purchased and your specific application requirements, I would consider the traditional planer tool due to the type of manufacturing you are involved in and the type of tooling you are working with already. However, keep in mind the disadvantages of traditional planer tools described earlier. As long as you face the tooling in the same direction when you reassemble them after cutting (aligning the tools 1-1, 2-2, and so on), they should work just fine for you and save you a little money too.

Planer tooling that you cut into segments should be labeled as such so that, when used together, they are mated in the order they were initially cut.
About the Author

About the Publication
subscribe now

The Fabricator is North America's leading magazine for the metal forming and fabricating industry. The magazine delivers the news, technical articles, and case histories that enable fabricators to do their jobs more efficiently. The Fabricator has served the industry since 1970.
start your free subscription- Stay connected from anywhere

Easily access valuable industry resources now with full access to the digital edition of The Fabricator.

Easily access valuable industry resources now with full access to the digital edition of The Welder.

Easily access valuable industry resources now with full access to the digital edition of The Tube and Pipe Journal.

Easily access valuable industry resources now with full access to the digital edition of The Fabricator en Español.
- Podcasting

In this episode of The Fabricator Podcast, Caleb Chamberlain, co-founder and CEO of OSH Cut, discusses his company’s...
- Trending Articles
1
Tips for creating sheet metal tubes with perforations

2
JM Steel triples capacity for solar energy projects at Pennsylvania facility

3
Are two heads better than one in fiber laser cutting?

4
Supporting the metal fabricating industry through FMA

5
Omco Solar opens second Alabama manufacturing facility
