


Contributing Writer
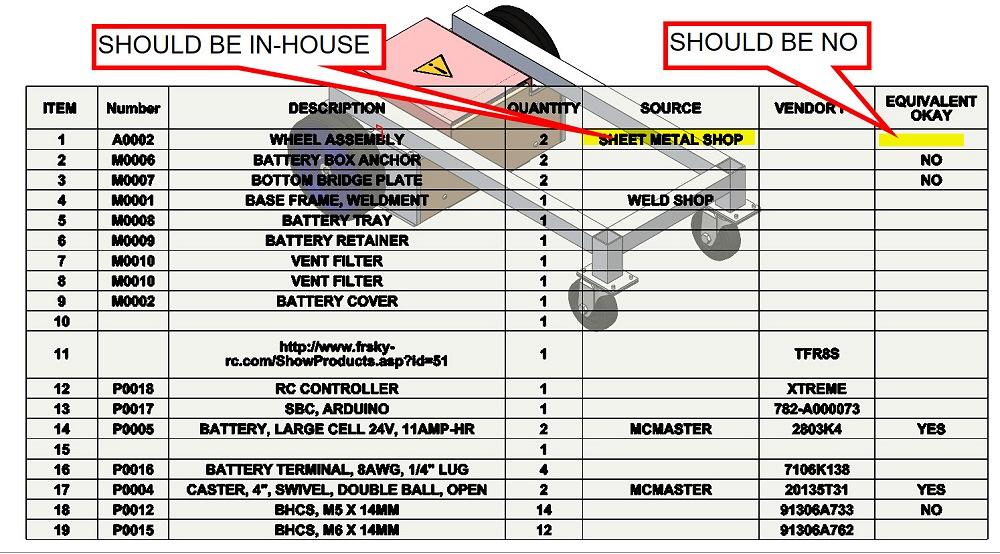
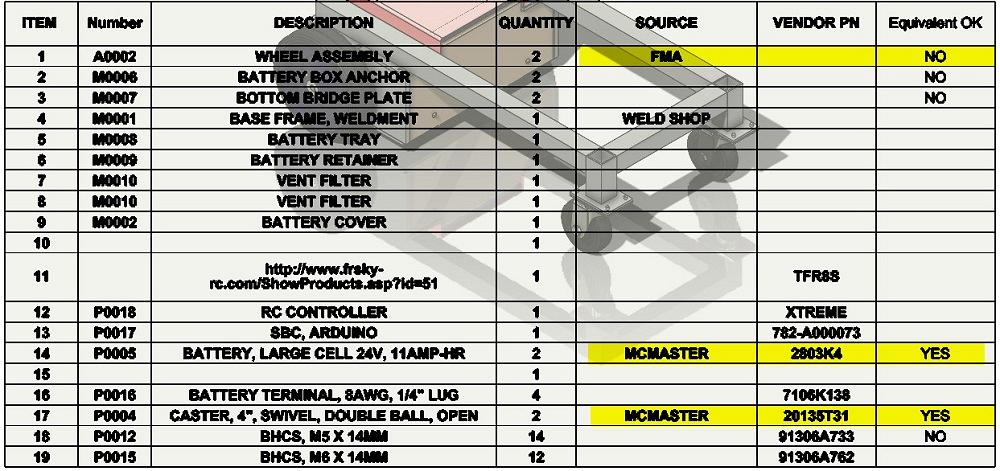
FIGURE 1. Although progress has been made, there are still errors in the product manufacturing information. For example, Line 1 has an incorrect source, and an Equivalent OK is not acceptable.
A self-propelled shop cart has been the CAD project under discussion in the past few episodes of this column. The cart’s design is still evolving with regards to electromechanics, but the basic structure and assembly have met preliminary approval by our imaginary elves.
Even while final details are being worked out, we are adding official part numbers, descriptions, sources, and related product manufacturing information (PMI) to the modeled items. This is in support of creating the 2D drawings for fabrication, quality control, and illustrated manuals. That is to say, the PMI is used in many places. Accurate PMI is of paramount importance. Well-designed data entry forms help with speed and accuracy in this endeavor.
Progress in data entry is shown in Figure 1. This table, a bill of materials (BOM), has been inserted into the CAD assembly file as a convenient way to preview the status of the PMI. A similar table is likely to be inserted into a second drawing file, by the way.
With the CAD software being demonstrated, the BOM displays the PMI contained in the CAD models (aka components) that are, in turn, contained in the CAD assembly.
In terms of progress, we are pleased that many of the line items in the BOM table show proper part numbers and descriptions. The task at hand is to correct several data entry errors.
For example, Item 1 has a good number, A0002, and good description, WHEEL ASSEMBLY. The quantity is assigned by the system, and two is what we expect. Unfortunately, the source is showing incorrect data. Further, an equivalent item is not to be allowed.
As a side note to explain this specific bit of PMI, Equivalent OK set to Yes allows purchasing to make the choice of supplier and its part number. Defining the limits of equivalence is a matter of rational opinion.
In this case, the line item must be made one specific way. There is no discretion in where this comes from. Thus, a resounding no to equivalents! OK. Calm down.
As part of correcting data entry errors, the Custom Properties flyout pane displays the PMI in the WHEEL ASSEMBLY (see Figure 2A). Well, maybe don’t see Figure 2A. The data entry form shown is incorrect and out of date. It lacks a checkbox to answer the Equivalent OK question.
This has been a demonstration of how first-time CAD projects cause forehead slapping. In this case, a Custom Properties form was adapted from project A, and the BOM table template was borrowed from project B.
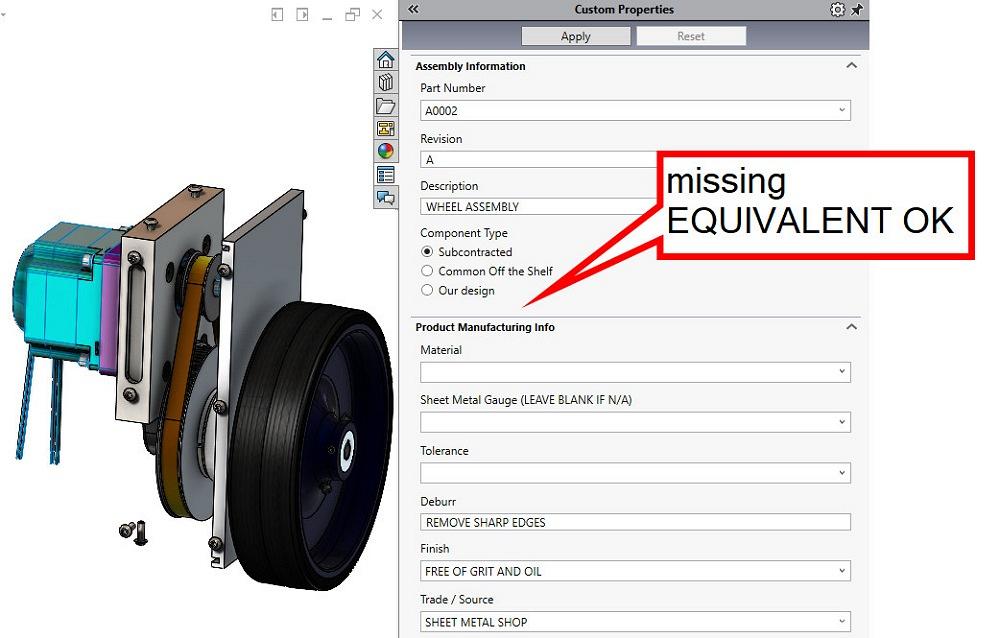
FIGURE 2A. To correct the PMI, you can use a data entry form. In this example, the data entry form is incorrect and must be repaired before the data entry can be completed. The form is missing a checkbox for Equivalent OK (Yes or No).
To synchronize the table with the form, either edit the BOM table (and its template) to not display the Equivalent OK property’s value in a column or edit the form to include the missing property.
Property Tab Builder is the tool to use to update the data entry form. To employ that tool effectively, you need the exact spelling and capitalization of the property name the BOM table uses.
Figure 2B shows a way to discover the name of the property that the BOM table is expecting. Select the column in the table. In this example, the column titled Equivalent OK. Select the Column Properties in the pop-up menu, and the pop-up dialog shown in Figure 2B will appear. These settings for the column are editable. The intent at the moment is to simply memorize (CTRL-C) the name of the property displayed.
Property Tab Builder creates unique forms used on assemblies, parts, and drawings (.asmprp, .prtprp, and .drwprp, respectively). Figure 2C is a screen shot of Property Tab Builder with the FMA.asmprp file open.
The Property Tab Builder user interface presents the form being edited in the center column of three columns on the screen. The column to the left of the form contains templates of things that can be used to design a form (dragged onto the form). The column to the right displays the settings for the item selected in the form (middle column).
In Figure 2C, a checkbox was mouse-dragged onto the form. With that new checkbox selected on the form, its settings were edited (shown to the right).
The checkbox’s caption has been set to Equivalent OK. The result is visible on the form; Equivalent OK appears next to the green checkmark. The spelling and capitalization of the caption are not critical. It is just to help the user of the form.
The name has also been set to Equivalent OK. The spelling and capitalization must exactly match the BOM table’s column property setting.
The remaining settings for the checkbox are a matter of preference. Our design intent is for checked to mean “yes, equivalent is permitted.”
On the form, checked-by-default eliminates mouse clicks for the user of the form since most items allow discretion. If you disagree, design your checkbox to be unchecked by default.
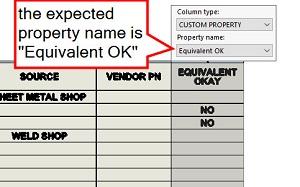
FIGURE 2B. To repair the form, we need to know what the BOM table is looking for. The column’s properties reveal the name of the custom property it displays. In this example, the name is “Equivalent OK.” (The caps matter.)
For this demo of improving the design of a custom property form, the allowable answers are “yes” and “no.” “Sure” and “never” might work just as well. It is your form, after all. The spelling and capitalization of these answers to the question of Equivalent OK will appear in BOM tables and may be used by other software. So design with intent.
The Configurations button in Property Tab Builder defaults to making the property configuration specific. If configurations are not in use or not needed, don’t use the configuration-specific button. In this example, we want Equivalent OK to apply to all configurations; thus, the left button is clicked as shown. Save the work. Perhaps test the form with an assembly before proceeding to design the next form.
In this example project, the Equivalent OK applies to both assemblies and parts. As was done with the form for assemblies, use Property Tab Builder to open and edit the form for parts—in this example, FMA.prtprp. A screen shot and procedure for adding and editing a checkbox to the form for parts is nearly identical to that used to add the checkbox to the form for assemblies.
Here’s a CAD tip: The form for drawings—FMA.drwprp—does not involve Equivalent OK, so the work with Property Tab Builder is complete for now. Make it a habit to go through all three forms when updating the data entry/custom property scheme.
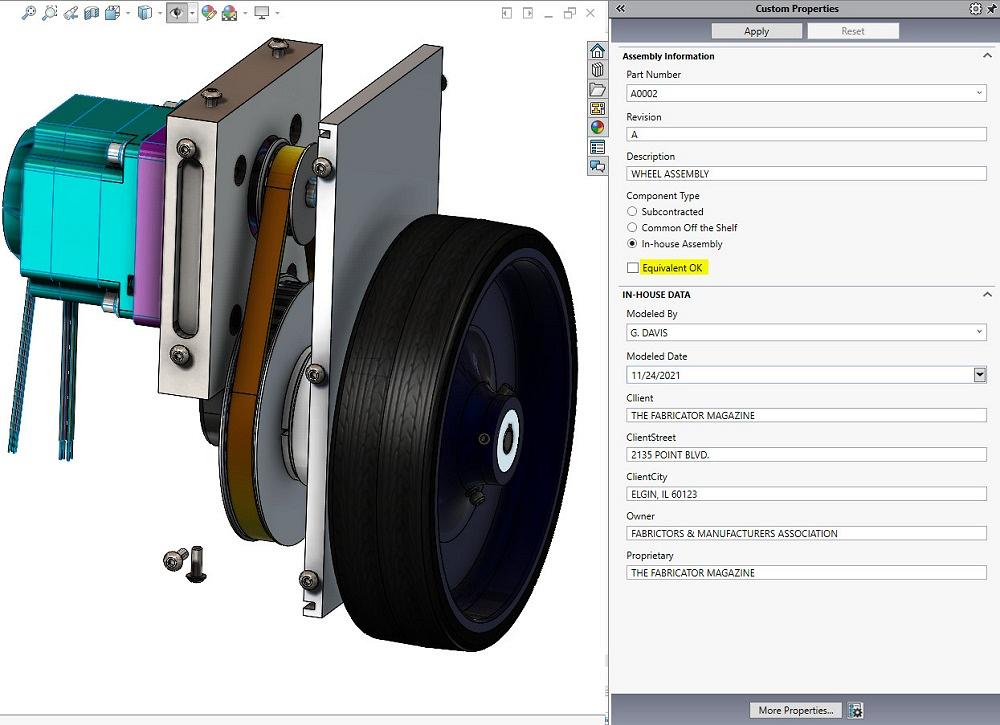
In Figure 2D, the form for assemblies is being tested. Compared to Figure 2A, we see that the radio button for Component Type now shows “In-house Assembly” instead of “Our Design.” Also, the Equivalent OK checkbox now appears, and it is unchecked because there is no equivalent wheel assembly.
With the data entry form working well, the top-level assembly with the BOM table is opened for review (see Figure 3). Line item 1 is now looking good. We are pretending that the Source is FMA. There is no vendor part number, so blank is good. There is no equivalent, so No is good. Line items 14 and 17 are also looking good.
The chore now is to open each of the remaining components in the BOM table, review and edit the PMI, save, close, and return to the BOM table.


The Fabricator is North America's leading magazine for the metal forming and fabricating industry. The magazine delivers the news, technical articles, and case histories that enable fabricators to do their jobs more efficiently. The Fabricator has served the industry since 1970.
start your free subscription
Easily access valuable industry resources now with full access to the digital edition of The Fabricator.

Easily access valuable industry resources now with full access to the digital edition of The Welder.

Easily access valuable industry resources now with full access to the digital edition of The Tube and Pipe Journal.

Easily access valuable industry resources now with full access to the digital edition of The Fabricator en Español.
In this episode of The Fabricator Podcast, Caleb Chamberlain, co-founder and CEO of OSH Cut, discusses his company’s...


